Users can create and edit alerts for both Discover reports and Present dashboards. Alerts for both content items are scheduled events that check if certain data driven conditions are met. If they are, they send the specified user(s) an alert to tell them the outcome of the data driven check.
Once created, Alerts are managed from the Alerts Manager in the content management system.
Accessing the Alerts Manager
Users can access the Alert's manager by either using the content item's context menu and choosing "Alerts" or via the Action Panel and clicking on the Alerts button (purple arrow below).
From the Alerts panel, you can edit or delete an alert schedule, or open a a specific execution of an alert run previously and see its results.
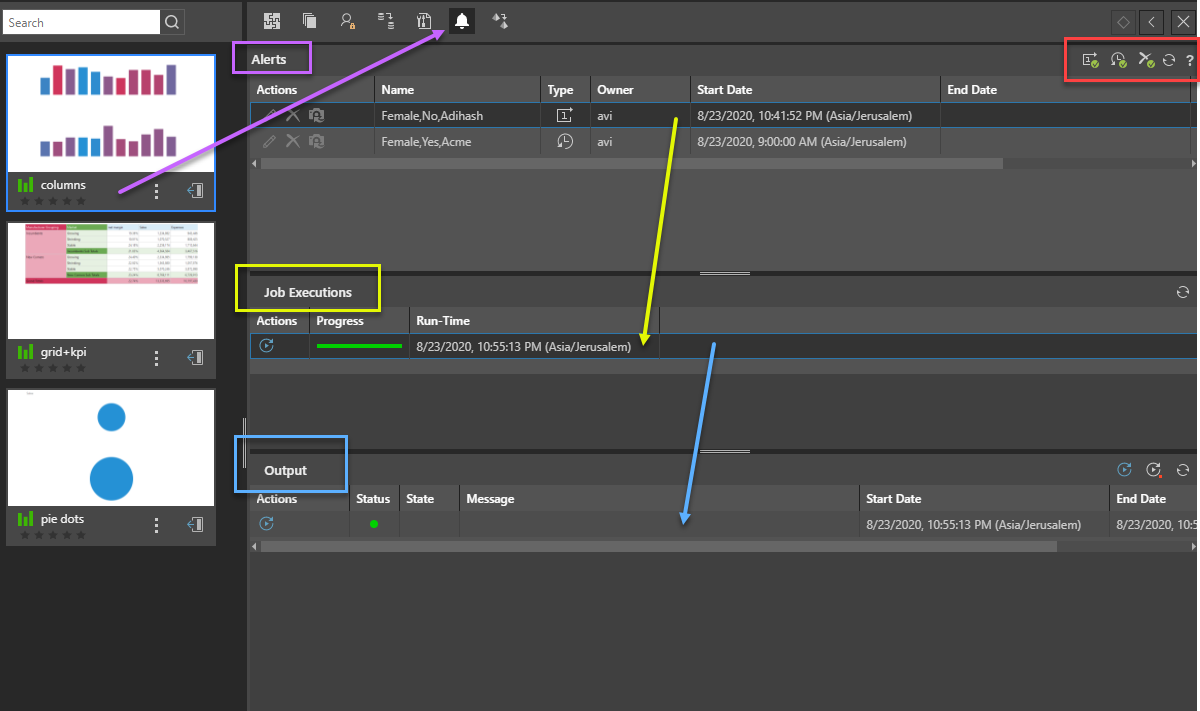
Alerts Panel
The alerts panel displays a list of all alerts (and their schedules) configured for the content item:
- Actions: you can edit or delete the alert, or open a snapshot of the underlying Discover report or Present panel from the time the alert was created (see below),
- Name: the name given to this specific the alert when it was saved.
- Type: the icon indicates the schedule type; one-off (with a "1" icon), recurring (with a clock icon), or on demand (with a calendar icon).
- Owner: the user who created the alert.
- Start Date: the date the first alert job was run.
- End Date: the date the last alert job will run or was run (if an end date was defined).
- Creation Date: the date the alert was created.
Alert Panel Action Buttons
The action buttons (red box above) allow users to:
- Show/ Hide old one offs: show or hide old on-off (non-recurring) alert schedules (hidden be default).
- Show/ Hide inactive recurring: show or hide recurring alert schedules that have been stopped (hidden by default).
- Show/ Hide deleted: show or hide deleted alerts (hidden by default).
- Refresh: refresh the list of schedules.
Report Snapshots
When an alert is created, the underlying content (query) structure is snapshotted, so the alert logic continues to work, even if the report itself changes. To see the snapshot driving the alert logic, the user can click the action button (described above).
Editing Alerts
If you clicked Edit from the Actions column, the Advanced Alert panel opens. You can edit the alert, its schedule, configure the triggering logic, and set the distribution from here.
- Click Save (purple arrow below) to save changes to the alert.
- Click Save and Run (yellow arrow) to save changes and run the alert job immediately.
- Click Cancel (green arrow) to discard changes and return to the Alerts panel.

Job Executions Panel
The Job Executions panel displays a list of all previous or current alert executions:
- Actions: use this button to re-run alert job.
- Progress: a status bar showing the progress or outcome of the alert execution.
- blue indicates the alert job is currently waiting in queue to be processed
- yellow indicates that the alert is currently processing,
- red indicates that the alert processing has failed
- green indicates that alert processing completed successfully.
- Run-Time: the date and time the job was run.
Click Refresh (purple arrow below) to refresh the list of job executions.

Output Panel
The Output panel displays the output for the selected alert execution:
- Actions: from here you can re-run the alert job.
- Status: whether the alert job was successfully executed or not.
- State: the specific outcome of the alert (see alert outcomes for more).
- Message: the generated message in the alert output.
- Start Date: when the alert job started.
- End Date: when the alert job ended.

- Click Rerun All (purple arrow below) to rerun all alert jobs listed in the Output panel.
- Click Rerun All Failed (yellow arrow) to rerun all failed alert jobs in the Output panel.
- Click Refresh (green arrow) to refresh the output list.