Lists: Custom Sets
Build custom lists (sets) in the Custom List designer. A list, or set, is a user-defined group of elements, from a single hierarchy in the data model. It offers users a convenient way to add multiple elements anywhere within their query when making data discoveries. For instance, you may want create a custom list of top 100 customers by sales; that list can then be added directly to queries.
- Click here to review examples of how to build a custom list.
Video
Language
Custom lists are written in PQL, unless working with OLAP, Tabular, or BW models, in which case the language is MDX. To review the PQL functions, click here.
Configure a Custom List
There are a few methods that can be used to create custom lists.
Custom List Designer
The custom list designer presents users with a point-and-click interface, enabling users to easily and intuitively construct complex list formulations, without writing any code. The custom list designer is accessed by opening the Formulate module and select List. After selecting the required server, database, and model, the custom list designer is opened.
Workspace
The custom list designer consists of the following areas:
- Actions panel, where users can select the functions needed to build their list.
- Canvas, where the list formula is built.
- List ribbon, which exposes additional functionality.
- Properties panel, where the selected block's properties are configured.
- Problems panel, where any problems with the list formula are displayed. If the custom list fails when tested, the reason(s) will be listed here.
- Context panel, which displays the location where the custom list will be saved.
- Result Preview panel, where a preview of the result set will appear when testing the list.
- Syntax Preview panel, where a preview of the PQL or MDX syntax will appear when testing the list.

Workflow
To build a custom list:
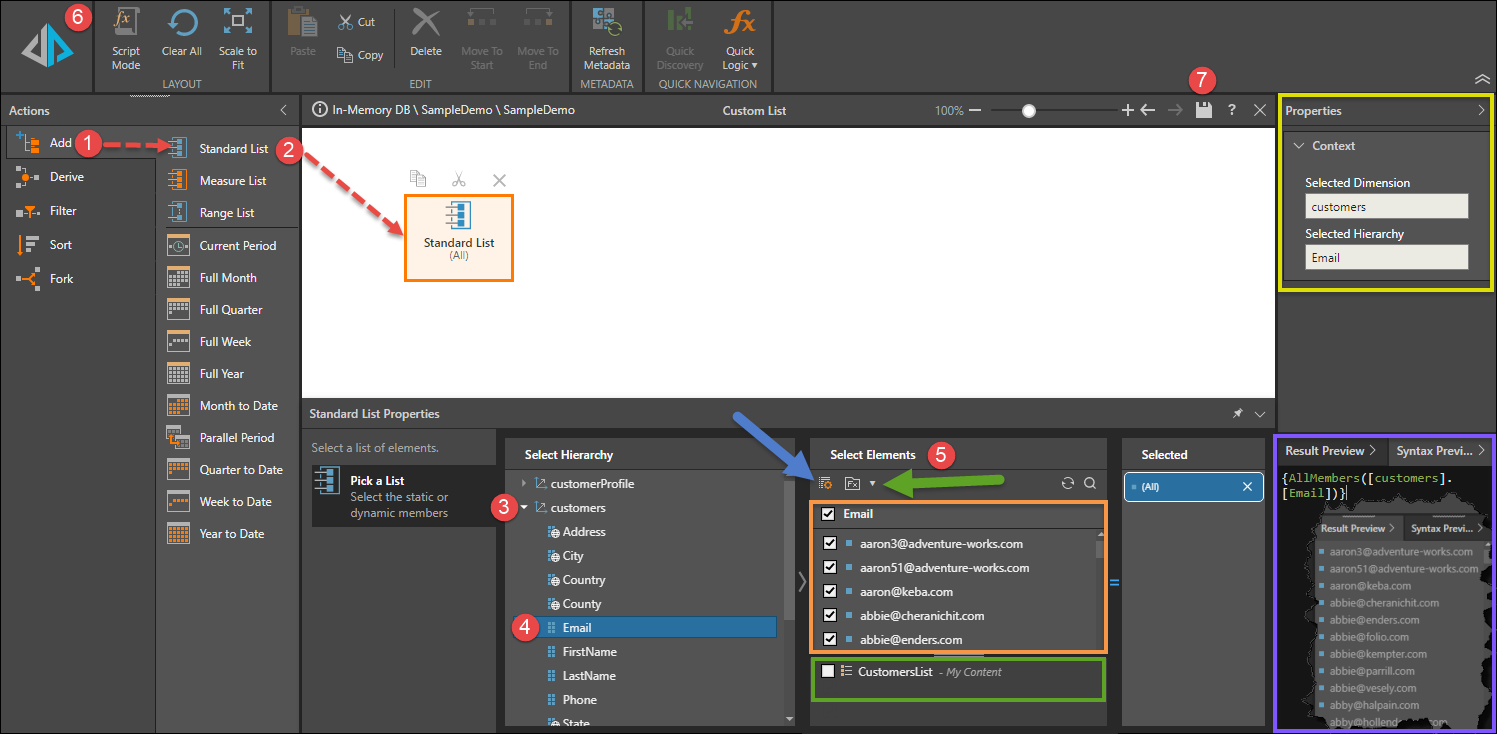
- Open the Actions panel where the required function is located.
- Drag the function onto the canvas; the List Properties panel will open, displaying the data model's metadata.
- With the function block selected, open the required dimension from the Select Hierarchy panel.
- Select the hierarchy from which you want to build your list.
- Select the required elements from the Select Elements panel; the chosen elements will be displayed in the Selected panel. There are a few ways to make your elements selection:
- Manually select the elements from the list (orange highlight).
- Open the list builder (blue arrow) to import and auto-select a list of elements.
- Select an existing custom list. To do this, click the Business Logic icon (green arrow) to expose existing custom lists that have been saved to the data model (green highlight).
You may connect additional blocks to the list formula to create a more complex custom list. For instance, you may want to filter the list to show only the top 20%, or you may want to configure a Switch expression.
- Click the Run button to test your custom list. The list's elements will be displayed in the Result Preview panel, while the list's PQL or MDX syntax will appear in the Syntax Preview panel (purple highlight).
- Save the custom list to the desired folder location.
Custom List IDE
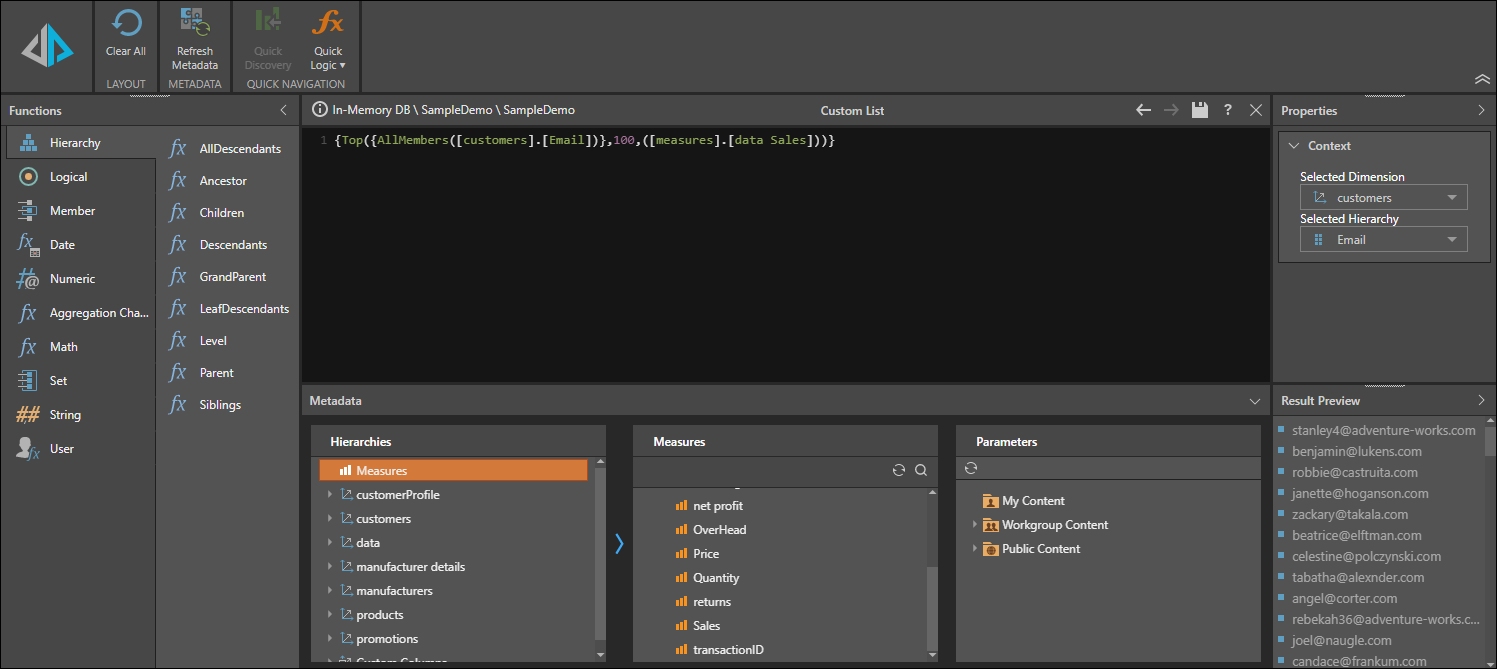
Click the Script Mode button in the ribbon (red highlight below) to access the custom list Integrated Development Environment (IDE), where advanced users can write complex custom list formulas using PQL or MDX (as opposed to constructing lists using the blocks in the custom list designer).

From the IDE, drag the required functions onto the code editor, and then inject the required data model metadata and integers into the expression.
Quick Lists
Utilizing the quick calculations functionality, users can easily build quick lists on the fly in Discover. Click here to learn more.
Using and Maintaining Custom Lists
Once saved, the custom list can be opened in Discover immediately, by clicking Quick Discovery in the ribbon. Alternatively, add the custom list to a data discovery; click here to learn how.
Custom lists can also be used to build other custom lists and parameters; from the Properties panel, open the hierarchy in which the list was built, then click the Fx button from the Elements panel. Find and select the custom list from the folder tree (rather than manually selecting a list of elements).
To edit a custom list, simply open it from the CMS.