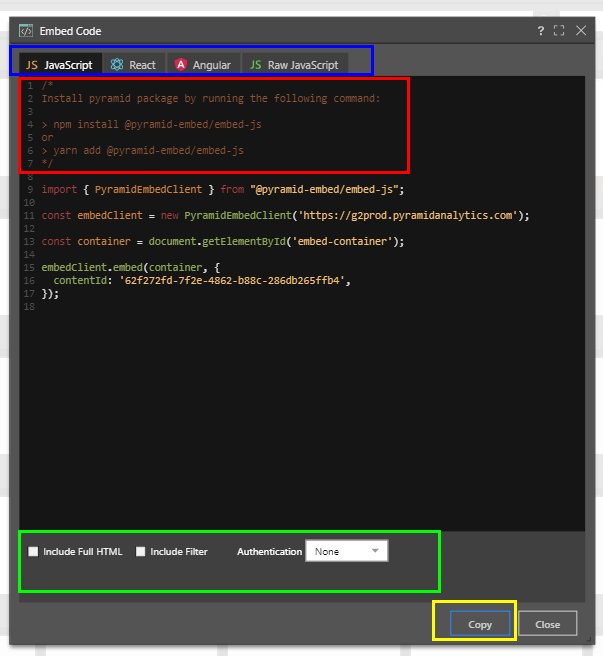
The Embed Code dialog generates embed snippets that you can then copy into your script editor. The embed code dialog generates code snippets in JavaScript, React, Angular, and Raw JavaScript.
- Click here to learn more about the Embed Code dialog.
- Click here to learn how to print embedded content.
Access the Embed Code Dialog
The Embed Code dialog is opened directly from the item being embedded; it can be opened from the content items Actions Panel, or App tab menu.
First, the user should select the required language: JavaScript, React, Angular, or Raw JavaScript (blue highlight below).
Instructions will be displayed above each code snippet in the code window (red highlight below). These instructions indicate any steps you need to take before running the embed snippet. When using JavaScript (without full HTML), React, or Angular, you must install the NPM embed API in your development project prior to running the embed snippet.
- Click here to learn how to install the embed API.

Code Snippets
- Install the package and import the Pyramid embed client:
import { PyramidEmbedClient } from "@pyramid-embed/embed-js";
- Create an instance of the embed client.
- The constructor accepts your embed site URL.
const embedClient = new PyramidEmbedClient('https://mysite.pyramidanalytics.com');
- Get container for embedding content.
- To embed multiple visuals, add this directive multiple times.
const container = document.getElementById('embed-container');
- Lastly, call embed function and pass the container and the options objects that contains the item content id.
- This statement can be added multiple times to embed multiple visual, with each contentId corresponding to a container (above).
embedClient.embed(container, { contentId: '62f272fd-7f2e-4862-b88c-286db265ffb4', });
The snippet JavaScript snippet with full HTML includes several directives.
- The first directive defines the character set:
<meta charset="UTF-8">
- Next, the meta name and resolution:
<meta name="viewport" content="width=device-width, initial-scale=1.0">
- Next, the title for the embed page:
<title>Embed Example</title>
- The script directive imports the embed JavaScript library from your Pyramid installation. It only needs to appear once on the page and should appear at the top of the page:
<script src="mysite.com/no-shell/pyramid-embed-js.min.js"></script>
- Create a DOM element where the embedding content will be placed.
- You can add multiple DIV tags per page for multiple visuals.
<div id="embed-container" style="width:1000px; height:400px;"></div>
- Add the script that initializes the Pyramid embed client and embeds the content.
- Add multiple visuals by adding multiple embed method calls.
- Each container and content id should have a corresponding DIV element (above).
<script> const embedClient = new PyramidEmbedClient('mysite.com'); const container = document.getElementById('embed-container'); embedClient.embed(container, { contentId: '62f272fd-7f2e-4862-b88c-286db265ffb4', }); </script>
- Install required packages.
- Import Pyramid embed container component.
import React from 'react'; import ReactDOM from 'react-dom'; import { PyramidEmbedContainer } from "@pyramid-embed/embed-react";
- Create embed options object.
- Add multiple options statements to embed multiple visuals.
const options = { contentId: '62f272fd-7f2e-4862-b88c-286db265ffb4', }
- Finally, render the Pyramid embed container component and pass the host and options as properties.
- The host should be set to your Pyramid environment.
- Pass the item's contentId in the options object.
ReactDOM.render( <PyramidEmbedContainer host="https://mysite.pyramidanalytics.com" options={options} style={{ width: 1000, height: 400 }} />, document.getElementById('root') );
- Install @pyramid-embed/embed-angular package.
- Add EmbedAngularModule to main NgModule imports, as indicated by step 2 of the instructions:
import { EmbedAngularModule } from '@pyramid-embed/embed-angular'; @NgModule({ declarations: [AppComponent], imports: [BrowserModule, EmbedAngularModule], providers: [], bootstrap: [AppComponent], })
- In your angular component, import EmbedOptions type:
import { Component } from '@angular/core'; import { EmbedOptions } from '@pyramid-embed/embed-angular';
- Create angular component.
- Modify app-root selector if needed.
@Component({ selector: 'app-root', template: ` <div> <pyramid-embed-angular host='https://mysite.pyramidanalytics.com' [options]='options' width="1000px" height="400px"> </pyramid-embed-angular> </div> `, })
- Create embed options object.
export class AppComponent { options: EmbedOptions; constructor() { this.options = { contentId: '62f272fd-7f2e-4862-b88c-286db265ffb4', }; } }
Embed Multiple Items
If embedding multiple items on the same page, the embed script must be adjusted accordingly, to include multiple embed containers and content id's.
The script below shows embedding code for 2 data discoveries using JavaScript including full HTML:
<!DOCTYPE html> <html> <head> <meta charset="UTF-8"> <meta name="viewport" content="width=device-width, initial-scale=1.0"> <title>Embed Example</title> <script src="https://mysite.com/no-shell/pyramid-embed-js.min.js"></script> </head> <body> <div id="embed-container-1" style="width:1000px; height:400px;"></div> <div id="embed-container-2" style="width:1000px; height:400px;"></div> <script> const embedClient = new PyramidEmbedClient('https://g2prod.pyramidanalytics.com'); const container1 = document.getElementById('embed-container-1'); const container2 = document.getElementById('embed-container-1'); embedClient.embed(container1, { contentId: 'b519f886-241a-4338-9d69-6d7d9a156014', }); embedClient.embed(container2, { contentId: 'b519f886-241a-4338-9d69-6d7d9a156015', }); </script> </body> </html>