You can right-click the empty background space in Content Explorer to open a context menu that provides access to actions for managing your view, creating folders, copying and pasting, importing items, creating new items, and so on. This menu offers options that are not specific to your existing items.
Most of the options on the Background menu relate to managing the view, but a key function available here is the New Item option, which allows you to create a New Model, Discovery, and so on, in your required Content Management location and with your selected name.
Important: The context menu options shown on a right-click will vary based on your Security permissions for the current folder and the contents of your clipboard.
Accessing the Background Menu
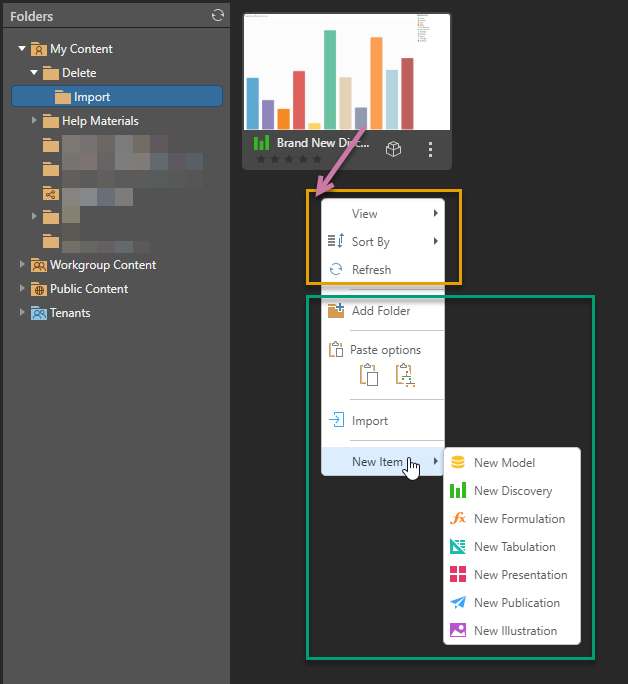
With the background of the panel selected (purple arrow below), right-click the empty space to open the context menu:
Creating a New Item in Content Explorer
From the Content Explorer:
- Browse to the folder where you want to create the new content item.
- Right-click an empty area of the background and select New Item > New <Item Type>. Where <Item Type> is one of the item types: Model, Discovery, Formulation, Tabulation, Presentation, Publication, and Illustration (see below).
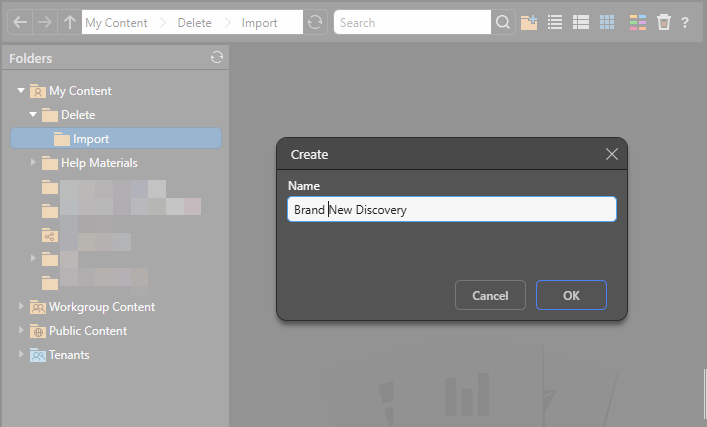
- Type a name for your new content item and click OK.
This must be a folder that you have write access to.
The Create dialog opens:
The process of creating the item type continues with steps that are appropriate to your selected Item Type:
New Model
Selecting the New Model option opens the Model page. To continue, you need to select the modeling tool that you want to use to create your model. The options are Smart Model, Direct Model, Model Lite, and Model Pro.
New Discovery
Selecting the New Discovery option opens the New Discovery page. To continue, you need to open the data model that you want to analyze. For more information, see Open Data Model in Access Discover Pro.
New Formulation
Selecting the New Formulation option opens the Formulate page. To continue, you need to choose the type of formulation that you want to create. For more information, see Choosing a Formulation Type in Access Formulate.
New Tabulation
Selecting the New Tabulation option creates the tabulation and opens it in the Tabulate workspace. For more information, see Accessing Tabulate Pro.
New Presentation
Selecting the New Presentation option opens the New Presentation panel. To continue, you need to select settings, including theme and canvas size, for your presentation. For more information, see Building a New Presentation in Present Pro.
New Publication
Selecting the New Publication option opens the New Publication panel. To continue, you need to select settings, including theme and page size, for your publication. For more information, see Building a New Document in Publish Pro.
New Illustration
Selecting the New Illustration option creates the illustration and opens it in the Illustrate workspace. For more information, see Illustrate.
Background Context Menu
View Options
These options help you control how content is displayed in this view (orange highlight above) and are available on the Background context menus in all views.
View (Display Mode)
Set the appearance of the content items in this view by choosing a display mode or "view" from the following options:
- Detail List: A grid-like display of content items with various details.
- Content List: Like the detail list but with a snapshot (or thumbnail) for each item.
- Tile List: All the content items as large tiles, with each including a thumbnail.
Sort By
Change to sort order of the content items. This option's submenu lets you sort the folder's contents by Name, Created Date, Modified Date, Type, or Creating User, and choose to arrange those items in either Ascending or Descending order.
Refresh
Refresh the current view.
Action Options
These options allow you to perform actions that are not associated with a specific content item (green highlight above).
Note: These options will be disabled in locations where the action is not supported.
New Item
If you have write access to a folder, you can typically create New Items there by right-clicking some empty space and choosing New Item > New <Item Type> from the context menu. You will then be prompted to provide a name for your new item before you can begin the standard creation process.
As you can see in the image above (green highlight), the New Item submenu options reflect each of the content item types that you have access to. For instructions describing how to create new items, see Creating a New Item in Content Explorer (above).
Add Folder
Content Explorer only. Add a new sub-folder to the currently selected folder. You can only use this option in folders where you have write access.
Paste
If you currently have a cut or copied item on your clipboard, you can select the appropriate Paste option to paste it into the folder:
- Click Paste to paste the copied or cut item into the new location.
- Click Deep Paste to paste the copied or cut item and the entire tree of items beneath your selected item into the new location.
- Click here for more details about Paste options.
Import
Import external PIE files into the current folder.
- Click here for more details about import and export.