The User Hub Editor lets you customize your own view of the User Hub. Edits made to the User Hub can only be seen by the current user and cannot be shared with others. Your default User Hub is defined by the system Admin; you can easily revert back to this default if needed.
Opening the User Hub Editor

From the Home page:
- Click Edit (purple arrow above).
This puts your Hub into Edit mode, so that you can manage and customize the tabs, content items, and so on that appear in your hub. Note the changes to the controls that are available in Edit mode:

Editing your tabs
Use the options on the tabs themselves (left-hand side) to manage your tabs:
- To add a new tab, click Add Tab (blue arrow above).
- To rename your tab, click the current name and then edit it directly.
- To change the sequence of your tabs, drag the Handle (orange arrow above) to reposition each tab as needed.
- To delete a tab, click its Close (X) icon.
Editing the content of a tab
Use the macro buttons (green highlight above) at the top-right of the page to add content to your currently selected tab and to save your changes:
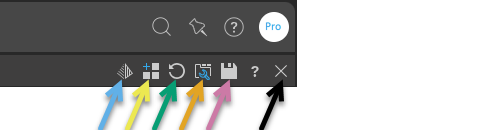
- Embedded: Use the Chatbot to create and embed a new discovery in your Hub (blue arrow above). For more information, see Embedded Search.
- Add Content or Widget: Add a discovery, presentation, or widget preset to your tab (yellow arrow above). For more information, see Add content or widget.
- Reset: Discard any changes and revert to the default user hub (green arrow above). The default layout is the layout defined by the Hub Template without any of your customizations.
- Tab Manager: View details of the current tabs. For more information, see Tab Manager.
- Save: Save changes to all tabs and exit edit mode (purple arrow above).
- Cancel: Discard all changes and exit edit mode (black arrow above).
Embedded Search
Use Embedded Search (blue arrow above) to add a new discovery. The Embedded Search button opens a text field where you can describe a discovery that you would like to build and add to your Hub. The Chatbot then builds the discovery as you described it and, if you click Add To Hub, saves it and embeds it in the Hub.
- Click here to learn how to use the Embedded Search.
Add content or widget
Use Add Content or Widget (yellow arrow below) to open the Content Directory panel, where you can select a presentation, discovery, or "widget preset" to add to the current tab. Note: If your currently selected tab contains no current content items, there is also a Add Content or Widget tile that you can click to access the same function.
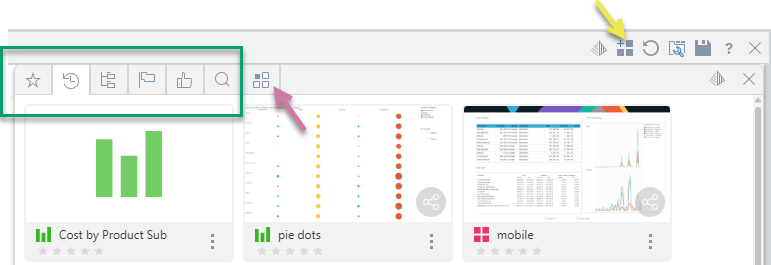
The Content Management tabs (green highlight above) along the top of the Content Directory panel offer different views of the available discoveries and presentations in the CMS:
- Favorites: Favorites is a flat list of up to 20 items (content items and folders) that have been flagged as favorites by the current user.
- Recent: Recents is a flat list of up to 20 content items that have been used recently by the current user.
- Content Explorer: This is the master content view. A folder and item interface allowing users to organize and manage their content and folders.
- Most Used: A flat listing of the top 20 most used content - as measured across all users on the system.
- User Recommended: A flat listing of the top 20 most recommended content items.
- Search: A combination function and view, allowing users to find things in the system, then use the results like any other item listing with standard content actions and tools.
Widget Presets
Select Widget Presets (purple arrow above) to add out-of-the-box widgets to the current tab in the form of a preset widget:
- Alerts: Alert messages that have been posted to the user's inbox.
- Auto Recommended: A list of the top system recommended content items for a given user, based an AI-driven algorithm.
- Bulletin Board: All rendered publications and alerts earmarked for the user, their conversation threads, and the status of any model processing jobs.
- Favorites: Favorites is a flat list of up to 20 items (content items and folders) that have been flagged as favorites by the current user.
- Models: Recents is a flat list of up to 20 content items that have been used recently by the current user.
- Publications: A list of rendered publication reports that have been posted to the user's inbox.
- Recent Activity: A flat listing of all recently used content items by the current user.
- Subscriptions: A list of rendered subscription reports that have been posted to the user's inbox.
- Tutorials: The in-app, interactive, tutorials are designed to give users hands-on experience with the application.
- URL: Load a URL in an iframe. To set this up, you need to paste the URL into the URL field.
- User Recommended: The top 20 most recommended content items.
- Welcome: Opens the Quick Start and Learning Center dialog, letting Pro users quickly start new Model and Discover sessions or jump to the Content management tools.
- Workflows: Displays all of a user's workflow and conversation threads. This includes threads initiated by the user, or those that have the user as a participant.
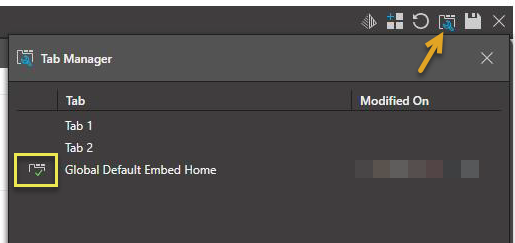
Tab Manager
Click Tab Manager (orange arrow below) to see the current tabs. The list displays any new tabs added by to the template by the Admin. Click the corresponding icon (yellow highlight below) to add the new tab to your hub.
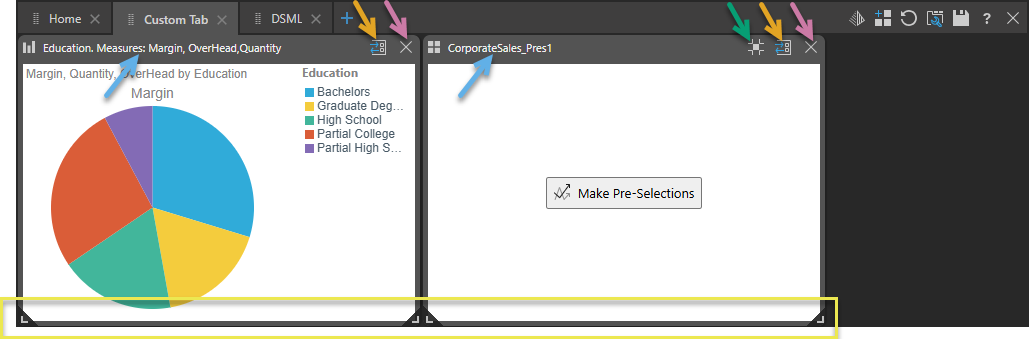
Customizing your Containers
While you are in Edit mode, you are able to drag, drop, and resize the containers as needed:
- Drag container: You can drag the container to a new position when you select its header (blue arrow below).
- Resize container: You can resize your container by dragging the resize widgets at the bottom corners of the container (yellow highlight).
You can also use the following functions (found at the top right of the widget and content containers) to change what is displayed in each container:
- Optimize Size: (Presentations only.) Make the container size match the presentation size (green arrow).
- Switch To: Swap the currently selected content item for another. Note that this option (orange arrow) opens the Content Directory panel, where you can select an alternative presentation, discovery, or widget preset to swap this content item with.
- Remove: Remove the widget from the tab (purple arrow).