Use the Bot Wizard to create or import an Agent, automatically embed it into a new Decision Flow model, and run that model on a schedule (running the agent and emailing its response to your targets). The agent accomplishes tasks on your behalf, acting like a member of staff who responds to instructions, and uses tools and reference materials selected by you to complete its work.
As an example, you might want to create an agent that finds the best restaurants in a geographic location and emails the results to your office manager. Your instructions describe the role your agent should perform and tells it exactly what to do. The instructions could use Tools to get trusted data from a restaurant-rating tool's MCP Service. It could also use References to consume additional information about your business into the selection, such as a spreadsheet describing restaurants you have a corporate relationship with.
The Bot Wizard is available from both Discover and Tabulate.
Configuring Agents
Before you begin
- You can only create an agent for a discovery that has already been saved. Where this is not the case, the Bot Wizard button is disabled in the Home ribbon.
- You can only create agents using a Bot where an LLM Provider has been enabled for you. Where this is not the case, the Bot Wizard button is not available on the Home ribbon. For more information, see AI Settings.
Opening the Bot
To open the Bot Wizard dialog, click Bot Wizard from the Home ribbon:

Creating your Agent
Choose your Starting Point
With the Bot Wizard dialog open, you can choose from the two starting point options:
Option 1: Marketplace
If you want to choose a template or open a blank bot, you should select the Marketplace tab and then:
- Blank Bot: Select the Blank option to begin with a clean, empty agent with no preset instructions.
- <Template>: Select one of the predefined, built-in templates to get started quickly. Templates typically contain detailed instructions, which might give you a head start on defining your agent.
Option 2: Custom Agents
If you want to use an Agent from Pyramid, select the Custom Agents tab. You will then need to select your agent from the standard navigation tree.
Define your Agent's Details
Whichever starting point you chose, you now need to define the Agent's details:
- In the Bot Job panel, supply or update the following details:
- Instructions: Agent instructions tell the agent how to behave and respond, defining both the agent's persona (what it is like) and its instructions (what it is supposed to do).
- Tools: MCP tools offer some external capability to the agent. You can fetch data from the real-world or make use of external services. When you add an MCP tool, you are extending the agent's capabilities with services that are specific to your requirements.
- References: References are documents (images, PDFs, spreadsheets, and so on) that the agent can use. When you add a referenced document, you are typically providing the agent with some specific domain or company information.
- Optionally, create a Schedule for processing your Model in the Bot Execution panel.
- Click Test to run the agent in the dialog.
- Click Apply to create the agent and build a Decision Flow containing it.
Tip: If you add Tools and References, you should always return to your Instructions and make sure it is clear what your agent should do with them.
If you do not define any schedule details, the model will run once on creation. If you do define schedule details in the Bot Execution panel, this configuration will determine when the model is run and whether it is run once or on a recurring basis.
Tip: You do not need to define a schedule now. Once your model is created, you can return to it at any time and use the Scheduler (either in Model or in the CMS) to create a new schedule for it. For more information, see Model Scheduling.
The output produced, and information about the test, are displayed in a pop-up window.
A new Agent and Decision Flow are created alongside their discovery or tabulation. The newly created items use the Name value specified in the Instructions panel.
The Model will either run right away or will be scheduled to run according to the configuration. The last node in the Decision Flow is an Email node, meaning that, once the Model is processed, the content created by the agent is emailed to the model owner (the user who created this model).
What Next?
Currently, the model owner will receive an email notification whenever the data model is successfully processed. You can open the Decision Flow in Model and edit the Properties of the Email node to send your Agent output to a different email address or different set of email addresses.
- Click here to learn how to configure the Email node.
Bot Wizard
Bot Job
The Bot Job panel contains all of the details that allow you to define your Agent.
Instructions Tab
Agent instructions tell the agent how to behave and respond, defining both the agent's persona (what it is like) and its instructions (what it is supposed to do). You can specify the following details:
- Name: The name of the Agent. This name will be used for both the Agent object and its Model (the Decision Flow that contains the agent) when they are created.
- Persona: The character that we want the Agent to assume when it is fulfilling its instructions. This describes a simple, fictional user profile or job description that represents a typical target user's goals, behaviors, and needs.
- Instructions: This is the most important information for the Agent. It describes what the Agent needs to do; what it needs to look at, how to analyze that content, and what it needs to return. You should consider using lists or keeping your instructions in sequence to make sure that you cover everything. Also, be aware that if you use Tools or References, it might be a good idea to indicate how and when to use their content here.
Tools
MCP tools offer some external capability to the agent. You can fetch data from the real-world or make use of external services. When you add an MCP tool, you are extending the agent's capabilities with services that are specific to your requirements.
Add Tools
From the Tools page:
- Open the Tools Marketplace.
- If there are currently no tools selected, click Click here to start adding tools in the middle of the page.
- Otherwise, click Add Tools at the top-right.
- Optionally, filter the list of available tools by typing an entry into the search field at the top-right (purple arrow above).
-
Click the Plus (+) icon (blue arrow) to choose the Tool you want to add.
- Once you have selected all the Tools that you want to make use of, click Selected Tools from the top-left of the dialog (green highlight) to return to the previous page.
The Tools Marketplace opens:
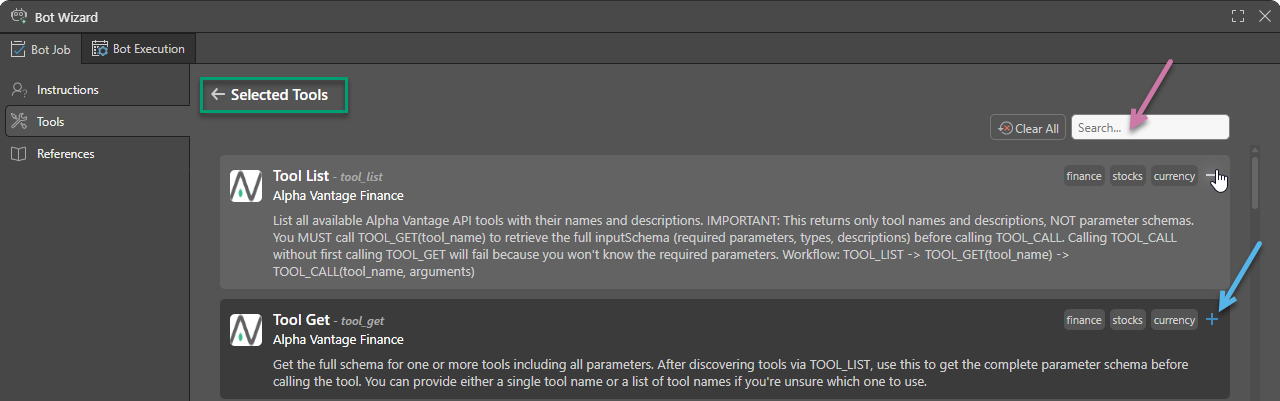
This is a "Contains" search, which searches for your string in the Tool Names, Tags, and Descriptions.
If you need to remove a selection later, you can click the Minus (–) icon. If you want to remove all selections, click Clear All from the top-right.
References
Add a Reference File
From the References page:
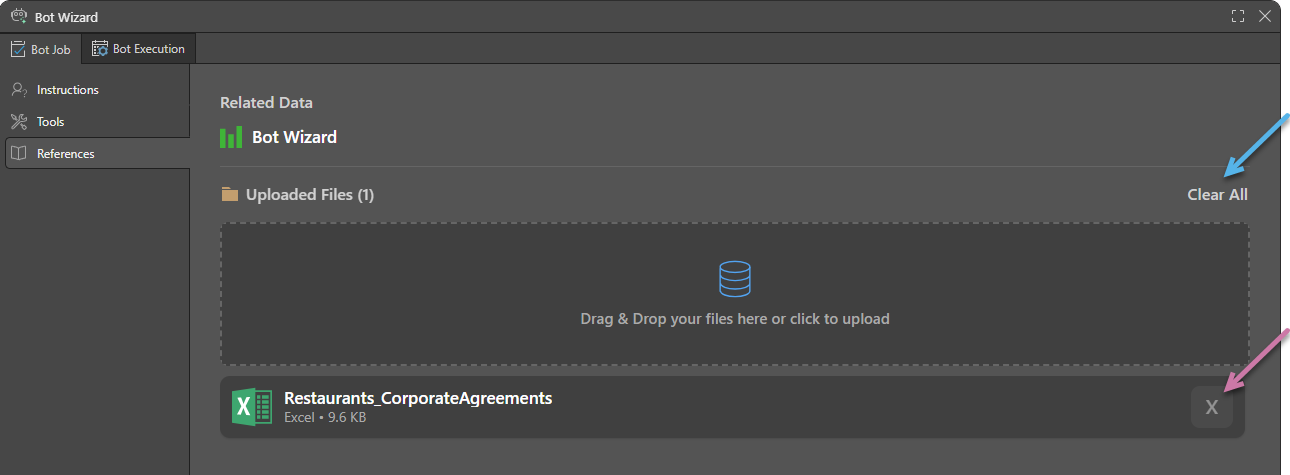
- Add the file using the Drag & Drop target:
- Drag the file from its folder location and drop it onto the target.
- Click the target to access the Open dialog, where you can navigate to the file's folder location and select the file.
- Repeat as required.
The file is added to the Uploaded Files list:
Remove Reference Files
- Click Remove (X) (purple arrow above) to delete a single reference file.
- Click Clear All to remove all (blue arrow) reference files.
Bot Execution
Set up the schedule configuration that allows the Bot to automatically process the data model either once or at recurring intervals. Recurring builds ensure that the model is regularly updated with the latest data. Currently, the model owner will receive an email notification whenever the data model is successfully processed. Click here to learn how to configure the email node.
The page is broken down into three sections, where you can configure the execution schedule for your model:
Open the Job Details panel to define the details of the Schedule itself:
- Name: The default schedule name is the model name and the schedule creation date and time. You can change the name as required.
- Description: Add an optional description.
- ETL Execution Part: Execute the entire Master Flow (including data flow and models) or execute the models only.
- Override Security: Select this checkbox to override metadata security set from the Admin console or the Materialized Manager. Clear this checkbox if metadata security should not be affected by processing the data model. Click here to learn more.
- Sync Model Columns: Select how the tables in the model should be synchronized. Click here to learn more.
Under Schedule, set the schedule to Once or Recurring.
Once
Select Once from the dropdown list to run the schedule once only, either immediately or at a specified time and date:
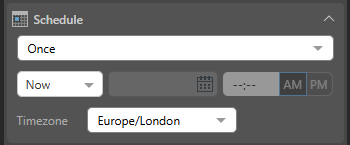
- Now: The schedule will run immediately.
- Delayed: The schedule will run at the specified time and date.
Timezone
Select the required timezone from the Timezone dropdown list. The schedule will run according to the selected timezone.
Open the Schedule Handling panel to define the system default values for scheduled jobs:
- Schedule timeout: Disables the scheduled task after this amount of time. Selecting None means that the job will run without ever aborting.
- Disable schedule after consecutive failures: Disables the scheduled task after this number of attempts is reached. Once a job has failed more than this number of times, it is canceled and will only run if it is manually restarted. Selecting Never disable means that the job will continue to retry regardless of the number of failures.
- Time to keep Model processing logs: Sets the amount of time to keep the Model processing logs in the system.