Once the pods are created, you will be prompted with the application initialization stage - which is the last step before fully launching the application. This initialization form is NOT optional.
This can be done using a YAML secrets file instead. Click here for more details.
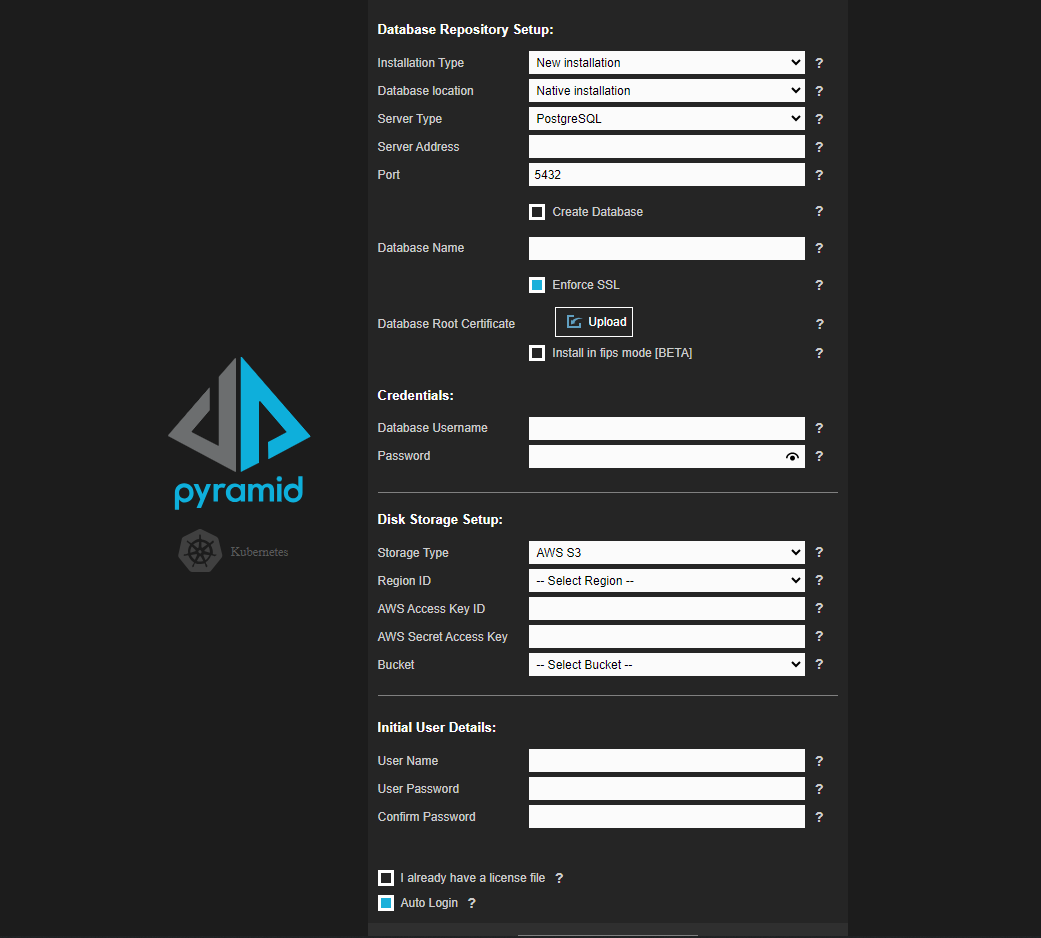
Initialization Items
- Database Repository Setup: Provide the connection details for the database engine that will house the Pyramid repository:
- Installation Type:
- Select Existing Installation if you want your database server to contain an existing (previously installed) Pyramid database.
- Select New Installation if you want a new Pyramid database schema to be created in the provided database. This is the default value.
- Database Location:
- Native installation - self provided database server. This is the default value.
- AWS RDS.
- Azure Managed Database.
- GCP Cloud SQL.
- Server Type: Choose from PostgreSQL or MS SQL Server.
- Server Address: The host name or IP address of the server hosting the database.
- Port: The database port.
- Select the Create Database checkbox to add a database as part of this process. This option is only relevant where the deployment is not to RDS.
- Database Name: The name of an EMPTY database that already exists and that will be used by this installation. For most RDS frameworks, the database must exist in advance.
- Database Root Certificate:
- Select the Enforce SSL checkbox to enforce SSL over the database connection. This option is supported for PostgreSQL and SQL server.
- Select the install in fips mode [BETA] checkbox to enable the use of FIPS-compatible encryption algorithms. Note that this necessarily disables some of the product functionality. For more information, see Encryption and FIPS.
Note: If you select this option and you have one or more certificates that are not publicly signed (that are self-signed), you need to upload a base64 encoded ZIP file containing those certificates in the PEM format. For more information, see Encrypting Connections.
- Credentials: The application credentials to use when connecting to the database server to perform the necessary operations to create the repository.
- Installation Type:
- Disk Storage Setup: Provide the details for connecting up to cloud-based storage service to host permanent files generated from the application:
- Storage Type: The preferred persistent file storage method. The option selected here determines which other fields are included on the page:
- AWS S3:
- Region ID: AWS Region Code. A full list can be found here.
- AWS Access Key ID: AWS Access Key ID. To use an AWS IAM role, type "iam" into this field after configuring a role on AWS. In this case, you do not need to set an AWS Secret Access key.
- AWS Secret Access key: AWS Secret Access key.
- Bucket: After connecting, pick the correct bucket from this dropdown list.
- Azure Blob:
- Account Name: Azure account name.
- Account Key: Azure account key.
- Container: Azure container name.
- Secure FTP (SFTP)
- Host: Either the FTP IP address or Fully Qualified Domain Name of the machine.
- Port: Usually 22.
- User Name: FTP server username.
- Password: FTP server password.
- Authentication: User name and Password
- Folder: The relative path on the FTP server that will be the root storage folder for Pyramid.
- Network File System (NFS). This requires no configuration as it is handled in the YAML itself.
- Initial User Details: Provide the username and password for the first system user on Pyramid.
- Select the licensing and user options:
- If you already have your license key file, select the License File checkbox and upload your file. Otherwise, it can be added after the system initializes.
- If you want to login automatically once the installation is complete, select the Auto Login checkbox .
- Click Run Setup to initialize the repository, setup key structures in the repository, and launch.
The initialization process will take a few minutes to run, after which, if you selected Auto Login, the tool will automatically bounce you directly into the application.