The filter node is used to filter a table using a specified column. You may filter the table by a static value or a variable.
Filtering is an important part of the data cleansing process often required for optimization of the data set to be queried by end users. The Filter function allows you to load only a specified subset of data into the target, based on the given filter expression.
Note: You can typically filter your Table data either using the Filter node (as described here), or by adding a filter to your Table node. If you use the Table Filter, the underlying query that retrieves data from the database is filtered, hence that filtering option being limited to non-file based data sources. This option filters the data as part of the Data Flow, so it has no such limitation.
Configuring the Filter Node
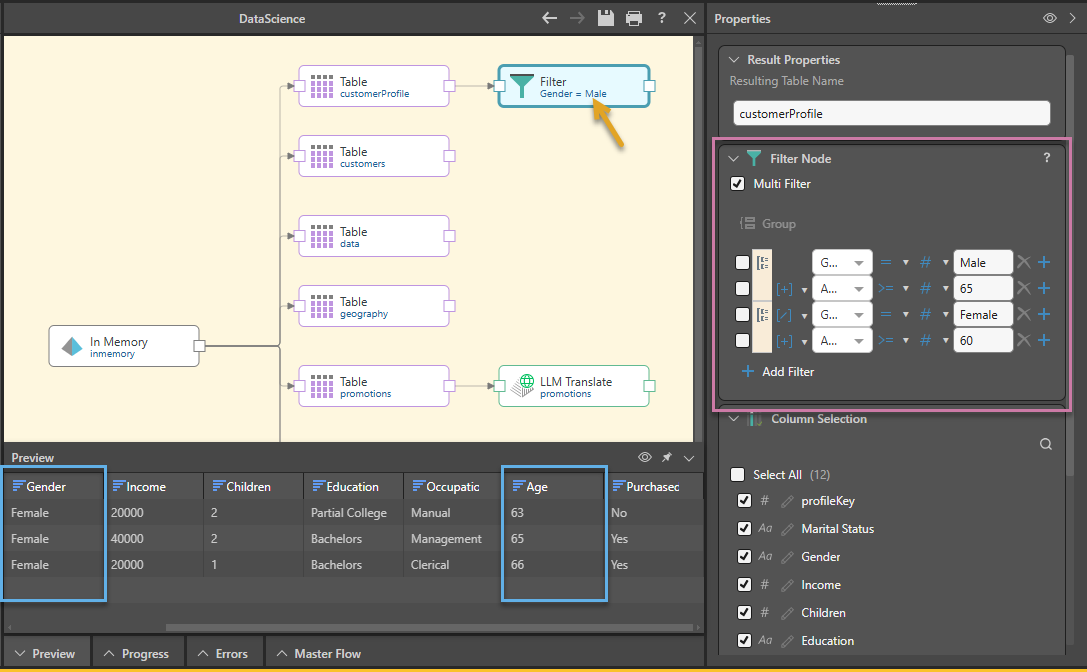
Connect the Table node to the Filter node, then select the Filter node (orange arrow below) and go to the Properties panel to configure the node:
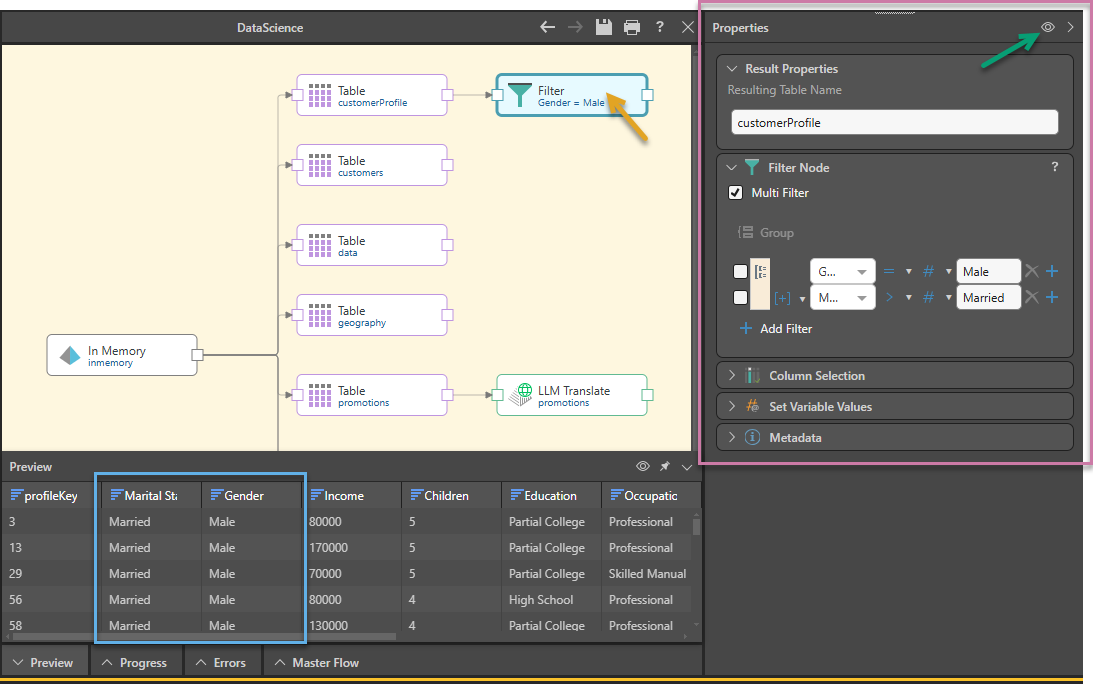
At the top of the Filter Node panel, is the Multi Filter checkbox:
- Do not select the Multi Filter checkbox if you want to define a single filter condition. For example, if you want to filter the Gender column to only show males and have no other filtering requirements.
- Select the Multi Filter checkbox if you want to define multiple conditions the filter multiple columns. For example, if you want to filter the Gender column for males and also filter the marital status columns by the married.
Single Filter options
With the Multi Filter checkbox cleared (not selected):
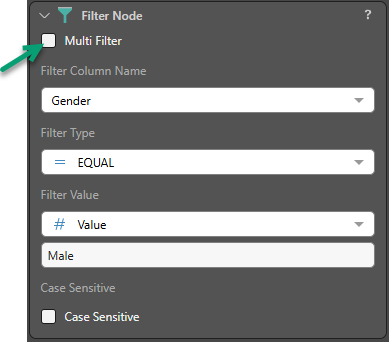
- Filter Column Name: Select the column that you want the table to be filtered by.
- Filter Type: Choose the type of filter from the Filter Types dropdown list (see below for details).
- Filter Value:
- Select Value and type a static numeric or string value.
- Select Variable and then select your required variable from the dropdown list; this can be a static or SQL variable.
- Case Sensitive: Depending on the data type of the filter column you may be able to filter by a string (unless the filter type is set to search for nulls or blanks). If filtering by a string, you can set the filter as case sensitive.
Filter Types
- = Equal: Returns the rows in the selected column that are equal to the given filter value.
- != Not Equal: Returns the rows in the selected column that are not equal to the given filter value.
- > Greater Than: Returns the rows in the selected column that are greater than the given filter value.
- >= Greater Than or Equal To: Returns the rows in the selected column that are greater than or equal to the given filter value.
- < Less Than: Returns the rows in the selected column that are less than the given filter value.
- <= Less Than or Equal To: Returns the rows in the selected column that are less than or equal to the given filter value.
- =|= LIKE: Returns the rows in the selected column that are "like" the given filter value. This option enables the use of wild cards. For example, selecting FirstName LIKE "J%" indicates that first names beginning with "J" should be returned.
- =/= NOT LIKE: Returns the rows in the selected column that are not "like" the given filter value.
- IN LIST: Enter a comma-delimited list of values; values in the list are returned.
- NOT IN LIST: Enter a comma-delimited list of values; values not in the list are returned.
- IS NULL: Returns rows containing nulls in the selected column. No filter value input is required.
- NOT NULL: Returns rows not containing nulls in the selected column. No filter value input is required.
- IS NULL OR BLANK: Returns rows containing null or blank cells in the selected column. No filter value input is required.
- NOT NULL OR BLANK: Returns rows not containing null or blank cells in the selected column. No filter value input is required.
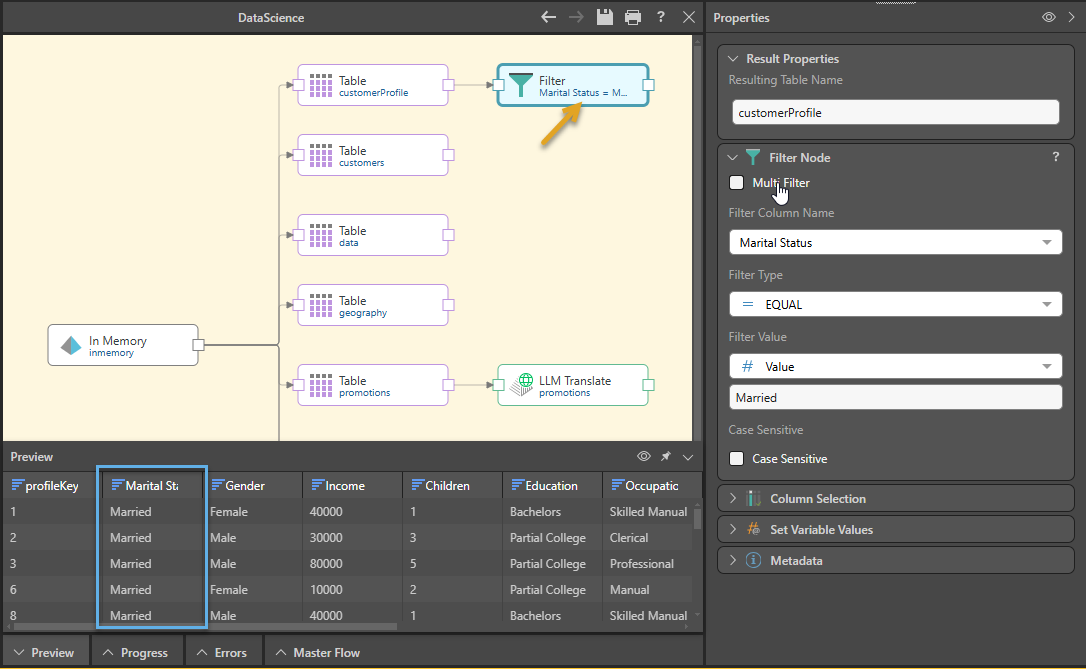
In this example, the table is filtered to return only those rows in which the value in the Marital Status column matches the string Married:
Multi Filter options
To open the multi filter interface, you need to select the Multi Filter checkbox.
To create a multi-value Filter:
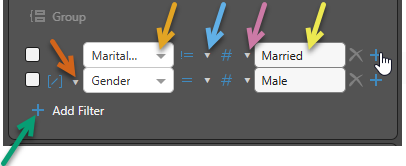
- Click Add Filter (green arrow) either alongside an existing condition or under your current filters to create a new query condition:
- In the new row, specify:
- The column name to be used as the operand for the filter (orange arrow above).
- The operator (blue arrow) for your condition. This can be one of equals, greater than, and so on.
- The type (purple arrow) for the second operand. This can be one of column (Table only), variable, or value.
- The value (yellow arrow) to compare your first operand to.
- Repeat as required, considering:
- If you add multiple conditions, they need to be "joined" to prior conditions using an OR or AND operator (brown arrow).
- You can, optionally, group multiple conditions to specify that two or more conditions must be treated as a single group (for example, if you want to use conditions to select customer data from Females over 5'6" OR males over 5'10", you need four conditions in two groups).
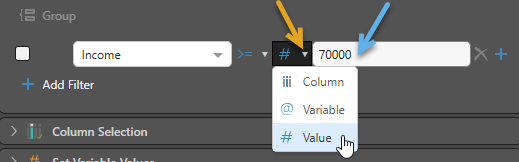
Second Operand
The second operand selected (blue arrow below) depends on the selected comparison type (orange arrow):
- (Table only.) If column is selected, you need to select a column from the dropdown list of all columns.
- If variable is selected, you need to select a variable from the dropdown list of all variables.
- If value is selected, you need to type the actual value manually into the text field.
Multiple conditions
Join conditions
- If multiple conditions are required, click on the + (plus) sign (purple arrow below) to add an additional query condition.
- Select AND or OR (yellow arrow) to determine how the two conditions should be joined.
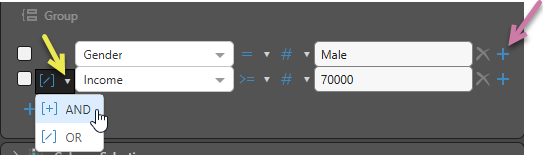
Note: If you select Plus alongside a row that is part of a group, the new rule will be added to the same group.
Group Conditions
If you want to group conditions together:
- Select the checkboxes for the conditions that you want to group together (yellow arrows below).
- Click Group (blue arrow) to group the columns.
- Click Ungroup (purple arrow) to remove a group that has been created.
Tip: As well as joins between the conditions, as described previously, you will also need to create joins between the groups (orange arrow).
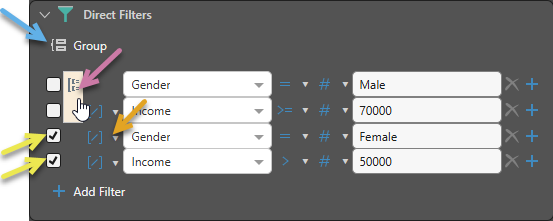
In this example, the table is filtered to return only those rows where one of the following conditions is true:
- The value in the Gender column matches the string Male and the value in the Age column is Greater than or equal to 65.
- The value in the Gender column matches the string Female and the value in the Age column is Greater than or equal to 60.
Related information
Common Properties
There are a number of fields that are present in the Properties panel when you have any of the preceding nodes selected on the canvas. These fields include Result Properties, Column Selection, Set Variable Values, and Metadata.
- Click here for more details about the Common Properties