Dynamic data masking encrypts or hides designated column values when viewed by certain users. This ensures that sensitive data is not shown to users who do not need to see it, while allowing other users to view the column values as normal.
For example, you may use dynamic data masking to hide some administrative data from analyst users whose interest is in business data only, while expose it to management, who may need to see the details for auditing purposes. Other examples of data that may need to be hidden on a selective basis include names, phone numbers, addresses, social security details, credit card details, insurance details, and more.
Dynamic data encryption has the following characteristics:
- Dynamic data masking is virtual and not materialized. This means that Pyramid can dynamically encrypt / mask and decrypt /unmask values to hide and show column data as required.
- Unique names in the model are masked if they are set as "maskable". This does not affect visuals, but does, for example, affect calculations created in Formulate. The purpose of this masking is to allow, say, the calculation to be shared without the risk of leaking the unmasked value. Unique names are always masked with a random string of letters and numbers.
- Values are only masked in visuals if the user logs on with a role that explicitly masks the column in question. Note: Where a user has more than one role, the value is only masked if the column is defined as masked for all of the user's roles.
- When masked values are 'encrypted', they are shown as a random string of letters and numbers when the standard Encrypted option is selected in the data model. Otherwise, values are masked using asterisks as is configured using the Masking Type setting (see below).
Tip: If you require materialized masking; that is, you want to mask columns in the data model for all users; you should follow the alternative deterministic data masking process. Click here for more information.
Re-usability of Masked Content
A key benefit of dynamic masking is that reports, functions, and capabilities built on masked data can be directly consumed by users with no masking requirements WITHOUT adjusting the content, and vice versa.
Enable Dynamic Data Masking
To set up dynamic data masking, you will:
- Identify the column as "maskable" in the Model.
- Configure the Model Settings to indicate which users should see the columns as masked, based on their roles.
Step 1: Make Column "Maskable"
In Model, from Data Model > Tables:
- Right-click the relevant column name, select Set as a Masked column, and then select the Masking Type from the context menu:
- Repeat as required.
- Save your changes and process the model (click F2).
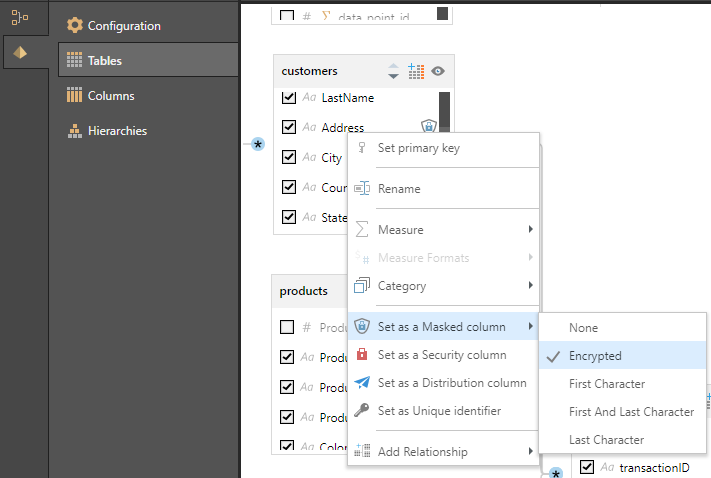
The Masking Type controls both whether the value in the column should be encrypted and what it should look like in a visualization when it is masked (its "masked appearance"):
|
Masking Type |
Masked Appearance |
|---|---|
|
None |
Not applicable. |
|
Encrypted |
When encrypted, the value is masked using a random string of letters and numbers. |
|
First Character |
When encrypted, the value is masked using a fixed length string of asterisks (*) and is prefixed with the string's actual first character. For example, 1exampleX becomes 1*******. |
|
First and Last Character |
When encrypted, the value is masked using a fixed length string of asterisks (*) and is prefixed and suffixed with the string's actual first and last characters. For example, 1exampleX becomes 1******X. |
|
Last Character |
When encrypted, the value is masked using a fixed length string of asterisks (*) and is suffixed with the string's actual last character. For example, 1exampleX becomes *******X. |
Note: Whichever masking type is selected, encrypted values are always masked with a random string outside of visualizations; for example, when the column value is shown in Formulate.
A badge is added to the column, indicating that it is "maskable".
![]()
Important: Your column is not yet masked in visualizations. It is simply flagged as maskable. This means that its values will be masked when it is used in unique names in the model (for example, in calculations), but will not be masked when anyone views it in a visualization.
Context Menu
You can set this same option (indicating that this is a maskable column) from right-click menu on the Columns page. For more information, see Columns.
Step 2: Mask Columns for Roles
Now that you have indicated that it should be possible to mask this column for users with a particular role, you need to update the Model Settings to associate the column with one or more roles.
In the Admin Console:
- In the main menu, click Data > Source Manager.
- Navigate to your Model in the Servers column.
- From the Model Settings tab, select the Role that you want to mask the column for.
- Select the Masked checkbox alongside the column you want to mask for this role (red highlight, following).
- Click Apply and process the model.
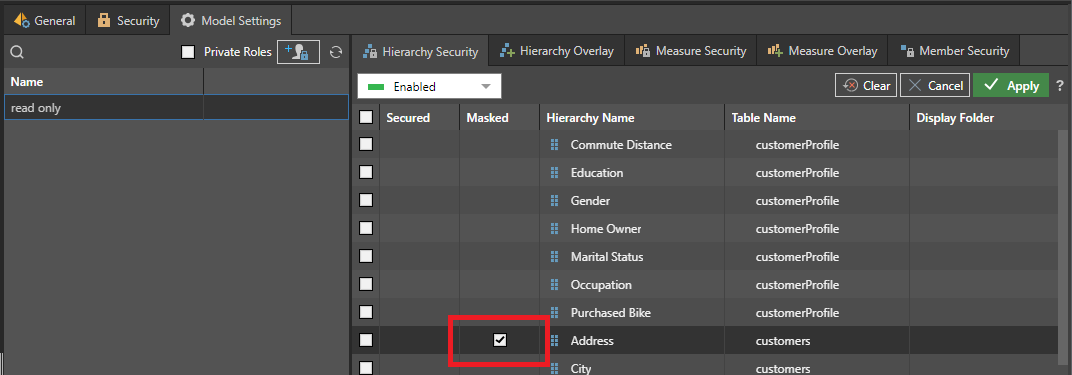
When a user with the role "read only" logs on, they will see a masked version of the Address values in their visuals.
Examples
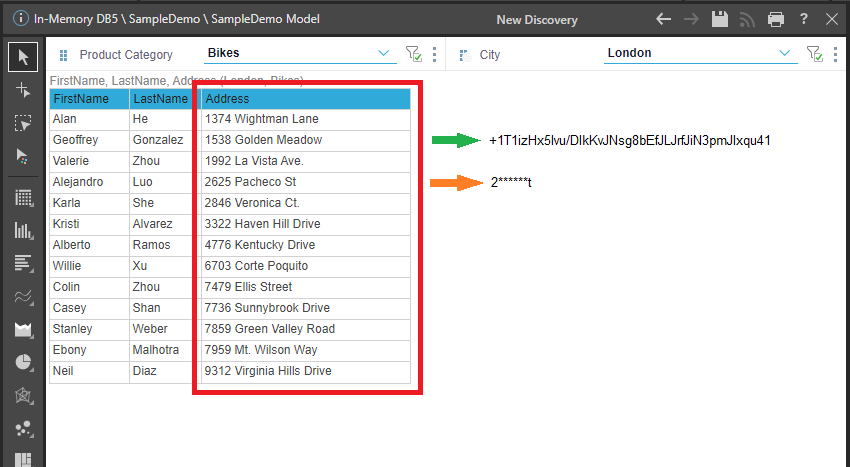
Notes about the Encrypted values:
- The content highlighted in red is the original unencrypted data from the Address column.
- The green arrow shows what the visual effect of selecting the Encrypted masking type for this value might be.
- The orange arrow shows what the visual effect of selecting the First and Last Character masking type for the value would be.
The encryption is not different in these two example cases, but the presentation of the masked value in the report varies depending on the masking type selection.
Note: Where my values are encrypted, I can still interact with the field (for example, I can still focus on selected values using the options on the context menu) but I cannot see the unencrypted value if my roles indicate the value is masked for me.
Update Dynamic Data Masking
When you update the model to encrypt or decrypt a column whose values are in use as part of a filter, you may need to manually repair your report or model:
- If you are filtering the newly encrypted or decrypted data in any reports and then you change a column's masking type, the "not enough information" placeholder may be shown. In this case, you need to update the report manually to show the newly encrypted or decrypted value.
- Likewise, if you have calculations or other uses of the data outside of reports, you may need to manually update your calculations and so on to take account of the change to the underlying data model.
Tip: When updating model details, be sure to always save your changes and process the model right away. This will ensure that you see any impacts as soon as possible.