Once you have added your items to your canvas, you can drag them around to appropriate locations and then, if necessary, make use of the Alignment and Distribute options to space those objects evenly either with reference to the canvas itself or, where you have multiple objects selected, with reference to one another. The "snapping" functionality and the align and distribute options help you to create a professional look-and-feel by positioning items precisely.
Note: Items that you might want to align or distribute include visuals, slicers, shapes, images, buttons, and dynamic assets.
Alignment
The alignment options allow you to:
- Reposition a single selected item relative to the canvas. For example, move a visual to the center of the canvas.
- Select multiple items on the canvas and align them relative to one another. For example, select three boxes containing metrics and align them relative to the top border of the selected item whose own top border is highest on the canvas.
Slide ribbon
Access the alignment options from the Slide ribbon (green arrow, below):

Note: Use the dropdown lists to view the Alignment and Distribute options. These options, indicated with the blue and purple arrows above, are only enabled where the appropriate number of items are selected on the canvas.
Alignment context menu
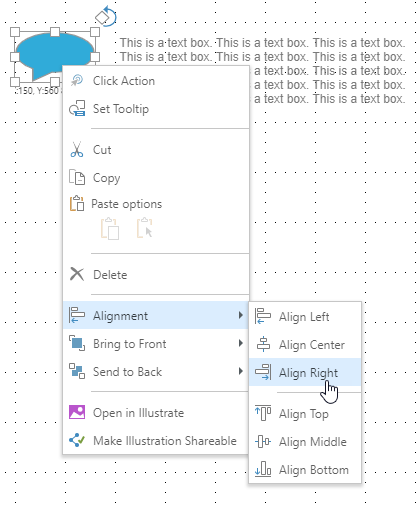
Access the alignment options from the right-click context menu:
Align a single item relative to the canvas
- Select the item you want to reposition on the canvas.
- Do one of the following:
- Click the Alignment dropdown menu on the ribbon and select one of the alignment options.
- Right-click the selected item and click Alignment > Align Option.
Since only one item is selected on the canvas, choosing Alignment > Align Right moves the selected item to the right of the canvas.
Align multiple items relative to one another
- Select the items you want to reposition relative to one another.
- Do one of the following:
- Click the Alignment dropdown menu on the ribbon and select one of the alignment options.
- Right-click the selected items and click Alignment > Align Option.
Click to select the first item, then Ctrl+click to select each subsequent item. Alternatively, drag your cursor while holding your mouse button to select multiple items in a particular area of the canvas.
Since multiple items are selected on the canvas, choosing Alignment > Align Right moves all of the selected items horizontally to align with the selected item whose right edge is the furthest to the right.
Align options
|
Option Name |
Description |
|---|---|
|
Align Left |
If one item is selected, it aligns to the left edge of the canvas. If multiple items are selected, they align to the leftmost item among them. |
|
Align Center |
If one item is selected, it is aligned vertically through its center. If multiple items are selected, they are aligned vertically through their centers. |
|
Align Right |
If one item is selected, it aligns to the right edge of the canvas. If multiple items are selected, they align to the rightmost item among them. |
|
Align Top |
If one item is selected, it is aligned to the top of the canvas. If multiple items are selected, they are aligned along their top edges with the item whose top edge is the highest of the selected items. |
|
Align Middle |
If one item is selected, it is aligned horizontally through the middle of the canvas. If multiple items are selected, they are aligned horizontally through their middles. |
|
Align Bottom |
If one item is selected, it is aligned to the bottom of the canvas. If multiple items are selected, they are aligned along their bottom edges with the item whose bottom edge is the lowest of the selected items. |
Distribute
The distribute options allow you to evenly distribute multiple elements horizontally or vertically, relative to the selected items. For example, you can add four icons to your canvas with the first and last at the two furthest points, then distribute those four items horizontally. The first and last items remain where they are, and the other two move so that the items are evenly distributed.
Distribute context menu
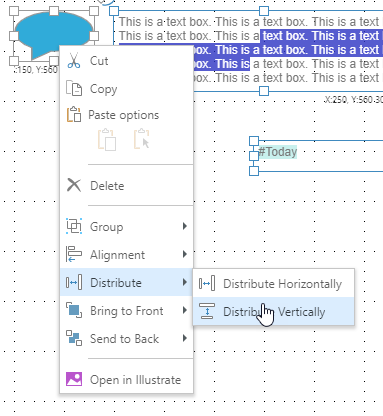
Access the distribute options from the right-click context menu:
Distribute multiple items
- Select at least three items on the canvas.
- Right-click the selected elements and from the context menu, select one of the distribution options:
- Select Distribute > Distribute Horizontally to evenly distribute selected items horizontally between the selected item that is furthest to the left and the one that is furthest to the right.
- Select Distribute > Distribute Vertically to evenly distribute selected content items vertically between the selected item that is furthest to the top and the one that is closest to the bottom.
Click to select the first item, then Ctrl+click to select each subsequent item. Alternatively, drag your cursor while holding your mouse button to select multiple items in a particular area of the canvas.
Tip: If you distributed some items, you might also want to align them while they are selected!