You can use the Formatting panel in Present Pro to change the appearance of the visuals and panels included in your presentation. If the visual in your panel is not linked to a Discovery (it has been "unlinked" or created in Present), you can edit all relevant formatting options, including Panel Settings. If the visual in your panel is linked to a Discovery, is a visual area from Tabulate, or is a Slicer, you can only format the Panel Settings or Slicer Format in Present; any other formatting (for example, editing the text for your legend) must be done in the linked app.
Important: When you change formatting options inside a presentation, your changes only impact that presentation. When you open the linked visual in its source app, any formatting changes you make apply anywhere the visual appears.
- Click here for more information about formatting and design
- Click here to learn how to unlink content
Opening the Formatting panel
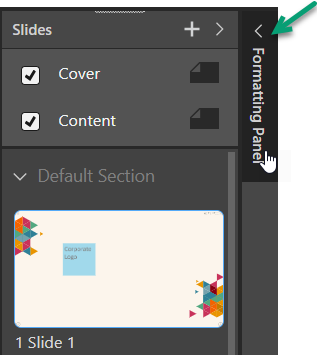
Click Expand (green arrow) to open the Formatting panel at the right side of the interface:
More Panel Options
Selecting Show Panels > More Panel Options (green arrow) from the Component or Slide ribbons:

Note: If you select this option from the Slide ribbon or with more than one panel selected on the slide, the Formatting panel opens with the Slide Panel Settings selected. These options control the same formatting as Panel Settings, but they apply to every panel on this page.
Other Options
You can also open the Formatting panel by:
- Right-clicking the visual and selecting Panel Settings or, in the case of slicers, Format from the context menu.
- Use the Formatting Selector from the Toolbox.
Formatting panel
The formatting panel incorporates different options depending on your selected content item:

Settings for unlinked or "one-off" visuals
Where the selected visual is local to this presentation; that is, it was created in Present or has been unlinked from its original discovery; you can edit any of its formatting in Present. This means that the options you can select from the dropdown list (green arrow, above) are:
- The formatting options associated with the selected visualization type, such as Report Title, Data, Color, and so on. (If you're working on a grid, grid options are shown; if you're working on a pie chart, formatting options for pie charts are shown; and so on.) These options are described in the Discovery section: Formatting Panel.
- Panel Settings: These options format the panel containing the visual when it is rendered; indicating its general look-and-feel and the look-and-feel of its title and subtitle. For details of these settings, see Panel Settings in Present Pro.
Settings for linked visuals
For linked discoveries, containers (mini-tab or matrix table layout), and Tabulate visual areas, the dropdown list only includes the different Panel Settings options:
- Panel Settings: These options format the panel containing the visual when it is rendered; indicating its general look-and-feel and the look-and-feel of its title and subtitle. For presentations, the selected style also dictates where the panel tools should be shown when viewed at runtime.
- Slide Panel Settings: These options control the same formatting as Panel Settings, but they apply to every panel on this page.
- Presentation Panel Settings: These options control the same formatting as Panel Settings, but they apply to every panel in this document.
For details of these settings, see Panel Settings in Present Pro.
Tip: If you want to format your visual, but only in this presentation, you can only do this by breaking the link between the visual and its discovery.
Settings for Slicers
For Slicers, use the Slicer formatting options to modify the panel containing the slicer and other slicer formatting options. For details of these settings, see Slicer Formatting in Present Pro.
Related information
Common Panel Options
Using the options along the header bar, you can:
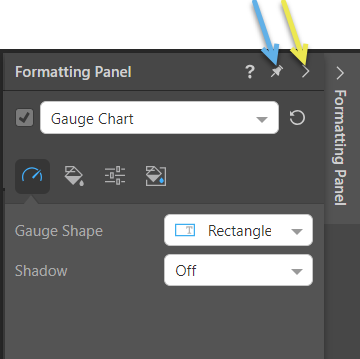
- Click Pin (blue arrow) to pin or dock the Formatting panel. By default, the panel "docks" beneath the Slides panel. Once you've docked the panel, you will need to click Collapse if you want to close it again.
- Click Collapse (yellow arrow) to close the panel.