Slicers allow you to create different versions of a published document with data that is filtered according to your slicer selections. For example, you can create a Mexican version of your Sales document by associating all its visuals with a country slicer and then selecting "Mexico" from that slicer on build.
This topic describes how to add a slicer to your publication that already exists in the content management system. This slicer must have been built and saved in Discover. You can drag the slicer onto your canvas from the Content panel onto your canvas.
Tip: Alternatively, you could create new slicers using the Advanced Slicer wizard or the Quick Slicer toolbox options and add them to your publication "on the fly."
Adding an existing slicer to your publication
Before you begin
You would typically add slicers to your publication after you have added one or more other content items to your pages. This usually means adding existing visuals that were created in Discover or creating new "one off" visuals locally in the publication using Discover Lite or Smart Reporting.
Step 1: Dragging the slicer onto the Interaction Manager
The existing slicers that you can add to your publication were created in Discover and are saved to the content manager. You do not need to have created the slicers yourself, but you must have access to the folders they were saved to if you want to use them in your publication.
- From the left-hand Content panel, search for or navigate to your slicer:
- Open the submenu and drag one of the slicers (yellow highlight) from the content tree onto your canvas.
- Drop your slicer into the Interaction Manager panel.
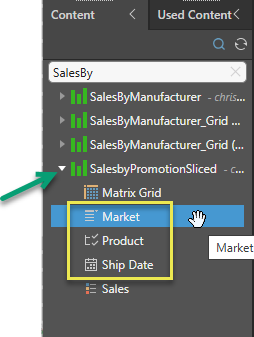
The existing slicers are saved as sub-content items associated with your discoveries, so you need to expand the discoveries to see them in the tree. For example, in the preceding image, the Sales by Manufacturer discovery (green arrow above) is a Pie Chart with four slicers (Commute Distance, Education, Gender, dateKey) and a Manufacturer legend.
Note: You can tell which type of slicer is associated with your discovery by its icon. In this case, Multi-Select Tree, Multi-Select Dropdown list, Buttons, and Date Calendar.
As you drag your slicer over the page, the Interaction Manager opens.
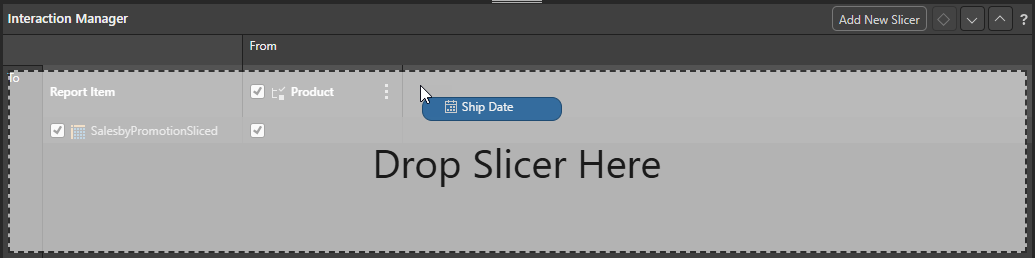
The slicer is added to the Interaction Manager, ready for configuration.
Important: Your slicer will be added as one of the supported slicer types. For example, a slicer whose slicer type is Buttons in Discover (which is not supported in Publish) will be added as a Dropdown slicer type. Once added, you can alter the slicer type in the Slicer Settings. For more information, see Slicer Settings in Publish Pro.
Step 2: Creating slicer interactions
From the Interaction Manager, select the relevant checkboxes to create interactions between your slicers and the content items that you want them to filter:
- If you do not want the slicer to affect a content item in the built publication, do not select the checkbox between the slicer and the content item (green arrow below).
- If you want the slicer to affect a content item in the built publication, select the checkbox between the slicer and the content item (purple arrow).
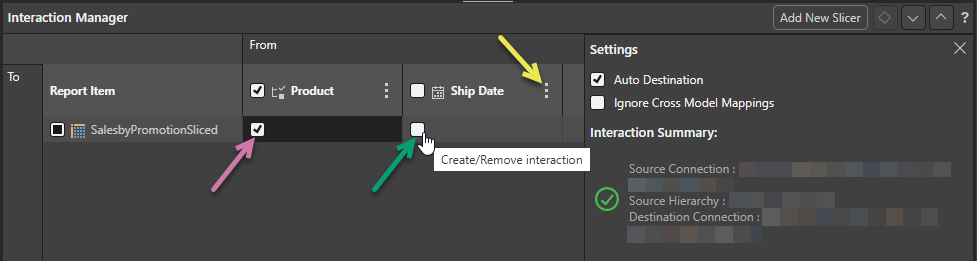
The Settings panel is open in the preceding view because the cell containing the Commute Distance checkbox is selected. For more information about these optional settings, see Interaction Manager.
Tip: You can pin the Settings panel in the Interaction Manager to keep it open while you work. Click the Pin icon (blue arrow above) in the header to pin the panel. The panel will remain open until you unpin it.
Step 3: Testing your slicer
You should build your publication in an appropriate format to test that your slicers are applied correctly.
Open the Print & Export dialog
To open the Print & Export dialog, do one of the following:
- Click Run (top-left) or press F2 on your keyboard.
- Click Print from the Status bar (top-right, above the canvas).
- Type
printinto the Chatbot and press Enter.
Export the Publication
Use the Print & Export dialog to select the details of the Output type you want to create and the Slicers that you want to select in your build.
Pyramid builds the publication in the format selected and with your specified settings. You should check that the slicers affect the publication as you would expect. For example, if you selected to show only Sales information relating to the Occupation Manual Workers, you should check that the breadcrumb trails in the visuals reflect that filtering.
Important: When you select multiple values from multi-select slicers, all selections are applied in the output publication. This means, for example, that you could select all European countries from your country slicer to filter a single Map visual to show sales for all of those countries.
Managing existing slicers
Once a slicer is configured in your publication, you can:
- Use the Interaction Manager to create, configure, and remove interactions between slicers and other content items. Tip: You can even create a new slicer from the Interaction Manager by clicking Add New Slicer.
- Use the Slicer context menu (yellow arrow above) to configure your slicer's settings (including changing the Slicer Type), create slicer actions (jump to tab), and delete slicers from the publication.