You can use the Page Repeater to render a single page in your publication multiple times, with visuals on each of the repeat pages filtered using a different slice value. You may want to use this feature to maintain one visual for, say, sales data but then publish a document that repeats the Sales page for each of your company's countries as defined by a slicer.
The page repeater produces a single publication that contains "repeated" pages, with each of the repeated pages filtered by a particular slicer value. This is unlike selecting multiple slices for a scheduled build where multiple publications are built, each of which is filtered by a different slice.
For an overview of Page Repeaters, watch the following video:
Adding a Page Repeater
The following walkthrough adds a Page Repeater to a publication that creates a separate page of sales for each of the countries in the region "Europe."
Before you begin
- Create a publication with at least one page.
- Add a Sales visual that you would like to repeat for each of the countries in your region. You can add an existing visual from the Content panel or create a new visual "on-the-fly" using Smart Reporting or Discover Lite.
Step 1: Open the Page Repeater panel
Note: A Page Repeater always applies to a particular page in your publication. This is different to a standard "Global" slicer which applies across your publication.
With the page that you want to repeat selected in the Pages panel:
- From the Page ribbon (green arrow below), click Page Repeater (blue arrow).

The Page Repeater panel opens at the bottom of the page.

Note: The number in the header indicates the selected publication page (purple arrow). If you have slicers in this publication that are not associated with Page Repeaters, these are included in this panel as Global slicers (yellow arrow); these slicers cannot be used for Page Repeaters. For more information, see Page Repeater panel.
Step 2: Add a Page Repeater slicer
From the Page Repeater panel:
- Click Add New Slicer (blue arrow above).
- On the Data Source tab, choose your Model and select the Country Hierarchy.
- Limit the slicer to European countries:
- In the Elements panel, select Free Selection.
- Clear the (All) checkbox and select only European countries in the list (France, Germany, and the United Kingdom).
- Click Apply.
The New Slicer panel opens. For more information about this panel, see New "Advanced" Slicer in Publish Pro.

The Elements panel opens with All elements selected. Note: This selection would create a page in the final publication for every one of the countries in the hierarchy.
Your selection is saved, and the New Slicer panel closes.
Step 3: Link the Page Repeater slicer to a visual
From the Page Repeater panel:
- Select the checkboxes between the slicer and the visual or visuals you want to apply the page repeater to (green arrow below):
- Optionally, select the Settings for your slicer.
- Save your changes.

When you next build your publication, it will include an individual page for each slicer option; that is, for each of the selected European countries in your Country slicer.
Page Repeater panel
The Page Repeater panel is where your Page Repeater slicers are created and where the interactions between your slicers and the repeated visuals are created. You open this panel by selecting a page in your publication and clicking Page Repeater in the overhead Page ribbon.

- Title: The number in the header (purple arrow) is the page in this publication that the Page Repeater applies to. In the preceding case, page 2.
- Local Slicer: Any slicer that is not prefixed "(Global)" can be used to enable the Page Repeater. Select the checkbox between a local slicer and a visual (brown arrow) to create an interaction between the two items. When the publication is built, this page is repeated for each element in the local slicer with the visual filtered by the relevant slice on each page.
- Global Slicer: Any slicer that is prefixed "(Global)" can be used as a Cascading Slicer, filtering the elements in another slicer. For example, a Region Slicer could be used to filter the Country slicer at build time, limiting the page repeater to only repeat pages for countries in the selected region. For more information, see Cascading Slicers in the Discover help.
- Add New Slicer: Click this button (orange arrow) to add a new Page Repeater slicer.
Settings panel
When a cell representing an interaction is selected in the Interaction Manager, the Settings panel opens:
- Clear the Auto Destination checkbox to disable the interaction. This causes the interaction to be ignored when the publication is built.
- Select the Ignore Cross Model Mappings checkbox if you don't want cross-model mappings to be used where there is a cross-model interaction that is not supported out of the box. For more information, see Model Mapping in Publish Pro.
Tip: You can pin the Settings panel in the Interaction Manager to keep it open while you work. Click the Pin icon (blue arrow above) in the header to pin the panel. The panel will remain open until you unpin it.
Context Menu
Click the ellipse (green arrow) to open a slicer's context menu:
Slicer Settings
Update the Settings associated with a slicer that already exists in your publication. You can edit the slicer settings in the Slicer Settings panel, changing the slicer's title, slicer type, or configuring its elements list as needed.
- Click here for more information about Slicer Settings
Actions
Actions are only used to configure the Jump to Tab action in Publish. This feature is used to select which Tab (and therefore the visuals or images that the tab contains) should be shown in your Mini-Tab container when your publication is built.
- Click here for more information about Conditional Tabs (Jump Actions)
Delete Slicer
Since slicers do not appear on the canvas of your publication, you can only delete them from the Interaction Manager.
Example: Repeat per Country
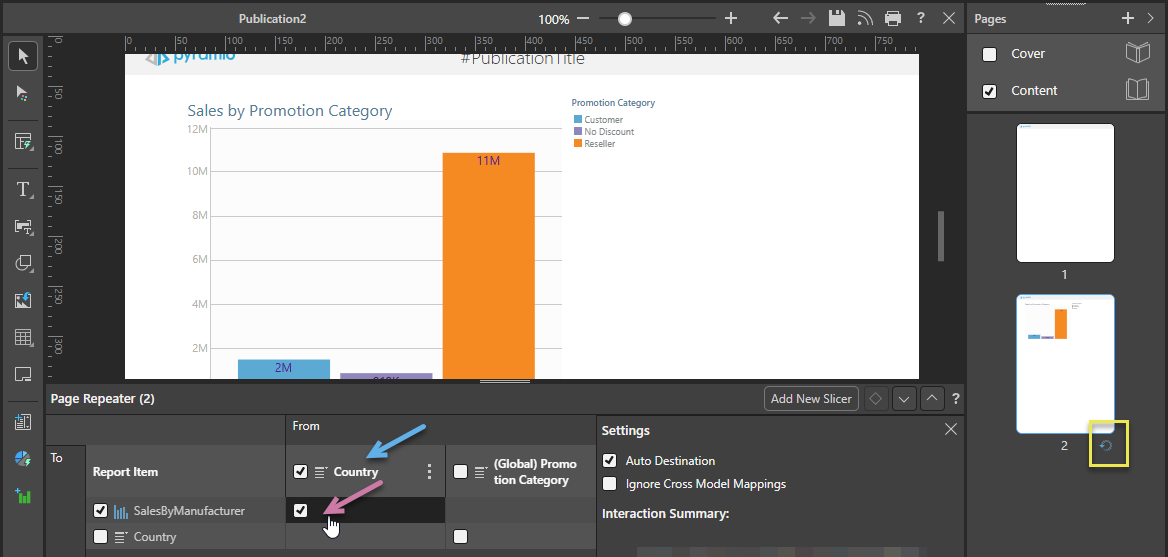
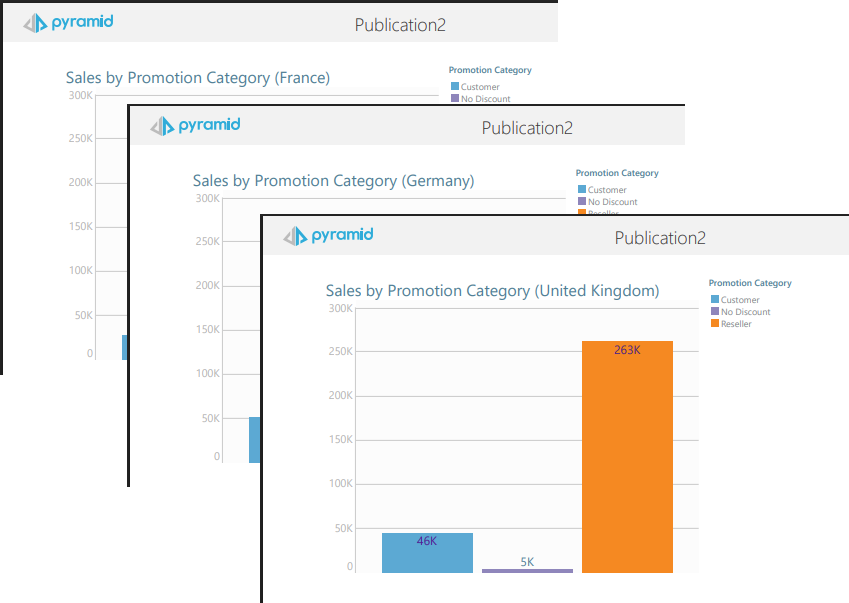
In this example, the page repeater was applied to the second publication page. This page contains a column chart showing Sales by Manufacturer. The slicer hierarchy was Country, which was customized to contain three elements (France, Germany, and the United Kingdom):

Things to note:
- The Pages panel, to the right of the canvas, shows an icon indicating that this page includes a Page Repeater (yellow highlight above).
- The selection in the Page Repeater panel (purple arrow) shows that the visual is sliced by the Country hierarchy.
On publication, page 2 of the output PDF (where the page repeater is located) is repeated three times (creating pages 2, 3, and 4) but with the visual filtered by a different Country on each page:

Excel with Page Repeaters
Where the publication is published to Excel, each of the repeated pages is created as a worksheet in the tabbed Excel Workbook:

The name of each tab is constructed as follows <panel>-<element>-<number>, where:
<panel>- This is the panel title / visual name. Note that you can customize this name in the Formatting panel (select Panel Settings > Title).<element>- This is the name of the Element that the slice represents. In the preceding example, this will be France, then Germany, and lastly United Kingdom.<number>- Where the name created from the <panel> and <element> values duplicates another tab name, the duplicate is suffixed -1, the third -2, and so on. (Not shown.)
Note: Because tab names are limited to 31 characters in Excel, the <panel> and the <element> names (above) may be truncated using an ellipsis.
Related information
Scheduling documents per slice
If, instead of using the Page Repeater to repeat a page, you want to create a separate document for each of your selected slicers, you should use the scheduler to build your documents and select Multi mode to choose the options that you would like to build a document for.
- Click here for information about Selections when Scheduling Builds
Conditional Page Repeaters
If you want to use your page repeater to select different slices where a condition is or isn't met, you can create a Page Trigger.
- Click here for Page Trigger information