Logs are used for tracking events in the system including user entry, transaction, and system diagnostics, as well as tracking the lifecycle of items (audit).
The log settings allow you to manage each type of logs independently:
- Enabling and disabling log collection.
- Specifying how long to keep logs before they are automatically purged by the scheduled "automatic purge" process. Note: It is good practice to purge logs regularly to keep the repository database "leaner and meaner."
- Manually purging the logs "on demand" (clicking Purge Now).
Warning: Logging can slow down the application. The higher-level logs should only be activated if they are in use.
Access Log Settings
From the Admin Console:
- In the left-hand menu, click Logs > Log Settings.
- Optionally, make any changes to the log settings that you require.
- Click Apply (top-right) to apply and save your changes.
The Log Settings page opens. This page is broken up according to the types of logs that you can collect. For more information, see Log Types.
This will typically be to change the time to keep your logs for. For more information, see Configuration options.
Tip: If you changed any of your "keep for" values, you might want to run Purge All Logs now. This option runs the purge process, applying your newly changed configuration settings to your stored logs.
Log Types
The Log Settings page is broken up into sections, each of which represents the configuration for one component. The sections are as follows:
- System logging: Tracks system-level messages from the system. The default "Level 0" should be selected in normal deployments. Warning: Changing the system logging to other levels can severely impact performance.
- Debug User Group Performance: Tracks the User Group Performance scan details and provides an audit log for the file system. Note: The log file will be located under the task engine that is running the scan.
- Transaction logging: Tracks query events associated with every report run on the platform. It provides insights into query performance as well as content usage and should be left on. Note: The transaction logs form the basis of the usage analysis in the system and as such it is good practice to keep these logs for longer than a few months.
- Solve Logging: Solve Transaction logging provides a list of all the occasions on which Solve algorithms have been run in the application, within a given time period.
- Entry Logging: Tracks user entry into the application. Also, monitors failed login attempts and, if the user uses the formal logout functions in the client, logouts.
- Audit Trail: The Audit Trail log framework tracks all changes made to key objects throughout the system. Buttons are located throughout the application for tracking events per relevant object. For more information, see Audit Trail Framework.
- Detailed LLM Logging: Selecting the Enable Logging checkbox to enable extra data from the LLM to be collected. LLM logging provides a list of all queries run by the Chatbot, including requests and responses. This data is heavier on the database, so you are advised to only enable this setting if you are currently diagnosing an issue. For more information, see LLM Logs in the Admin Console.
- Static Shares Logging: Tracks static shares; that is, shares created using the Send Export facility in Governed Sharing. For more information, see Static Shares.
- Other log settings: In addition to the preceding logs, logs are also collected that relate to Data Flow (ETL) progress, AI execution, and Temp files.
Configuration Options
Common options
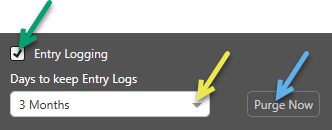
Most types of logs have settings for: <Type> Logging, Keep <Type> Logs, and Purge Now. The following image shows these common options for the Entry logs:
<Type> Logging
Select the <Type> Logging checkbox (green arrow, above) to enable log collection for the given component.
Keep <Type> Logs
Choose how long to keep logs of the named type (yellow arrow). Logs that reach this "age" are deleted by the automatic purge process.
For example, selecting 3 Months in the Keep System Logs field indicates that any system logs that are found to be over 3 months old will be purged when the purge process next runs.
Tip: If you shorten this setting, consider purging logs that fall outside the new retention period. In this case, use Purge All Logs rather than Purge Now to remove any logs older than the updated Keep <Type> Logs limit. For more information, see Purge All Logs.
Purge Now
Click Purge Now (blue arrow) to ignore the "keep for" schedule and purge the log messages immediately.
Tip: You can, alternatively, also Purge Now from many of the log pages using the Clear Logs option at the top-right of the page.
System logging
From the System logging level dropdown list, select an option to indicate which logs you want to collect. If you do not want to log any events for this component, select Off.
The severity level is numbered, with the highest severity event having the lowest numeric value (level 0):
- Log Level 0 (default) - The highest-level events. Important runtime errors or unexpected conditions. Note: Events at this level are further subdivided into Errors, Warnings, and Info.
- Log Level 1 - Undesirable or unexpected events that are not necessarily errors. For example, may indicate use of deprecated APIs, poor use of an API, and "almost" errors.
- Log Level 2 - Interesting runtime events. For example, logging start up or shut down events.
- Log Level 3 (Debug) - Detailed information on the flow through the system. Debug events are rarely required.
- Log Level 4 (Trace) - The lowest level events. Trace events are rarely required.
When you select a severity level, you collect both the events at that selected level and also events with any "lower" severity level. For example, selecting Log Level 1 collects both level 1 and level 0 events.
Warning: Changing system logging levels can severely impact performance.
Diagnostic logging options
- Select the CMS Diagnostic Logging checkbox to enable VERBOSE logging of content management events in the system for tracking down complex problems. Tip: Although it is tempting to leave CMS diagnostic logging on, it HEAVILY impacts performance and should be turned off unless specifically needed.
- If you are debugging, you may also be asked to select Store long log messages or Debug System Schedules. These are also debugging options, so should not be used routinely.
Debug User Group Performance
- Select the Debug User Group Performance checkbox to enable User Group Performance logging.
- Select the Verbose Debug Mode checkbox to enable VERBOSE logging of the User Group Debugging events in the system for tracking down complex problems.
Warning: This feature should only be used when scanning the user group performance of specific groups. It SEVERELY impacts system performance and can create log files that are too large to appropriately check.
Transaction logging
Select the Transaction logging checkbox to enable transaction logging.
Tip: As the transaction logs form the basis of the usage analysis in the system, it is good practice to keep transaction logs and transaction logs text messages for longer than a few months.
If required, select the Benchmark logging checkbox to expand transaction logging and gain deeper insights into query performance, including delineating performance issues at a much greater level than transaction logging.
Warning: Although it is tempting to leave benchmarking on, it impacts performance HEAVILY and should be turned off unless specifically needed. If benchmarking is left on, be sure to purge the logs after a short time.
Related information
If you have Benchmark Logging enabled, you can view information relating to the benchmark performance of a particular query in Discover using the Benchmark Performance dialog. For more information, see Performance dialog in Discover.
Disable Anonymous Telemetry
Select the Disable Anonymous Telemetry checkbox to stop sending anonymous telemetry to Pyramid.
Page controls
Purge All Logs
Runs the automatic purge process with the current settings for each log type.
You would typically use this function after changing the settings. For example, if you changed your Keep Audit Trail Logs selection from 3 months to 2 weeks, clicking Purge All Logs will delete any audit trail logs that are currently older than your new two-week limit.
Apply
Important: Always remember to apply any changes using the Apply button at the top-right of the workspace. Your newly applied settings will be used the next time your automatic purge process runs.