Server-Side Trusted Connections to SAP BW
This document covers single sign-on support for SAP BW from Windows machines hosting Pyramid servers using SNC.
Note: The same overall technique is possible for Linux servers too.
Required SAP Software
- 64-bit SAP Cryptolib libraries for Windows
- SAP GUI for Windows 7.4x or higher
- BI 7.0 ADDON FOR SAP GUI 7.4x or higher
Pyramid Server Installs
Before you being, ensure a Server-Side Trust relationship has been created on the BW instance (See detail here in section 9.5.6). One completed, follow these steps to implement.
- On each Pyramid Runtime and Task Server machine install the SAP GUI with these components
- SAP GUI
- SAP Logon
- Unicode RFC Libraries
- Business Explorer
- Run the BI 7.0 ADDON FOR SAP GUI 7.40
- Deploy the CRYPTO library
- Move SAPCAR_xxx.EXE and SAPCRYPTOLIBP_xxx.SAR to an empty directory.
- Extract the files: SAPCAR_xxx.EXE -xvf SAPCRYPTOLIBP_xxx.SAR
- Copy the files to a permanent location (e.g. C:\Program Files\SAP\Crypto)
- Add a Windows environment variable called SNC_LIB for the file sapcrypto.dll (e.g. C:\Program Files\SAP\Crypto\sapcrypto.dll).
- Create a sub-directory under the directory from step c above, named sec. Add another Windows environment variable named SECUDIR that points to this directory.
Certificate Setup
- Activate SNC
- Open Properties for your BW instance and establish the following in SAP Logon (Make sure to run SAP Logon with Administrator rights)
- Under System Entry Properties, Network, check "Activate Secure Network Communications"
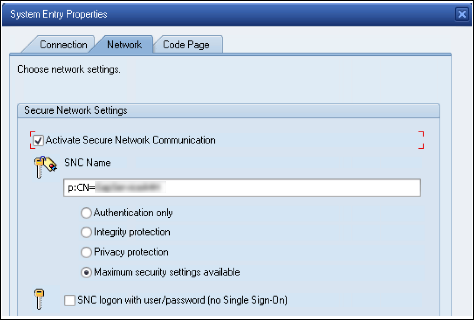
- Take note of the BW Instance SNC Name(p:xxxxx).
- Open a command prompt in the SECUDIR directory on the Pyramid machine(s) to generate the Personal Security Environment (PSE) certificate
- Generate the pse file: ..\sapgenpse.exe gen_pse -v -p {name}.pse. (Take note of the "Distinguished name of the PSE owner" for later steps)
- Generate the crt file: ..\sapgenpse.exe export_own_cert -v -p {name}.pse -o {name}.crt
- Import the crt file
- Log in to the BW instance and start transaction STRUST in SAP Logon.
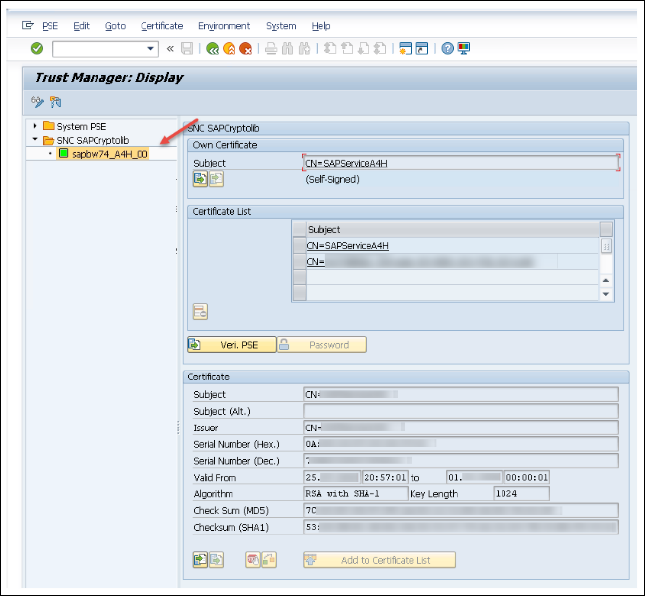
- Double-click the entry under SNC_SAPCryptolib on the left.
- Verify that the "Own Certificate" subject value changes to the Distinguished Name of the BW Instance Identity (e.g. CN=SAPService)
- Double-click the "Own Certificate" value to show details of the certificate below.
- Import {name}.crt:
- Enable editing by clicking the 'eyeglass' button in the top left-hand corner
- Click the import button at the bottom left-hand corner of the Certificate pane.
- Browse to your SECUDIR directory in the dialog and select the crt file.
- Click the green OK check button.
- Next, click the "Add to Certificate List" button at the bottom of the Certificate pane
- Check that the certificate now appears in the Certificate List
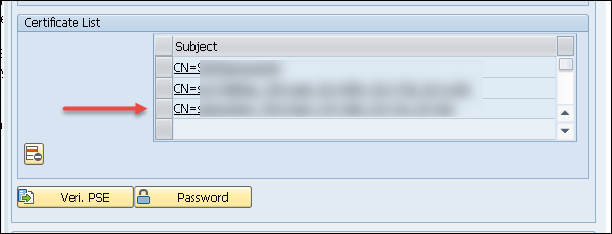
- Check that the certificate now appears in the Certificate List
- Click the Save button next to the transaction box to commit your changes.
- Log in to the BW instance and start transaction STRUST in SAP Logon.
- Export the BW Instance Identity's certificate to SECUDIR
- From transaction STRUST, double-click the entry under SNC_SAPCryptolib item in the tree on the left pane.
- Then double-click the "Own Certificate" subject value (e.g. CN=SAPService)
- In the Certificate pane, verify that the subject value matches the "Own Certificate" subject value.
- Export the BW certificate:
- First, if required, click the eyeglass icon in the top left to enable editing
- Click the export button - right of the import button in the bottom left corner of the Certificate pane
- In the dialog browse to the SECUDIR directory, enter a name for the BW certificate ({BW}.crt) in the File name box. Select "Base64" below that.
- Click the green OK check button.
- The exported certificate should be in the SECUDIR directory
- Exit Transaction STRUST
- Add the Pyramid Server Identity to BW's Access Control List (ACL):
- Start transaction SNC0
- Click New Entries near the top of the screen
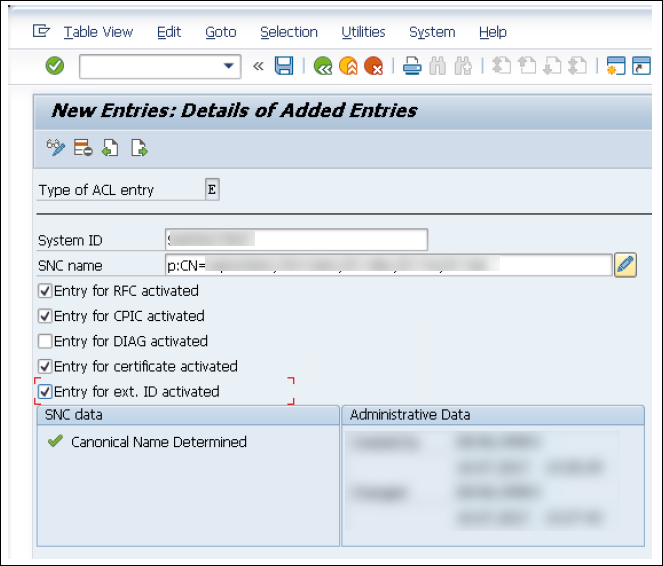
- In the System ID box enter a value for the Pyramid Server ID (e.g. pyramidsso)
- Click the pencil Edit button to the right of the SNC Name text box.
- In the dialog enter the SNC Name of the Pyramid Server Identity using the distinguished name generated by step 2.a above with the "p:" prefix (e.g. p:CN=pyramidsso, DC=mysite, DC=com).
- Then click the green OK check mark.
- In the SNC data portion of the New Entries form in the bottom left hand pane, a green check mark will be shown next to "Canonical Name Determined".
- Check the following boxes:
- Entry for RFC activated
- Entry for CPIC activated
- Entry for certificate activated
- Entry for ext. ID activated
- Commit the changes by clicking the save icon.
- Exit Transaction SNC0
- Import the BW certificate:
- Run the following in a command prompt from the SECUDIR directory ..\sapgenpse.exe maintain_pk -v -a {BW}.crt -p {name}.pse
- Run the following in a command prompt from the SECUDIR directory ..\sapgenpse.exe seclogin -p pyr_dev_run.pse -O "domain\user" (user is the user that is running the pyramid services)
- Check that the directory now contains a cred_v2 file
- Show the contents of the PSE by running the following command ..\sapgenpse.exe maintain_pk -l
- You should see a PKList having the subject and issuer values matching the distinguished name of the BW Identity.