The Migration Wizard is a content tool that allows Enterprise Admins to copy ("migrate") content items and folders from one Pyramid instance to another. It effectively offers a UI-driven wizard in place of manually exporting and importing operations or using the export / import API functions.
For example, you may have a test environment and a production environment and need to copy the tested content and structures to the final production instance.
The wizard allows you to select multiple content items, related content items, and content folders to another Pyramid environment. It is able to migrate single content items, a collection of items and entire folder of items.
Important: The Migration Wizard is only available to Enterprise Administrators with the Enterprise Edition of Pyramid. For more information, see Pyramid Licensing.
Using the Migration Wizard
Before you begin
In order to migrate content to another instance, the target instance must first be created as a Migration Destination in the Admin console.
For instructions, see: Migration Destinations.
Opening the Migration Wizard
Once set, the Migration Wizard can be accessed from:
- Content items using their context menu from any of the content views in the content manager. (Click here to read more about selecting many items for multi-item operations.)
- Content folders in the Content Explorer - effectively working on a folder's contents.
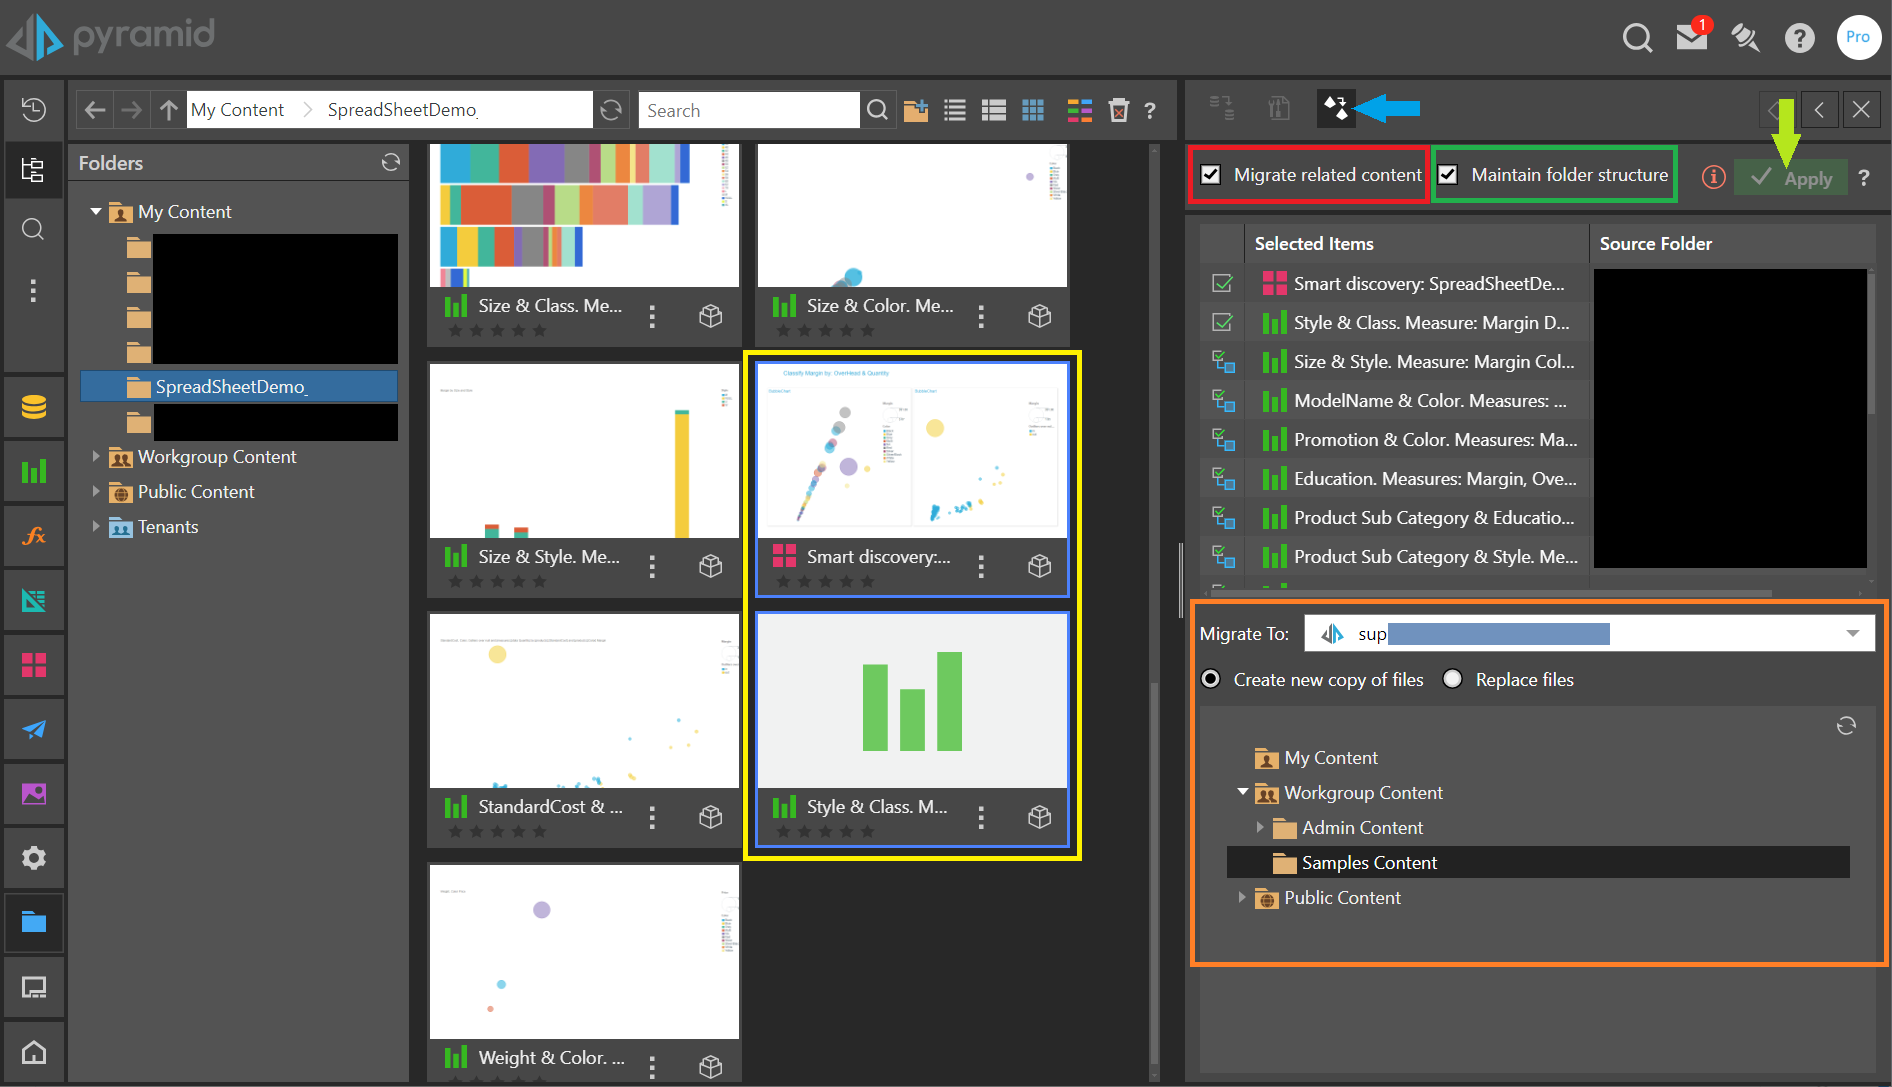
- The Action Panel for a given content item (Opened by clicking the Migrate icon - blue arrow below).
Migrate your Content
Once your item or items are selected and the wizard is triggered, the Migration tool opens on the right of the page. The selected items (yellow highlights), and their related content items (see below for details) are listed under Selected Items.
Migration Options
Migrate related content
By default, the content items related to the selected item or items will also be migrated. For example, if you select a presentation, all the discover reports within the presentation will also be migrated, along with any custom logic that was used to build those discoveries.
In some circumstances you may not want to migrate related content items. For example, you may be migrating a discovery that was built using a custom formula but have already migrated that item to the destination instance. In this case, you can clear the Migrate related content checkbox (red highlight above).
Maintain folder structure
If you are migrating a folder or a selection of items that contain folders, you can select the Maintain folder structure checkbox (green highlight above) to maintain the structure of sub-folders within the selected folder on the target instance. Related content from other tree branches will be imported to the root of the target instance.
If this checkbox is not selected, the content will appear as a single flat list of items when re-imported into the target folder destination.
Destination Options
The Destination Options (orange highlight, above) determine the target or destination location that you are selecting for your migration.
Migrate To
Use the Migrate To drop-down to select the target Pyramid instance that should be used for the migration. The list includes the Migration Destinations that have been created in the Admin console.
Once you've selected the Migration Destination instance, the content folder tree on that instance is shown beneath the selected destination name.
Handling Duplicate Files
When you import and export or migrate content, you need to tell Pyramid what to do to when both the source and the target contain items with the same name. You can do this by selecting one of the following options above the destination folder location:
- Create new copy of files: Where there are duplicate items, keep both old and new versions. Rename the new (source) version of each item by attaching a suffix and, if the item shares the same content ID as a target item, also assign it a new ID.
- Replace files: (Files only.) Where there are duplicate items, replace the item at the target with the new version from the source. Overwrite each existing file, retaining both the same name and content ID.
- Merge files: (Folders only.) Where there are duplicate items, replace the items at the target with new versions from the source as described above. Where there are new source items, copy them to the target. Where there are existing items on the target that are not present at the source, leave them unchanged. In short, replace duplicate items, add new items, and leave existing items unchanged. Note: The merge option is only available where the content was exported from version 2023.12 and up.
Destination Folder Location
Select the folder location that you want to migrate your content items to. Once you have selected your target, click Apply (green arrow).
Note: The folder structure presented matches the structures of the user account that were used in configuring the Migration Destination - not the user performing the migration.
The migration process may take a few minutes to complete, especially if the payload of items is large or deep.