The Targets panel lists the targets that have been created in this presentation to either enable cross-filtering between visuals on different slides (cross-slide interactions) or to allow the creation of direct URL or embedded JavaScript links where the Target is invoked externally (this is typically done to initialize the linked slicers or visuals with particular values).
- Click here for more information about Targets and their use
Opening the Targets panel
Click Expand (green arrow) to open the Targets panel at the left side of the interface:
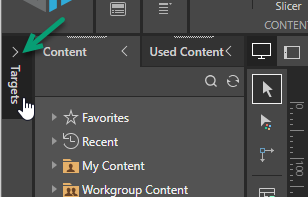
Once expanded, you'll see the list of Targets associated with this presentation.
Targets panel header
Using the options along the header bar, you can:
- Click Plus (green arrow above) to add a new target.
- Click Pin (blue arrow) to pin or dock the target panel. By default, the Targets panel will "dock" beneath the Content panel. Once you've docked the panel, you will need to click Collapse if you want to close it again.
- Click Collapse (yellow arrow) to close the panel.
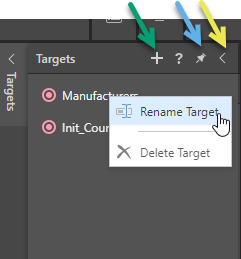
Target context menu
From the right-click context menu, you can:
- Select Rename Target to open a pop-up and give your Target a meaningful name.
- Select Delete Target to delete the target. Note: Your target and all its associated interactions are deleted.
Target interactions
Where your interactions are to or from a Target, you can create them using either:
- The Interaction Manager, opened from the Presentation ribbon.
- The Interaction Picker, opened from the Toolbox.
The following example shows how to add an interaction from a source visual to a Target object. All Target interactions are created following similar steps. Note: You would typically only create an interaction like this as part of creating a cross-slide interaction. For full details describing how to create a cross-slide interaction, see Creating Targets using Present Pro.
With the correct slide open on the canvas:
- Click Interaction Picker in the Toolbar (purple highlight, below).
- Click the visual that you want to drive the interaction, and then drag your cursor to the item that you want to be the target of your interaction.
- Optionally, select the arrow that indicates your new interaction.
As you drag your cursor, a green arrow is drawn. Once you drop, the two items are connected, and the interaction arrow becomes orange; this indicates that the interaction was successfully added.
The Interaction Manager opens. Note: The interaction that was just created, and has been selected on the canvas, is indicated in the following image by the yellow highlight:
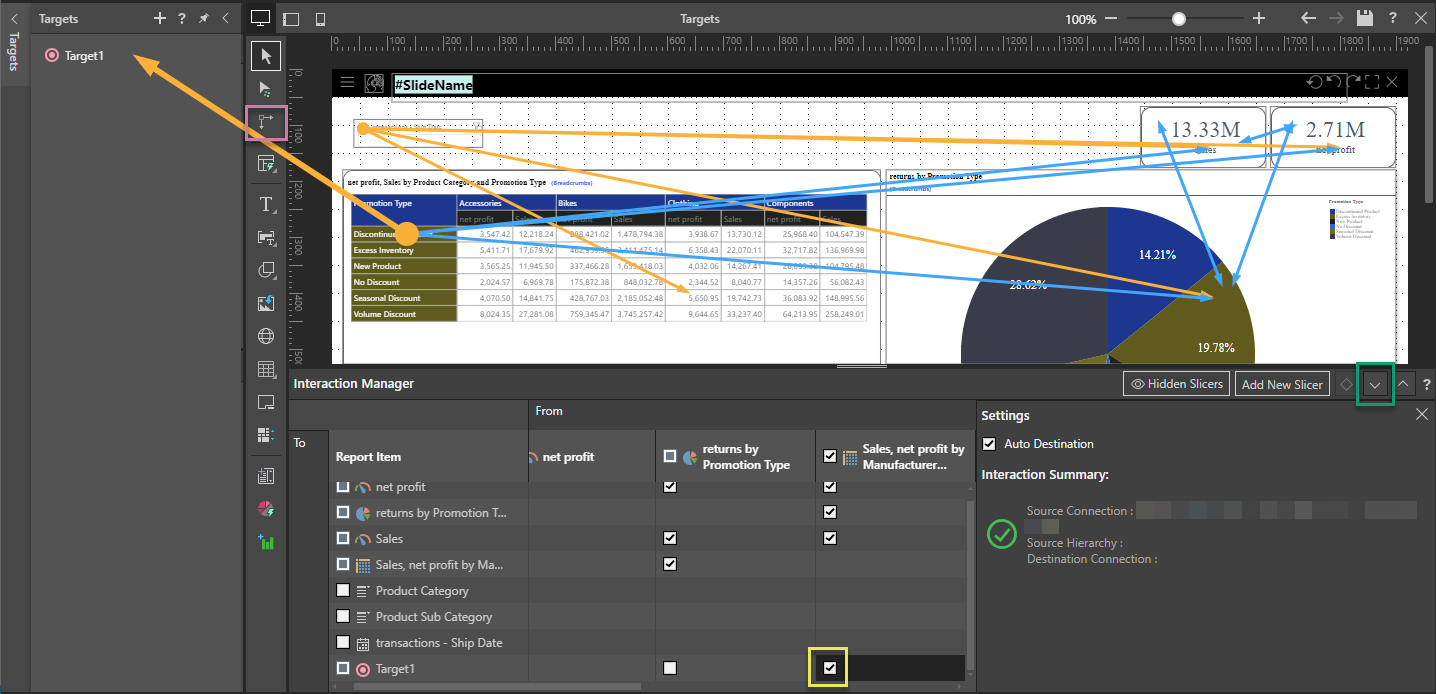
Tip: You can click Minimize (green highlight) whenever you are ready to close the Interaction Manager.
Tip: You can pin the Settings panel in the Interaction Manager to keep it open while you work. Click the Pin icon (blue arrow above) in the header to pin the panel. The panel will remain open until you unpin it.