You can subscribe to a presentation; setting up a schedule against which your presentation is generated with its current data, details of the message you'd like to receive, and the subscription output / format type. You can also share the presentation with the members of a distribution list according to your specified schedule. For example, you might want to receive a sales presentation containing the latest data on a monthly basis and also distribute that same report to your management team (popping up on their bulletin board).
Subscriptions effectively export or print the content in a selected document format and then provide you with access to that content and distribute it to a distribution list on a scheduled basis.
Note: This feature is only available with the Enterprise Edition license.
Configuring a subscription involves choosing an output, defining the schedule, and setting up distribution using the bulletin board or email. This allows you to share presentations in a similar way to the scheduling and distribution of publications. The setup of subscriptions is similar across the application.
- Click here for common subscription information
Before you begin
To create a subscription to a presentation, the presentation must first be saved in the system.
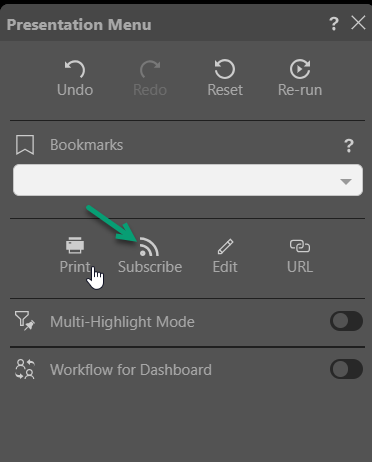
Accessing the Subscribe option
With the presentation open at runtime:
- Click the hamburger menu at the top-left corner of the slide (green arrow).
- Click Subscribe to open the Subscribe dialog.
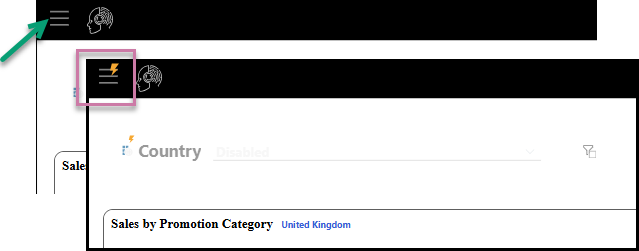
Note: If you see a lightning bolt icon on your Hamburger Menu, your slicer icon, or on a custom button with a jump action, the values from one or more of your slicers have been changed but that change has not been automatically applied to your presentation. For more information, see Run slicers at runtime.
The Present runtime menu opens to the left of the page.
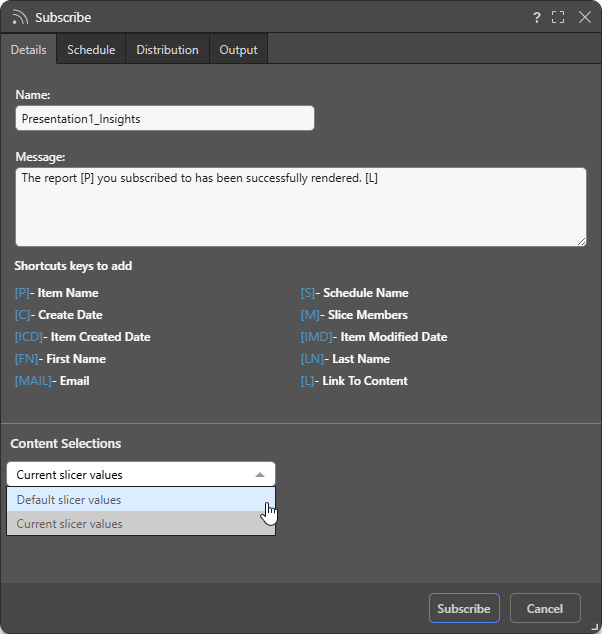
Subscribe dialog
You can work through the tabs in the Subscribe dialog to configure the subscription. This includes naming and describing your subscription, configuring the schedule for the subscription job, and configuring the list of recipients and method of distribution.
- Click here for more information about subscriptions
Details
- Name: Supply a name for your subscription. By default, the subscription name is based on the file name.
- Message: Add a message that describes the purpose of the subscription. You may include "Shortcut keys" in your message. These variables will be replaced with an actual value on generation, for example, [L] will incorporate a Link to the content.
Content Selections
Note: The Content Selections field is only available in Discover, Present, Tabulate, and the Viewer Client.
If the file contains slicers, you can use the Content Selections dropdown list to indicate which slicer selections to include in the exported content:
- Default slicer values: The default slicer value will be used for the subscription.
- Current slicer values: Presentations only. The value displayed at runtime when the subscription was started is the value that will be used in the subscription.
Schedule
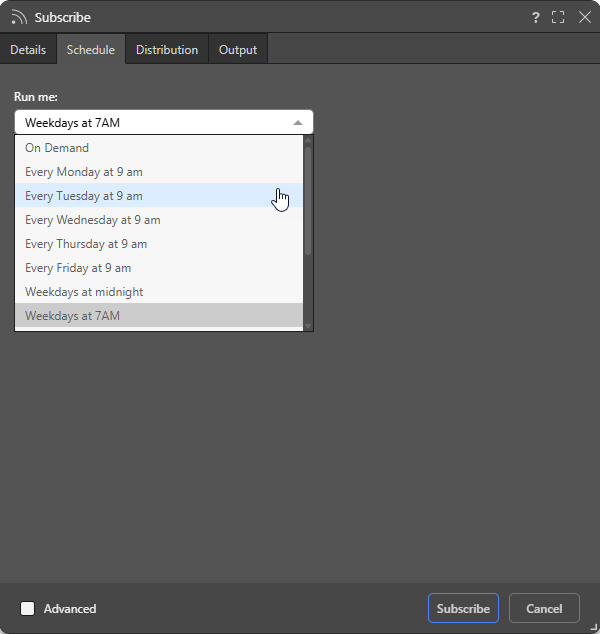
Configure the Schedule for the subscription job:
- On Demand: Select On Demand to trigger the schedule either when the underlying data model is reprocessed or through an API call.
- <Preset>: Select one of the Preset options, such as "Every Monday at 9am," to create a simple, repeat schedule for your subscription.
- Select the Advanced checkbox at the bottom of the dialog to create a custom schedule using the advanced options.
Tip: If you select one of the "Every..." preset options, but only after the 9 AM start time, you can indicate that you also want to run this schedule today by selecting the Run Now checkbox in the Advanced settings.
Note: Pyramid uses your time zone for the time and date settings by default. If you want to check that it has selected your time zone correctly, or you want to schedule times and dates in a different time zone, use the Timezone option in the Advanced settings.
- Click here to learn more about Advanced Subscriptions
Distribution
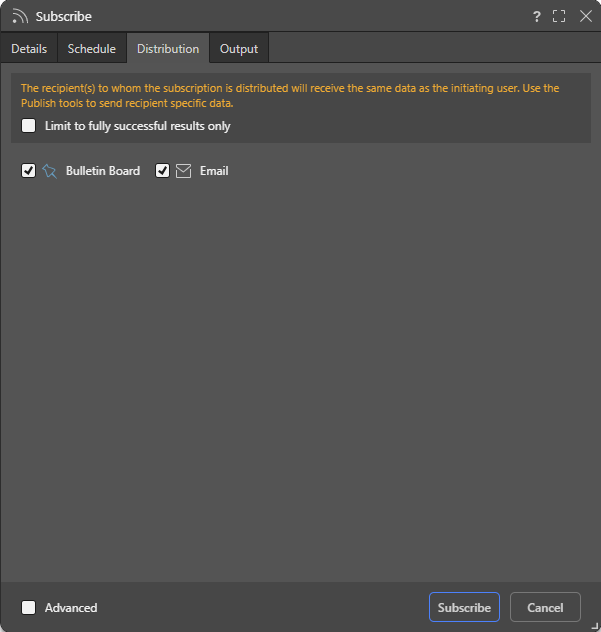
Limit to fully successful results only
Select the Limit to fully successful results only checkbox to prevent automatic distribution where content was not built completely successfully; that is, where a scheduled build "finished with errors" (or is a "Partial Success" in the language of the Task Manager):
- Where this option is not selected (default), the output is built and automatically distributed according to the schedule. The broken item is simply excluded from the output.
- Where this option is selected, the output is built with the missing broken item but it is not automatically distributed. You can still view the built output in the Schedule Manager.
Basic Distribution Options
Use the checkboxes to subscribe as yourself:
- Bulletin Board: Receive subscribed output through the Pyramid Bulletin Board.
- Email: Receive subscribed output by Email.
Advanced Distribution Options
For discoveries, presentations, or tabulations, you may be able to select the Advanced checkbox at the bottom of the dialog to create a custom distribution to other users. The functionality available is sensitive to the User subscription mode selected in the Admin Console. There are three modes: normal, personal and strict.
Normal
In normal mode (default), the following distribution options are available:
- Bulletin Board: Distribute to a list of existing users or roles (groups) using the built-in Bulletin Board interface.
- Email: Distribute to a list of any email addresses. Note: You may have an option to include a link to the content item.
- Phone: Distribute to a list of any users using SMS.
- Channel: Distribute to any channel Webhook. Note: You have an option to include a link to the content item.
You can distribute the subscription to multiple destinations, but the selected destinations must include one of either Bulletin Board or Email. This is because phone and channel distribution do not involve sending the subscription output (the actual exported report). The output itself can only be sent through the Bulletin Board or email.
Warning: In NORMAL mode the subscription runs as the initiating subscriber, and any other recipients of the distribution get the same outputs with the SAME DATA as the initiating subscriber. Use STRICT mode to allow each recipient to see their own data sets in generated outputs.
Personal
In personal mode, the user can only subscribe as themselves to the Bulletin Board, Email or Phone distribution end points using their own personal details.
Strict
In strict mode, the subscription is run with each recipient's own data security - allowing one subscriber to enroll multiple users, and still allowing each user to get a user-specific report output.
In strict mode, the following distribution options are available:
- Bulletin Board: Distribute to a list of existing users or roles (groups) using the built-in Bulletin Board interface.
- Email: Distribute to a list of existing users or roles (groups) using email. Note: You may have an option to include a link to the content item.
Unlike normal mode, the strict mode only allows existing system users to be added as recipients that meet certain criteria: the recipient user or role must have access to the content item, to the underlying data source and is part of the same tenant. If they meet these standards they will appear as green items in the search list and can be added to the recipient listing. Otherwise they will appear red, and will be rejected.
- Click here to read more on using strict mode and configuring role and end user security for subscriptions.
- Click here to learn more about scheduled distribution
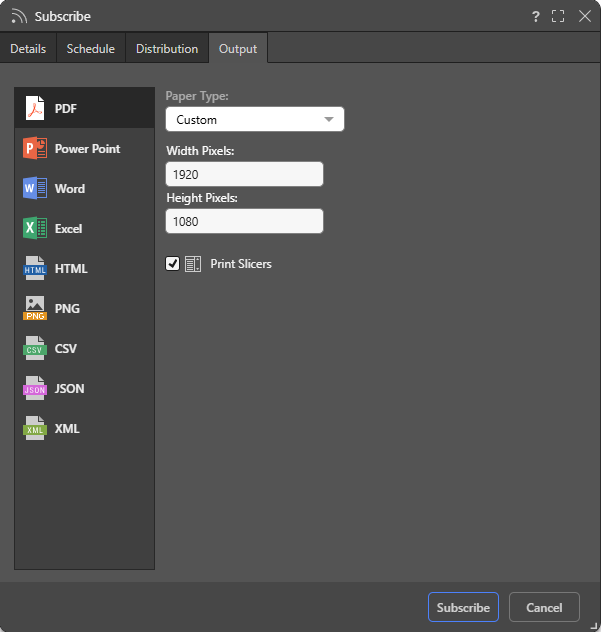
Output
From the Output tab, choose the required output type, then set your preferences for the selected output:
Note: Unlike discoveries and publications, you cannot export a presentation to the job spooler.
The following options can be selected when exporting your content for print:
- Paper Type: (PDF, Power Point, Word, HTML.) Select the paper size that you want to print to. If custom is selected, you will need to provide paper height and width settings.
- Image Quality: (Power Point, Word, PNG.) Select whether to incorporate images at low, medium, or high quality.
- Remove value based filters: (CSV, JSON, XML.) Where a value-based filter has been applied to data, select this option to export the entire dataset, rather than only the filtered values.
- Excel styling: Excel options, including options to show the title and breadcrumbs / filters in the output (context). For more information, see Print and Export to Excel.
- Print Slicers: (PDF, Power Point, Word, HTML, PNG.) Print a graphical representation of a slice if it's on the canvas:
- If this option is selected, the slicer visuals are printed with their current selections.
- If this option is disabled, on-slide slicers will not be shown in the exported or printed presentation, but interactions from the slicers are reflected in the output discoveries.
Warning: When subscribing to content in NORMAL mode and distributing it to other users, the subscription will run with the initiating subscribers data security. When Strict mode is chosen, the subscription runs as the recipient (the target user) so the recipient will only ever see data they have permission to see.
- Click here to learn how to configure Subscriptions from the Subscribe dialog.
Dynamic Interactions
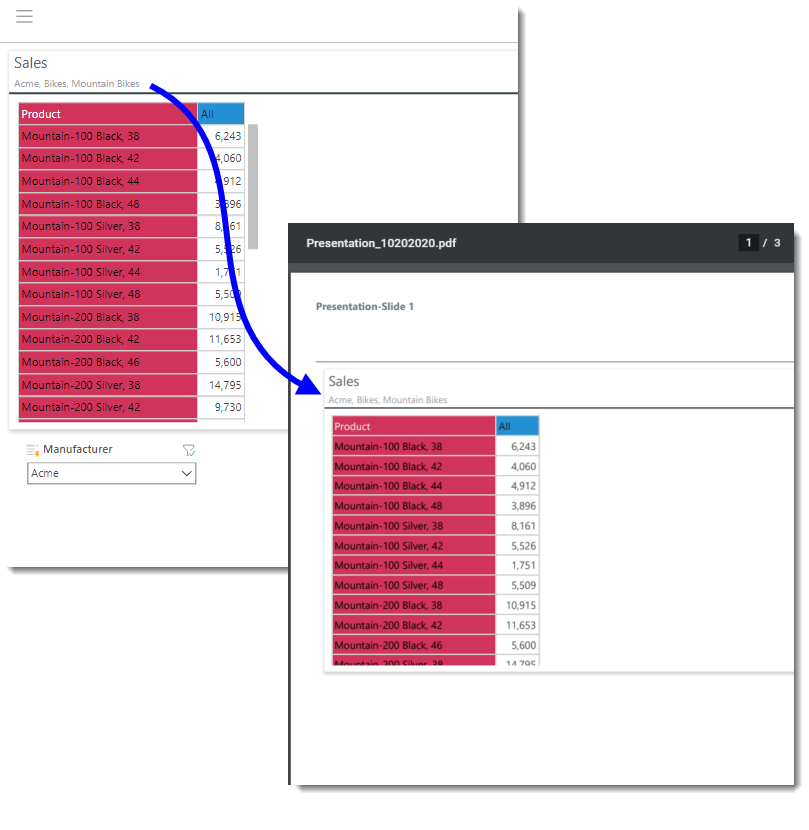
Any interactions you made at runtime, may be reflected in the exported presentation. For example, if you applied any quick filtering or sorting, this will be rendered in the exported presentation.
If the presentation contains enabled slicers, you can choose how the slicers interact with the content items that they share an interaction with using Content Selections.
In the following example, we see that the slicer and drill-down selections applied to the grid at runtime are reflected in the exported presentation:
Managing Subscriptions
Subscriptions can be edited or deleted from the Content Manager. Admins can also edit, remove, and rerun subscriptions from the Admin console.
- Click here to learn how to manage Subscriptions from the Content Manager.
- Click here to learn how to manage Subscriptions from the Admin console.
Related information
Data Source Authentication
If you’re using Windows Authentication or SAP Logon Tickets to connect to your data source, you may be prompted to enter Authentication credentials when saving your changes.
- Click here to learn more about Data Source Authentication.