This explains the security set up for connecting to an MS Fabric data source. This includes defining the Authentication Method that you want to use and incorporating details from the provider.
Process Overview
If you want to use MS Fabric as your data source, you first need to:
- Set up and configure Microsoft as an identity provider.
- Set up and configure Azure with the correct details to enable data source authentication using your identity provider.
- Set up and configure a Fabric public workspace (private workspaces aren't supported).
Lastly, you can configure Pyramid; setting up multiple fields that are used to establish a connection to the data warehouse or workspace.
Set up and configure Azure
Important: The following steps show an example setup and configuration process. It walks you through the basic process and helps you to understand where to source the information you will require when setting up the Pyramid connection. For more information about this process, please see the Microsoft Azure documentation.
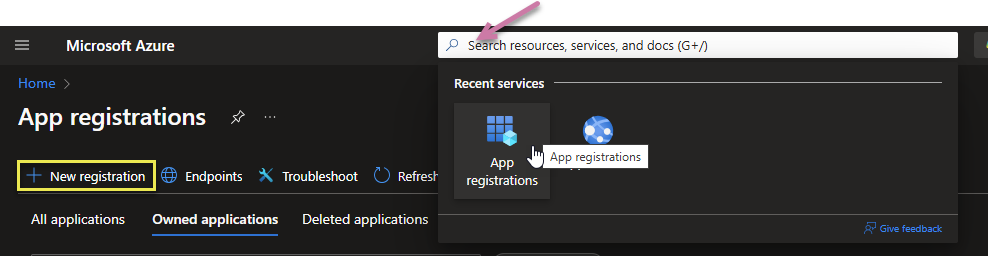
Log in to the Azure portal:
- Create a new App registration at:
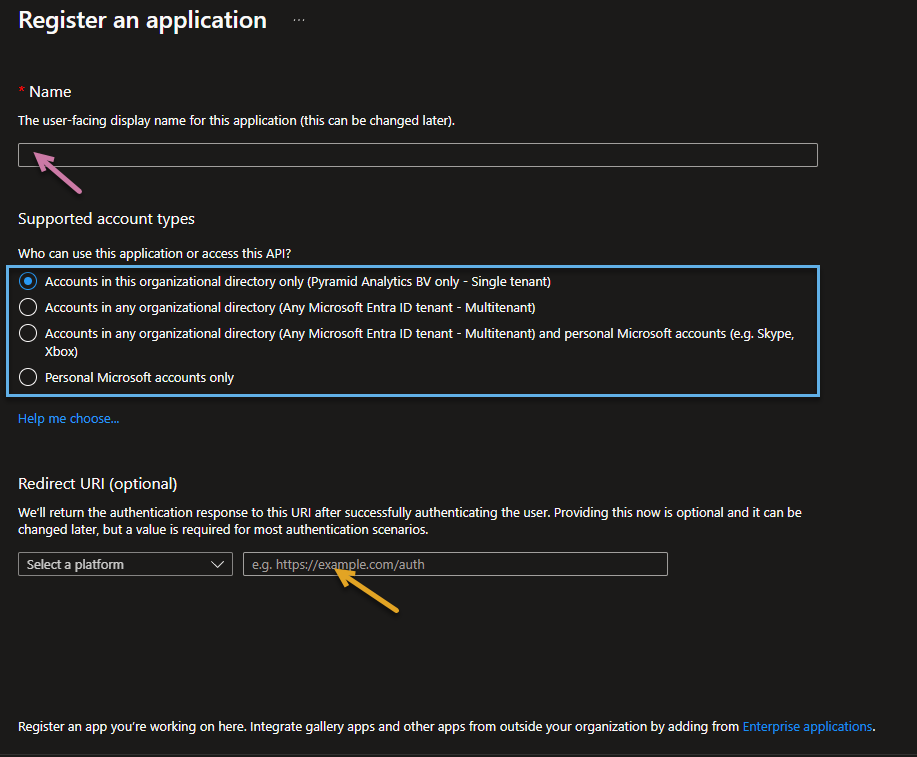
- From the Register an application page, specify the following details:
- Specify any Name (purple arrow below).
- Select the required Supported Account Type (blue highlight).
- If you are going to connect to Fabric as a user, specify the Redirect URL (orange arrow):
- From the Select a platform dropdown list, select Web.
- Specify the Redirect URL you have configured in the Pyramid Admin Console's Global Settings.
Note: Your Redirect URL is found on the Data > Global Settings page of the Pyramid Admin Console. If it has not been set up already, and you are going to connect as a user, you should set it up now. For more details, see Global Settings.
- Once you have created the app registration, you should go to the Overview page and copy the following details:
- Application (client) ID
- Directory (tenant) ID
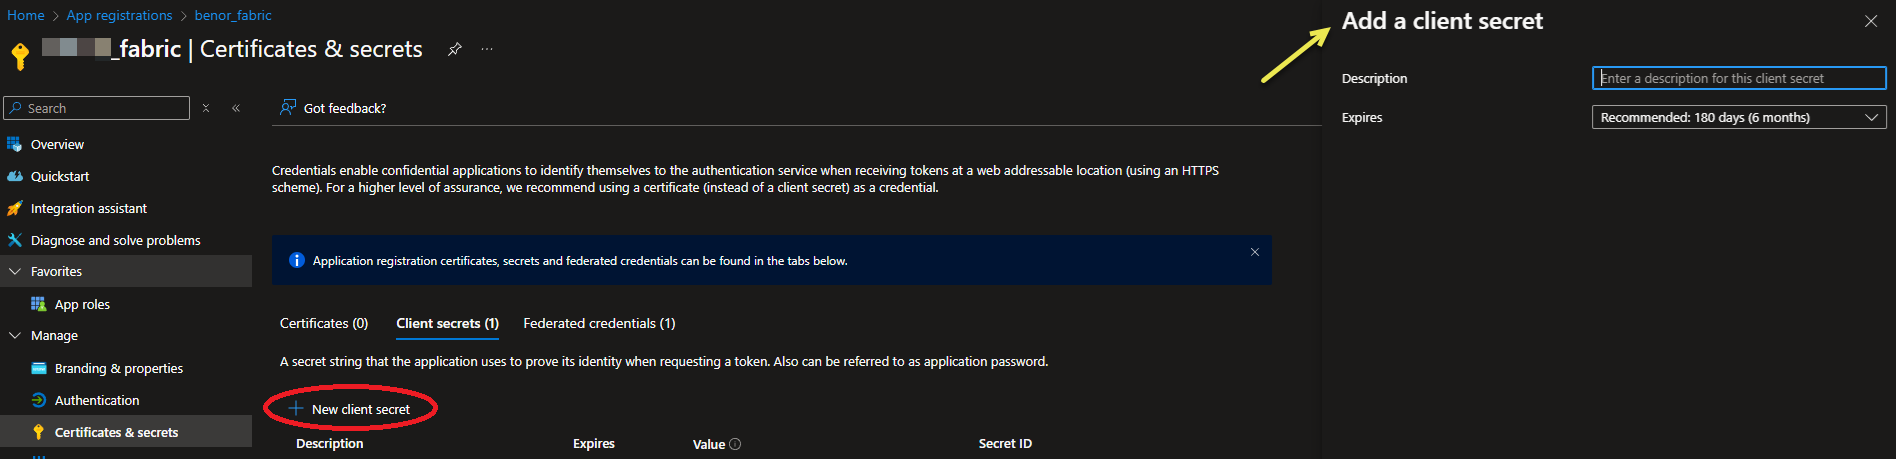
- Create a Client Secret to enable the connection:
- Go to Manage > Certificates & secrets and then click New client secret (red highlight). The Add a client secret panel opens to the right of the page (yellow arrow), you can give the client secret any description and expiry:
- Once the Client Secret is created, copy its Value (green arrow):
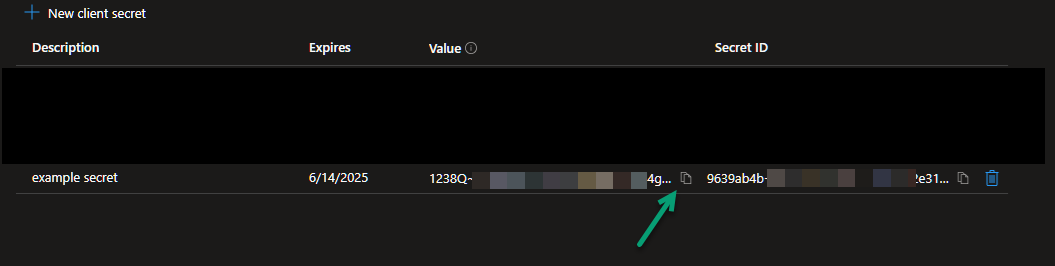
Important: The contents of the Value column will be "masked" once these details are refreshed. You must copy it now as you won't get access to the Value again, and you will need it when you are adding your security settings to Pyramid.
- If you want to connect as a user, you also need to create Federated Credentials:
- Click the Federated Credentials tab.
- Click Add Credential and specify details as required:
- The Issuer needs to be
https://sts.windows.net/<tenant>Where <tenant> is your Directory (tenant) ID. - The Subject identifier needs to match your Application (client) ID.
- The Issuer needs to be
You will need these details when you are adding your security settings to Pyramid. Note that the Application (client) ID is named Client ID in Pyramid.
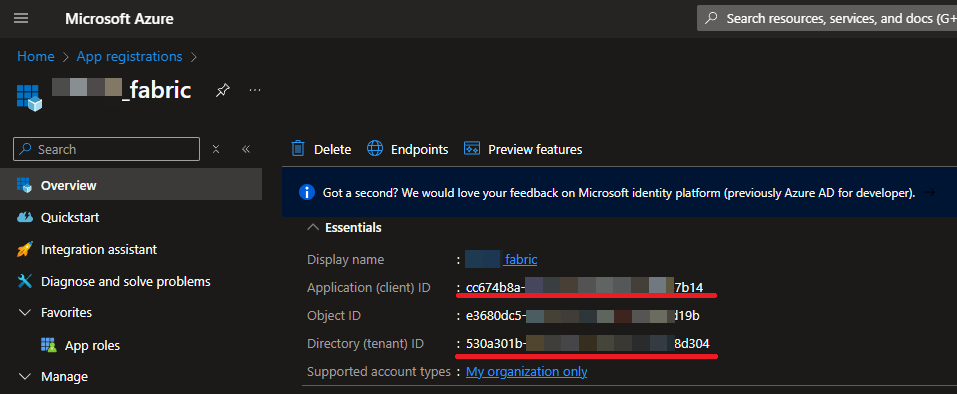
At this stage, Azure is configured as needed. You also have the Application (client) ID, Directory (tenant) ID, and Client Secret that you will need when configuring Pyramid.
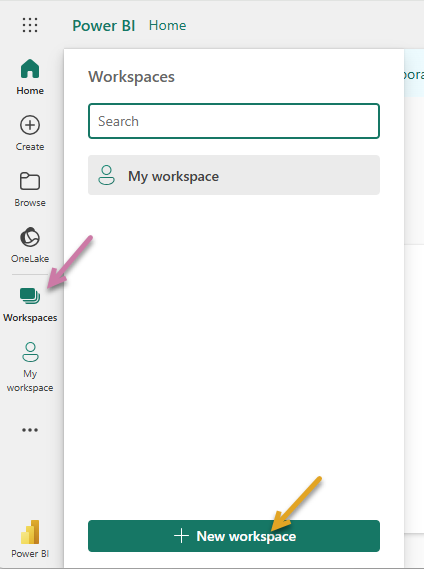
Set up and configure a Fabric public workspace
Note: You must set up a Fabric public workspace, private workspaces aren't supported.
- Open the Power BI home page.
- From the menu, click Workspaces and then New Workspace. Specify details for the workspace in the pop-up that opens.
- Inside your new workspace, create a New Warehouse.
- From the Warehouse settings, copy the SQL connection string.
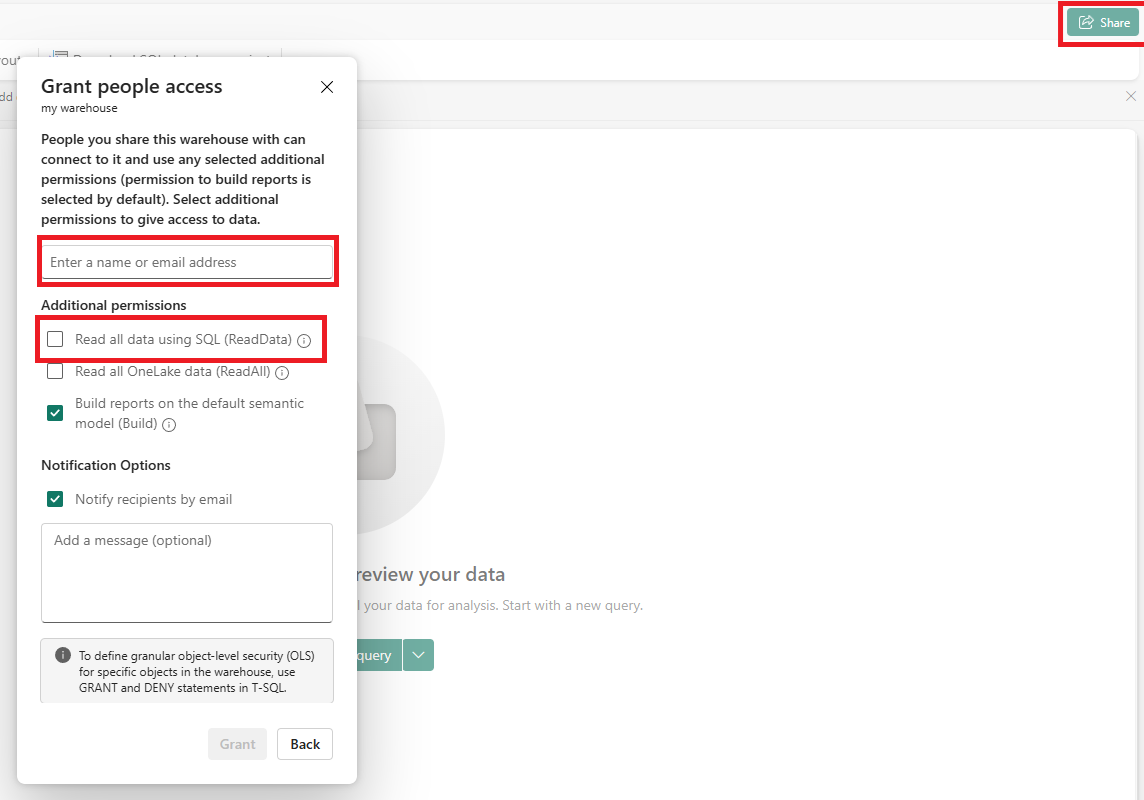
- Give the Azure service access to your warehouse by clicking Share and:
- Either specify the Azure service name created in the first step or enter the name or email address for a user with sufficient access rights.
- Select the Read all data using SQL checkbox.
- Click Grant.
https://app.fabric.microsoft.com/home?experience=power-bi
Note: We will use the Sample warehouse in this example.

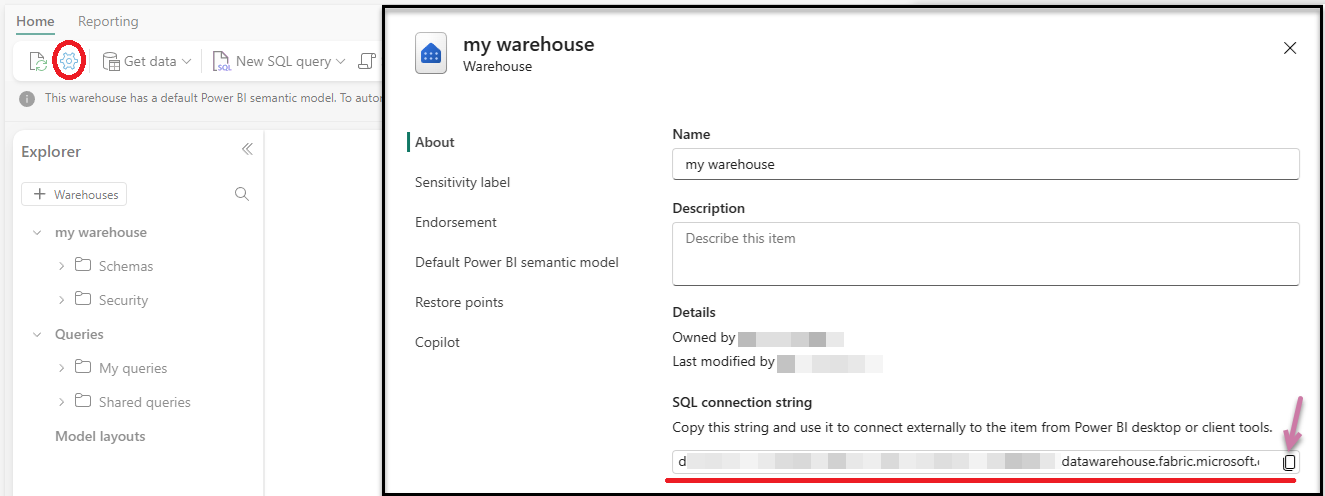
You will need this string when you are setting up your connection in Pyramid.
The Azure service or user is granted access to read using SQL.
The Fabric public workspace is configured. All you have left to do now is configure Pyramid to connect to MS Fabric.
Configure Pyramid
The Pyramid configuration happens in the Data > Data Source panel of the Admin Console. To create a new connection, click the Add Data Source button at the top-right of the page. The Add Data Source panel (where you will perform all the following steps) opens at the bottom of the page. You need to supply the following information and then click Apply to create your connection.
General
On the General tab, select MS Fabric as the Data Source Type and enter a Display name:
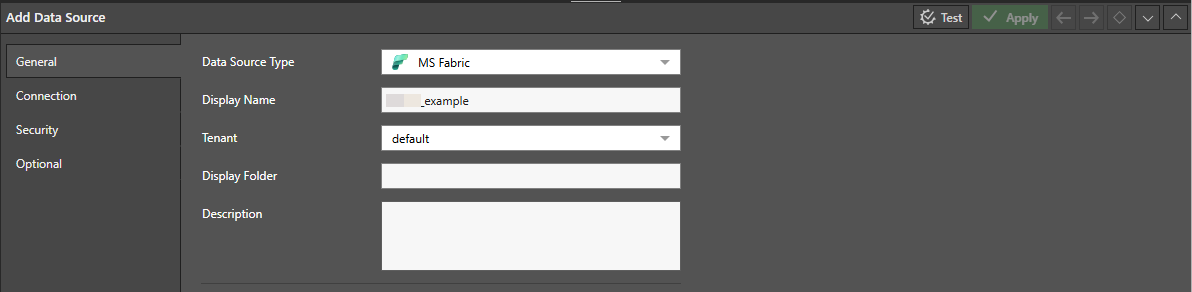
Connection
On the Connection tab, specify the connection string for your data warehouse as the Server Name or IP Address. (This was the SQL connection string that you copied when creating your Warehouse settings.)
Note: Leave the Port blank for this type of connection.

Security
On the Security tab for MS Fabric:
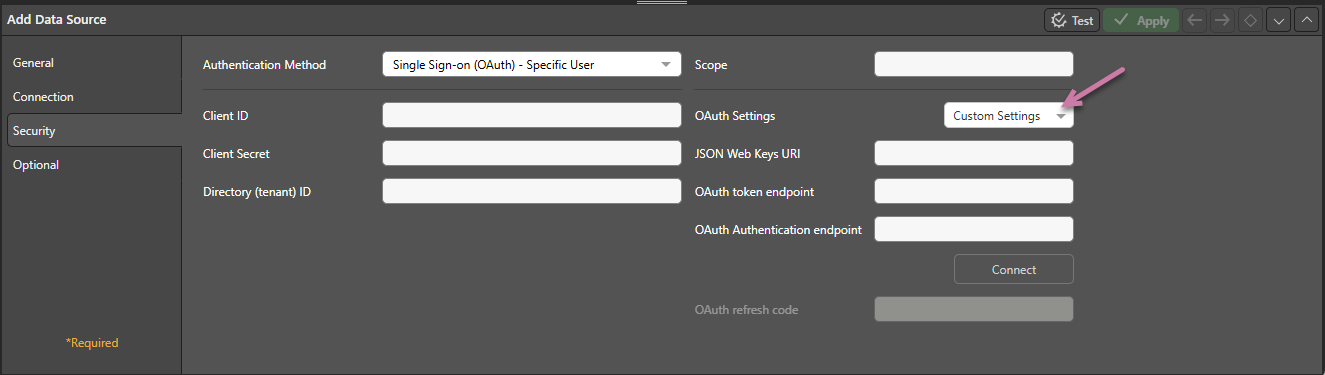
The Authentication Method can be one of:
- Service Account - When using a service account, the authentication is common to all users of the connection. Copy the authentication details; Client ID, Client Secret, and Directory (Tenant) ID; from the Microsoft Azure administrative console.
- SSO specific user - interactive authentication with a single account for all users.
- SSO end user - interactive authentication by each INDIVIDUAL user as the login into Pyramid.
- Microsoft Entra Password - Select this option to authenticate with a Microsoft Entra password (authentication without MFA), then enter the user name / password for your authenticating user. This user must already exist on the Authentication Provider.
Single Sign-on (OAuth) options
If you are using one of the SSO OAuth options:
- Single Sign-on (OAuth) - Specific User: All users of this data source share and use the credentials and sign in code defined here.
- Single Sign-on (OAuth) - End User: Each user signs in when starting Pyramid or when connecting to the data source. This is a "one off" event. The user's sign in code is stored and reused for subsequent data access. Pyramid automatically refreshes this as needed.
SSO OAuth Authentication makes use of the user's credentials to connect and authenticate access to a data source. The process is often used in big organizations that have centralized security and are using one framework to secure all data assets.
Provider Settings
Once the connection to an identity provider is set up and the authentication is working, you can provide details from your Provider to Pyramid. You need to retrieve all the options including Scope, Client ID, Client Secret, and Directory (Tenant) ID from the Provider.
Example: The Scope has a format like: https://database.windows.net/.default
OAuth Settings
Global Settings
If you want to use the global OAuth settings, you must set the Global Settings to match the provider details. These settings are found on the Data > Global Settings page of the Admin Console.
Important: You must always set Redirect URL in the Global Settings.
Custom Settings
If you do not want to use the global OAuth settings, you must override them by selecting the Custom Settings option (purple arrow above) in this panel and then setting the values to match the provider details.
Connecting
If you are setting up Single Sign-on (OAuth) - Specific User, you should click Connect to connect to the data source and generate an OAuth refresh code. Only do this once you have supplied the provider settings.
Signing in to Pyramid
If you have set the Authentication Method to one of the Single Sign-on (OAuth) options, you will need to sign in accordingly:
- For Single Sign-on (OAuth) - Specific User, each user will share the provider account as well as the Client ID and Client Secret.
- For Single Sign-on (OAuth) - End User, each user will be prompted to sign in for individually authenticated data access.