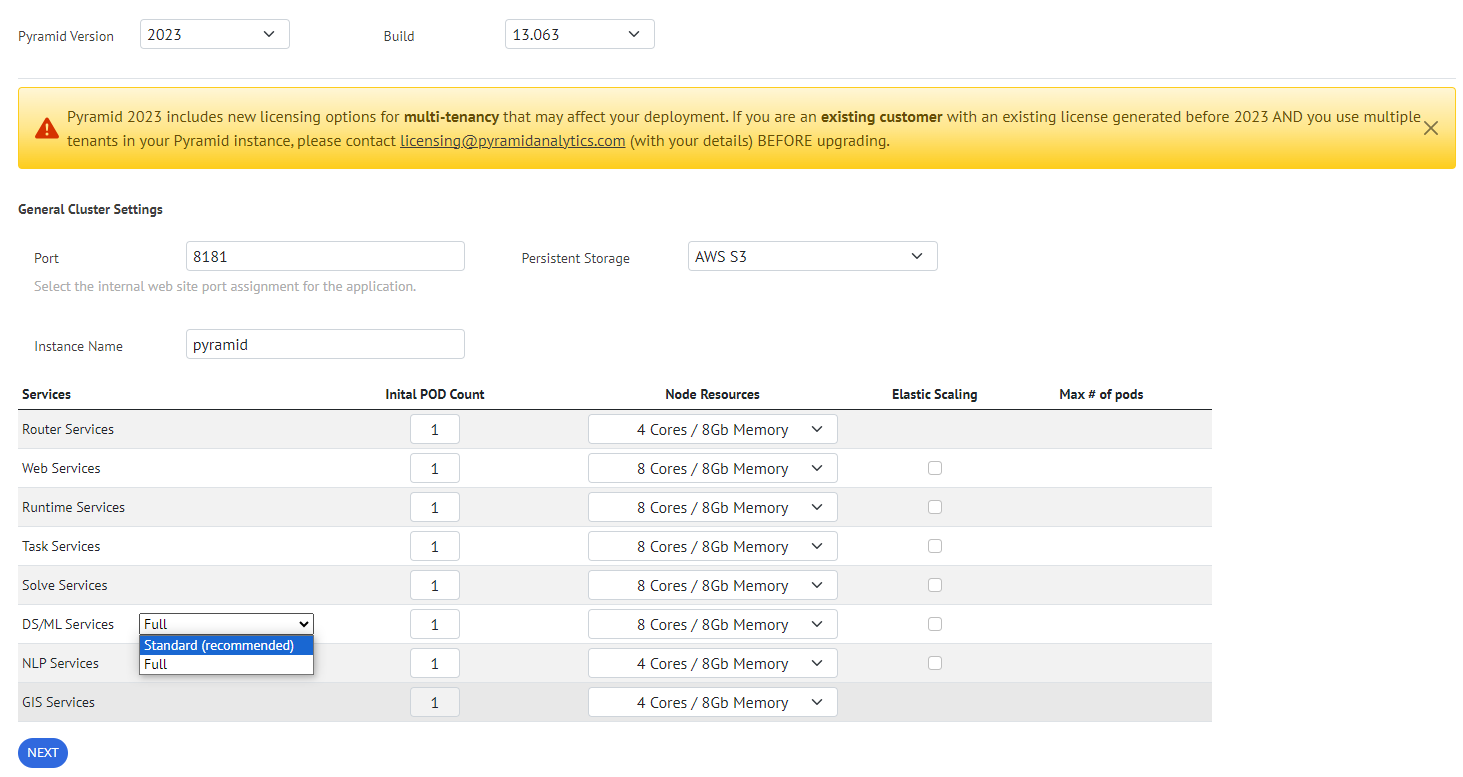
The Kubernetes configurator tool found in the Pyramid Analytics Customer Portal can be used to configure the "instructions" for your launch of a Pyramid cluster. This tool produces a "YAML" file with the instructions for how to find the right containers and how to deploy the services in a cluster.
Tip: Advanced users can generate their own YAML instructions to deploy Pyramid in other tools or a text editor.

Steps to use the Tool
- Select the Version and Build of Pyramid that you want to deploy.
- Select the Port assignment for the application.
- Select the Persistent Storage model for the cluster. Options include AWS S3, Azure Blob, GCP storage, SFTP, NFS, and so on.
- Supply an Instance Name for the Pyramid instance running in Kubernetes.
The name must only contain all lower case alphanumeric characters and hyphens; that is, 'a-z', '0-9', and '-'.
Notes: If the selected name contains upper case characters, they will be converted to lower case. An error will be displayed if there is an invalid character. For more information, see RFC1123.
- Describe the "per service" settings for the cluster:
For more information about the minimum recommended sizing guidelines, see Recommendations for Kubernetes.
- Specify the Initial Pod Count. The cluster assumes a minimum of 1 pod for each service, with the Router having a minimum of 2 pods.
- From the Node Resources drop-down, supply the initial memory and CPU core values for your Kubernetes environment. These are used to size the memory and CPU footprints of the service pods.
- If you would like elastic scaling, and it is available for the service, select the Elastic Scaling checkbox. For each service with scaling enabled, set the Maximum Number of Pods that the system can add when scaling out.
Note: The GIS service has a maximum pod setting of 1 that cannot be changed using this tool.
There are a minimum of 4 Cores for the Router and GIS, and a minimum of 8 Cores for the other services.
Note: Currently the configuration tool only supports horizontal scaling.
- Click Next to see the specific steps to deploy the YAML configuration file:
- Deploy the Keda and Prometheus engines for auto scaling containers in Kubernetes.
- Download the Pyramid YAML configuration file.
- If GoogleStore or NFS storage has been selected, manually edit the relevant section in the YAML file using a text editor (see NFS Edits or GoogleStore Edits, below).
- Deploy the YAML file into the Kubernetes cluster.
This is an internal port that is usually accessible from inside the network only. Usually a reverse proxy service is placed on top of this to handle URL and SSL processing, pointing all requests to the site and this port. For more information, see NGINX Web Server.
If you are using GoogleStore or NFS as persistent storage, you will need to manually edit the generated YAML file once these steps are complete (see the following sections for details).
NFS Edits
If you chose the NFS storage option, then you have to manually modify the YAML file in a text editor as follows:
- In the PersistentVolume section:
- Under spec > capacity > storage, specify your required <storage size>.
- Under spec > nfs > path, specify the <NFS path>.
- Under spec > nfs > server, specify the <NFS server IP>.
- In the PersistentVolumeClaim section:
- Under metadata > namespace, specify your required <namespace>.
- Under spec > resources > requests > storage, specify the <storage size> that you want to allocate for Pyramid external storage.
The following example is a snippet from the generated YAML file with placeholders for your entries shown in red.
--- apiVersion: v1 kind: PersistentVolume metadata: name: pyramid-storage-pv labels: name: pyramid-storage spec: capacity: storage: <storage size>Gi volumeMode: Filesystem accessModes: - ReadWriteMany storageClassName: manual mountOptions: - nfsvers=4 nfs: path: <NFS path> server: <NFS server IP> --- apiVersion: v1 kind: PersistentVolumeClaim metadata: name: pyramid-storage-pvc namespace: <namespace> spec: accessModes: - ReadWriteMany storageClassName: "" volumeName: pyramid-storage-pv resources: requests: storage: <storage size>Gi ---
GoogleStore Edits
If you chose the GoogleStore option, then you have to manually modify the YAML file in a text editor:
- In the PersistentVolumeClaim section:
- Under metadata > namespace, specify your required <namespace>.
- Under spec > resources > requests > storage, specify the <storage size> that you want to allocate for Pyramid external storage.
- In the StorageClass section:
- Under metadata > namespace, specify your required <namespace>.
The following example is a snippet from the generated YAML file with placeholders for your entries shown in red.
--- kind: PersistentVolumeClaim apiVersion: v1 metadata: name: pyramid-storage-pvc namespace: <namespace> spec: accessModes: - ReadWriteMany storageClassName: google-filestore-storage-class resources: requests: storage: <storageSize>Gi --- apiVersion: storage.k8s.io/v1 kind: StorageClass metadata: name: google-filestore-storage-class namespace: <namespace> provisioner: filestore.csi.storage.gke.io volumeBindingMode: Immediate allowVolumeExpansion: true parameters: tier: standard network: default