The Conversation tools available from Discover Lite, Discover Pro, and Present allow you to create conversation threads with other users or roles. A new conversation is created by commenting on a report, member, or data cell. You can then assign specific users or roles to the conversation, who will then participate in the conversation thread from the given visual or presentation, or from the Conversations Board.
The conversation tools facilitate user collaboration and communication directly from the data set, helping turn data findings into actionable analytics.
Note: Conversations are also available when viewing presentations at runtime. For more information, see Workflows and Conversations in Present.
Starting a Conversation
Member or Cell-Level Conversation
To start a conversation, right-click the member or data cell (purple arrow below) that you want to comment on and select Start New Conversation (green highlight):

Note: This option might be disabled by an Admin, in which case this option does not display.
Report-Level Conversation
Alternatively, if you wish to comment at the report level, open the main Conversations panel from the ribbon (green arrow below):

In the Workflows panel, click Start New Conversation (blue arrow) to create a report level conversation:

Note: The Start New Conversation button is only enabled once the report has been saved.
New Conversation dialog
The New Conversion dialog (opened for Members or Cells) and New Conversion panel (opened for Reports) include the same fields:

Basic Details
The Basic Details (blue highlight above) are typically provided for any Conversation.
To (Target Roles or Users)
Select multiple Roles or Users to send comments to. The Roles or Users search bar is a multi-select dropdown list where you type the role or username to filter the options for selection.
Note: When a role is added, it is counted as one participant in the conversation, regardless of the number of users who share that role.
Tip: Administrators can also hide roles from being used as recipients from the Admin Console. For more information, see Content Settings.
Comment For...
Optional field. The background of the conversation, beyond the actual comments made by users. By default, this is populated with the details of the item that the conversation is attached to.
Comment
The message that is used to launch the conversation. When others in a conversation thread respond, they are typically reacting to this text. You can attach audio recordings or documents to the message using the controls in the bottom-right.
When you add a comment, the Send button becomes enabled. If you don't add a comment, the Send button remains disabled.
Tip: You can add additional users to the thread by including their username in the comment using the @ prefix (@UserName).
Attaching Files
To attach files, click the Attachment icon (paperclip) and select the required file from its folder location. You can attach one file at a time.
Creating and Attaching Voice Recordings
To record a message, click the Microphone icon at the bottom of the Comment panel and then record your message. Once you have completed your recording, either click the green Tick to stop recording and attach your message or click the red X to discard your recording.
Important: To use the recording facility, the Pyramid website must be running with secure communication over HTTPS using a valid SSL certificate. On first use, each user will also need to explicitly authorize the browser to use the audio recording functionality.
Report Specific Comment
This checkbox is only enabled once the data discovery has been saved:
- Select the checkbox to indicate that the conversation only applies to the member or cell in the current discovery. This type of conversation is known as a Report Specific Conversation.
- Clear the checkbox to indicate that the conversation applies to the member or cell globally, across the current data model. This type of conversation is known as a Global Conversation. A global conversation may be opened from other discoveries that contain the given member or cell, in Discover and Present.
When viewing the Conversations panel, you can choose to show global conversations (for the current data model) or conversations specific to the current discovery only.
Advanced Options
Access these options by clicking More (green arrow above):
Description
By default, this includes the details of the item that the conversation is attached to.
Expiration Date
You have the option to select an expiration date, after which you will no longer be able to access the conversation. If you do not want the conversation to expire, select None.
Email Participants
Enable this option to send your comment not only through the Bulletin Board (the default) but also using email:
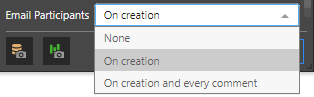
- None Choose this option if no email is to be sent to a participant.
- On Creation Choose this option to send an email alert to a participant you've added to the conversation. Participants will receive an email notifying them that they've been added to a new conversation, along with a link to the conversation.
- On Creation and Every Comment Choose this option to send an email alert to a participant you've added to the conversation on creation and also to send an email for every new comment added. The email will only be sent after 10 seconds if the user has not already accessed the comment in real time. Participants will receive an email notifying them that a new comment has been added, along with a link to the conversation.
Snapshots
Once you've started a conversation, you may want to continue interacting with the query. In the event that you save changes to the query (for example, if you dice the given cell by another hierarchy), then the given cell will no longer appear in the query. This means that participants will not see the given cell, nor will the conversation appear within the newly saved data discovery.
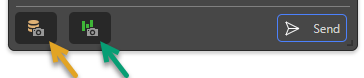
To solve this, you can use the snapshot buttons:
- Click Save Data Snapshot (orange arrow above) to store the results of the query at the time the conversation comment was submitted. When this option is selected, a discovery snapshot is also saved by default.
- Click Save Discovery Snapshot (green arrow) to store the query structure at the time the conversation comment was submitted. It is possible to select this option without also saving a data snapshot.
Snapshots are enabled by default. If you don't want to save a snapshot, deselect the buttons before you submit your comment.
Note: You may start a conversation based on an unsaved discovery. In this case, you should be sure to save snapshots.
Show Conversations
To show your Conversations in Discover Lite, click Workflows in the ribbon (green arrow below) to open the Workflows panel. The panel lists all conversations for the current visual.
Where Workflows are created at the Member or Cell-level:
- If the current visual is a grid, you can see existing Conversations as small triangular shapes in the top-left corner of a cell (blue arrows).
- If the current visualization is a chart, the Conversation icon appears in the tooltip (on hover) rather than in the visual.
Click on the relevant conversation to open it and make comments.

Conversations Feed
Open the Bulletin Board and then go to the Conversations Board, where you can access all your conversations.
Learn More About Conversations
To learn more about conversations, follow the links below to the relevant documentation in the Discover Pro section of the help: