Add an AI Data node to your Data Flow to use content from files that need to be processed by AI before they can be used as a data source in your workflow. You can drag and drop images, entire documents (such as PDFs, Word documents, PowerPoint presentations), or any other supported file types (such as audio files or videos) onto the Properties panel, and then supply a prompt that describes the data to extract from the file. The LLM uses the prompt to extract and augment the data from the file for use as source data.
Getting the LLM to derive source data from a file lets you bring external or ad hoc data into your workflow quickly and easily. Typically, you are expected to join or "mash up" data extracted in this way with data from other sources already in your workflow, enriching existing datasets.
Warning: When using LLMs, your assets are generated using public domain algorithms. This can produce erroneous and inconsistent or random results. Use at your own risk.
Using AI to Create a Data Source
Important: You can only make use of this functionality if your administrator has selected to Enable Generative AI in the AI Settings page of the Admin Console. Otherwise, the function is not available for use.
Before you begin
- You must have access to a Data Flow that you want to add your new source to.
- You must have access to an enabled LLM.
Configure your AI Data node
From the Data Flow page:
- Drag and drop the AI Data node from File Sources onto the Data Flow canvas (purple arrow below):
- Select the AI Data node on the canvas.
- Upload your local file or link to a shared file.
- Specify the prompt to send to the LLM along with the uploaded file. This prompt indicates what data the LLM needs to extract from the file. It may also include requests to augment the data from the file.
- In the Tables panel below the AI Data Source panel, click Add Table.
- Optional. You can preview the data in your table by selecting the Table node on the canvas. This opens the Preview panel at the bottom of the page.
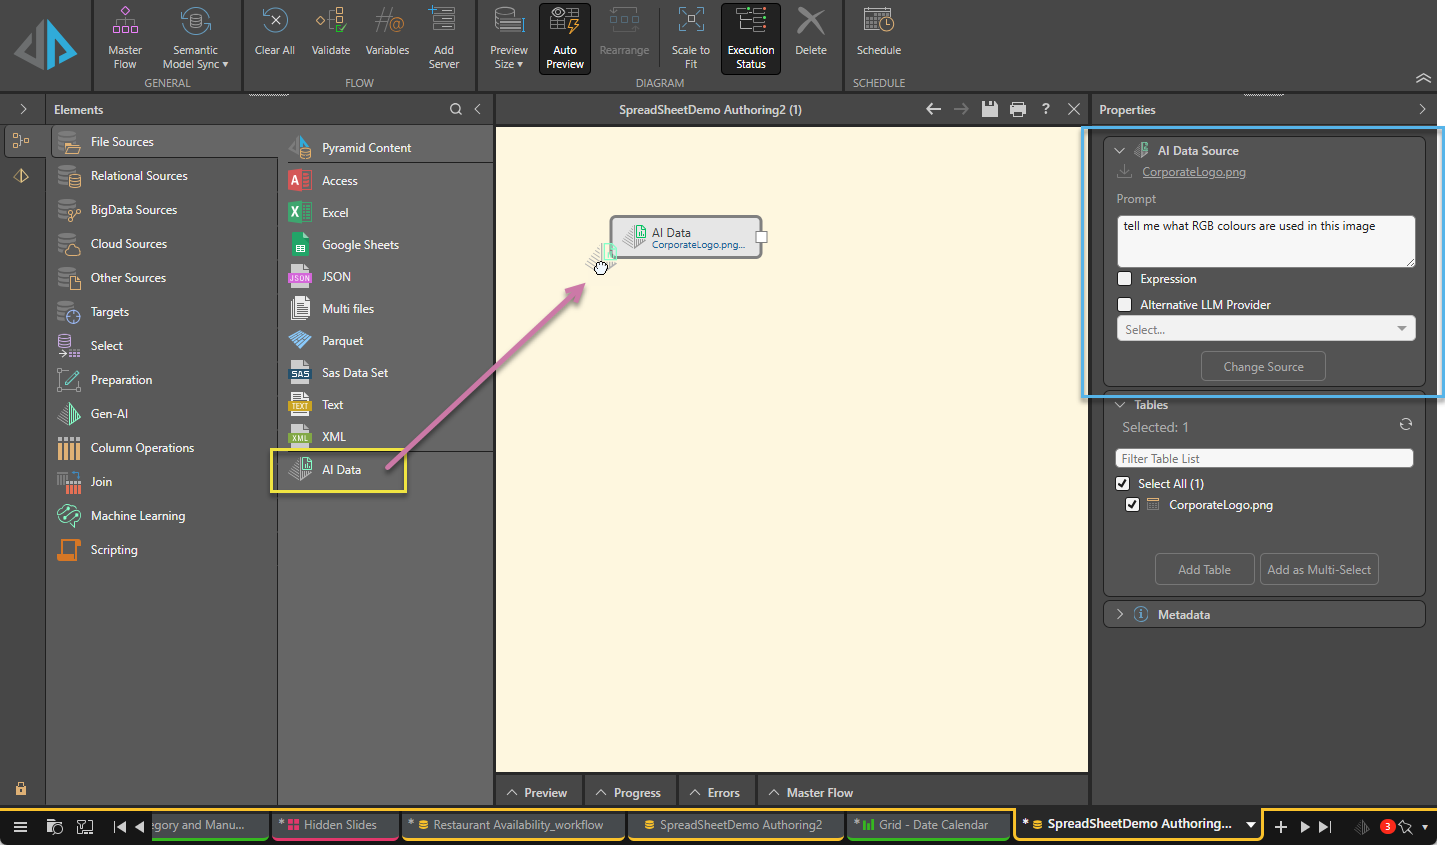
The Properties panel opens to the right. In the first instance, the AI Data Source panel shows the File Upload options.
The available mechanisms are Upload (drag and drop or select the file), Shared (browse to a shared network location), or URL (enter a direct link to the file). For more details, see below.
Once your file is uploaded, you will see it in the Properties panel as shown above (blue highlight).
You can type a prompt directly into the text window or select the Expression checkbox to build a PQL Expression in the PQL Editor. You can also select an alternative LLM to use for this action if you know that a different LLM type is better suited to the job.
An individual Table node is created and connected to the AI Data node. The data is generated using your prompt and written to your table.
Important: There is always a one-to-one mapping between the AI Data node and a single Table node. If you want to extract data from two different files, you need to create two AI Data nodes and Tables, and use a Join to connect the table nodes to each other.
![]() You can run the Preview panel using the Eye icon wherever you see it. For more information, see Datasource Preview.
You can run the Preview panel using the Eye icon wherever you see it. For more information, see Datasource Preview.
What next?
You should add more nodes to your Data Flow:
- Add other nodes to prepare and manipulate the data. This includes preparation (applying formulas to the data), transforming your data automatically using an LLM (Gen-AI) or Machine Learning, manipulating the content of your tables (performing column operations and joining tables), or using R or Python scripts.
- Add a Target - Set up the target destination to store the processed data.
Examples
The following examples show how you could use the AI Data node to pull data from simple files using an LLM prompt.
Important: The outcome of running this node will differ each time and may differ according to your LLM.
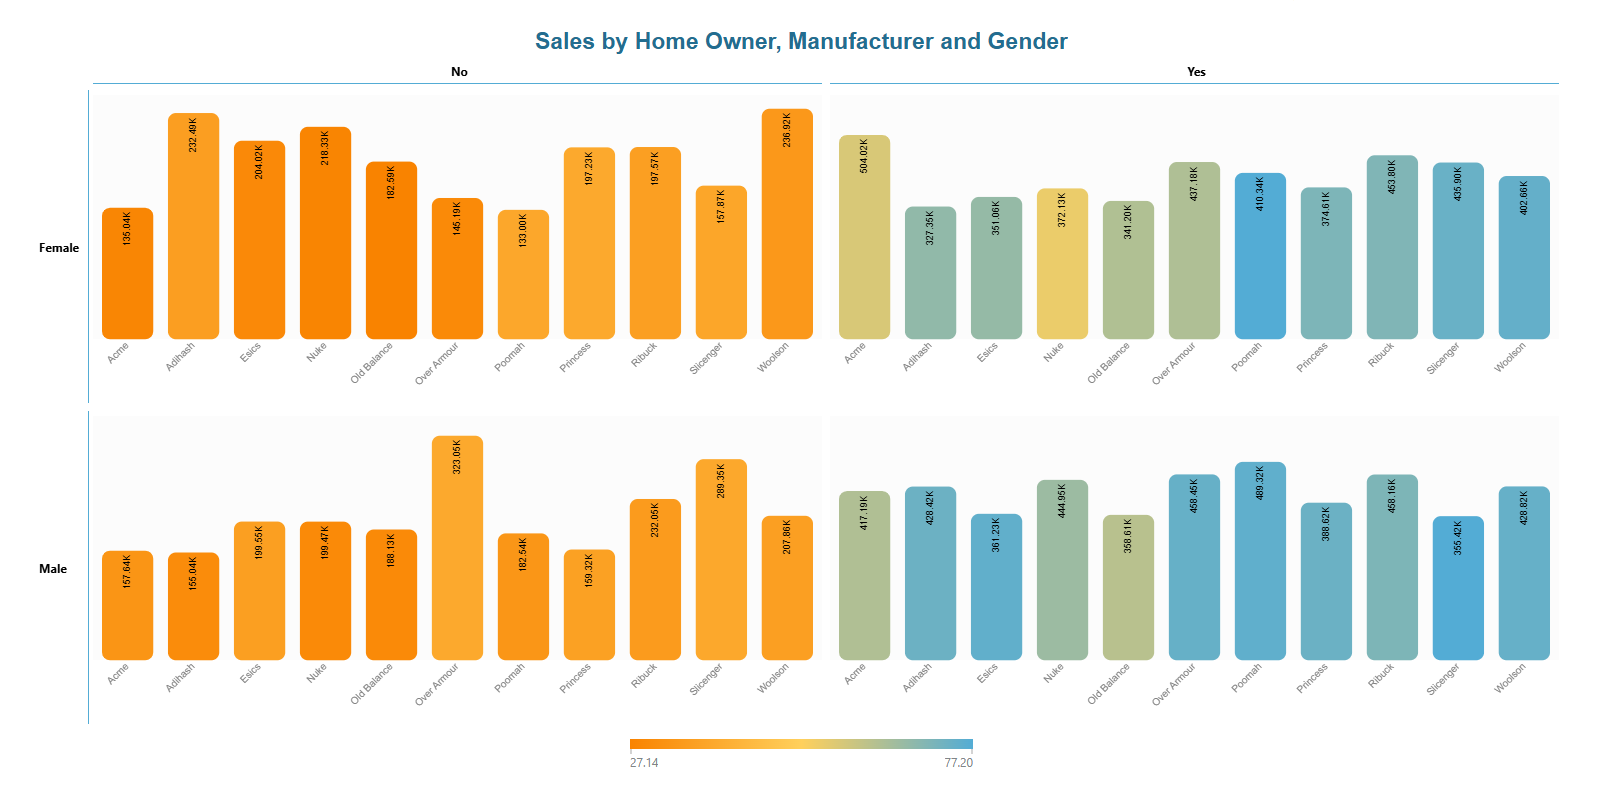
This example takes some Data that you have received in an unstructured format; for example, in a sales report that was created in another tool; and pulls that data into your model as described in the prompt.
The input is an image containing some sales data:
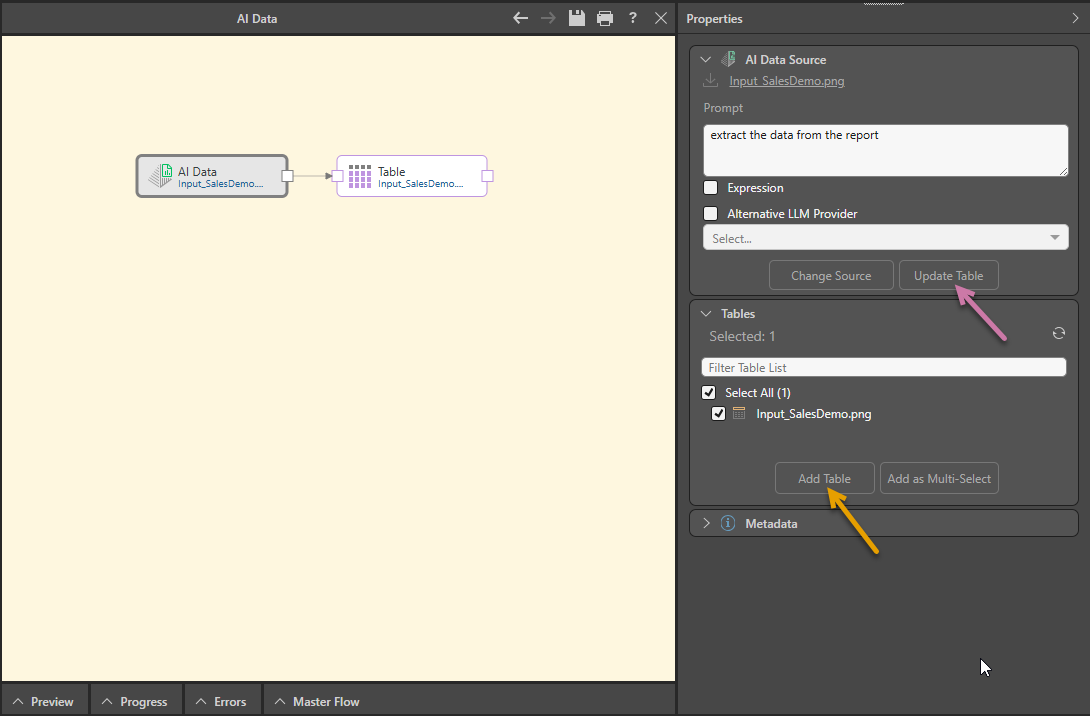
The input sales data file is uploaded to the AI Data node on the canvas and a prompt is configured. In this case, the prompt is very simple and may not have been necessary at all. Clicking the Add Table button (orange arrow below) creates the table and connects it to the AI Data node.
Tip: If you update your prompt after the table is created, you can use the Update Table button (purple arrow) to update your table to reflect your recent changes.
Selecting the Table node (blue arrow below) on the canvas opens the Preview panel at the bottom of the page:
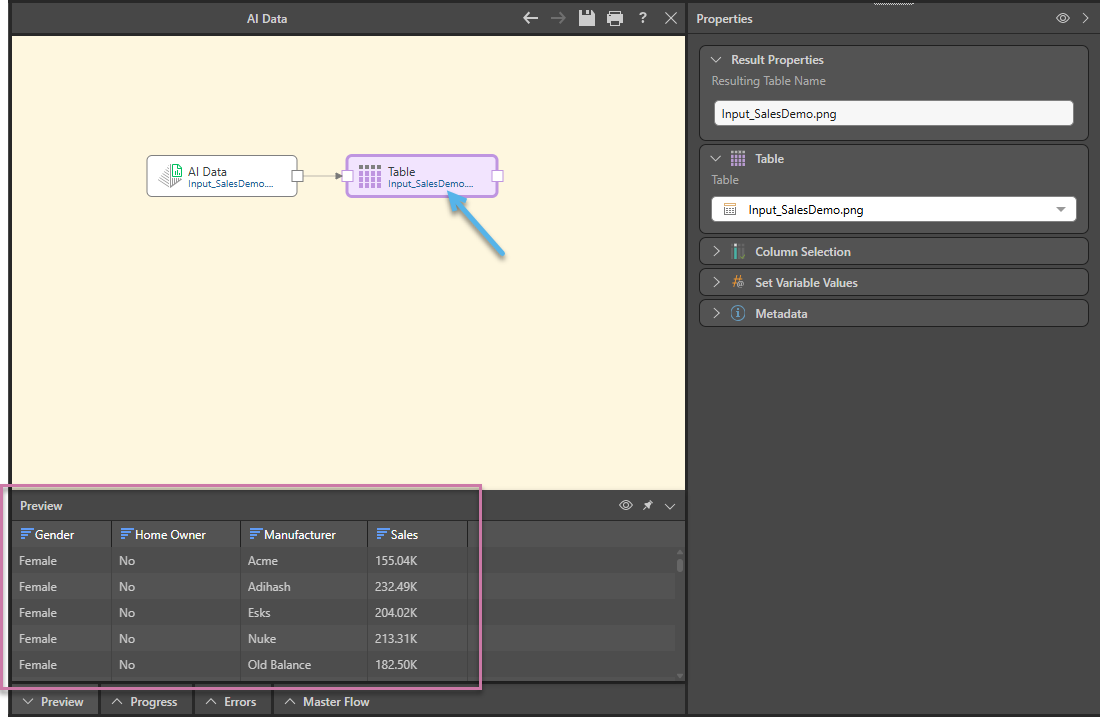
Notice how the columns in the Preview (purple highlight above) reflect the initial image:
- The initial image shows "Sales by Home Owner, Manufacturer, and Gender" and the columns match each of these items.
- The Sales values are represented by the columns in the column chart and in the Sales column.
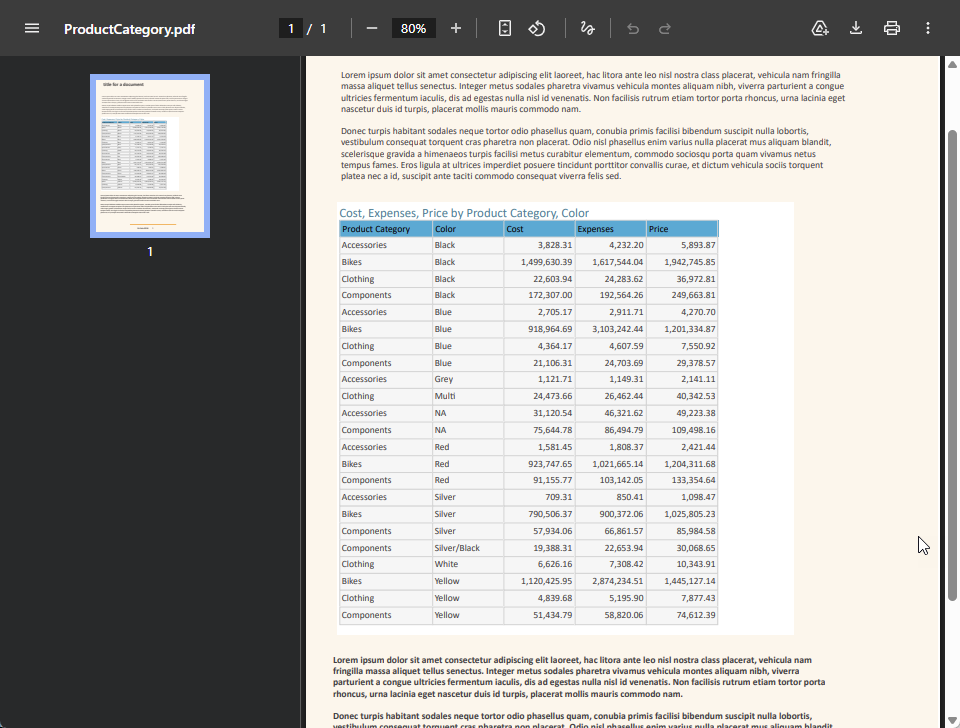
This example reads a table from a PDF file and pulls that data into your model as described in the prompt.
The input is a PDF containing a table of Values split by Product Categories:
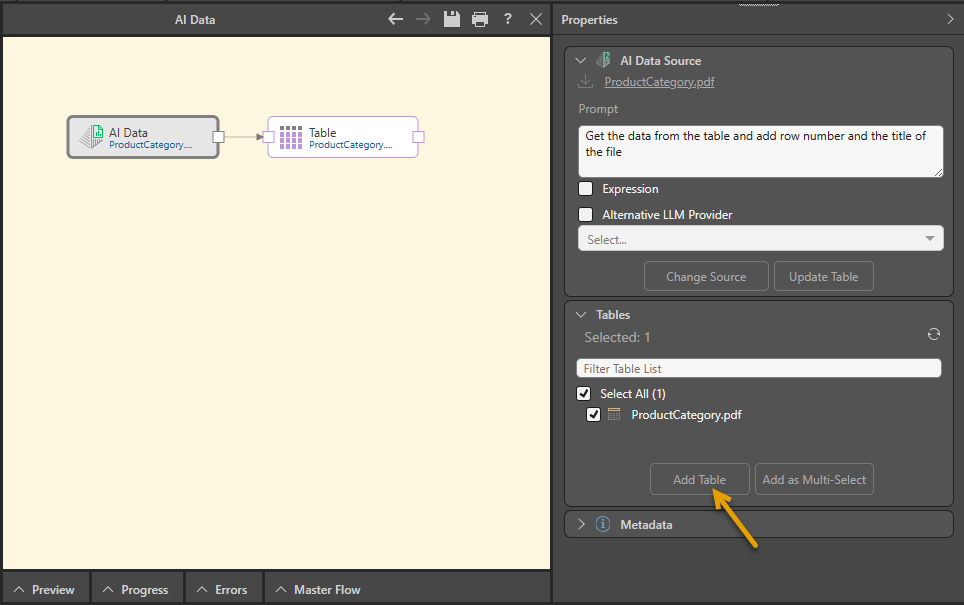
The input PDF is uploaded to the AI Data node on the canvas and a prompt is configured. Clicking the Add Table button (orange arrow below) creates the table and connects it to the AI Data node.
Selecting the Table node (blue arrow below) on the canvas opens the Preview panel at the bottom of the page:
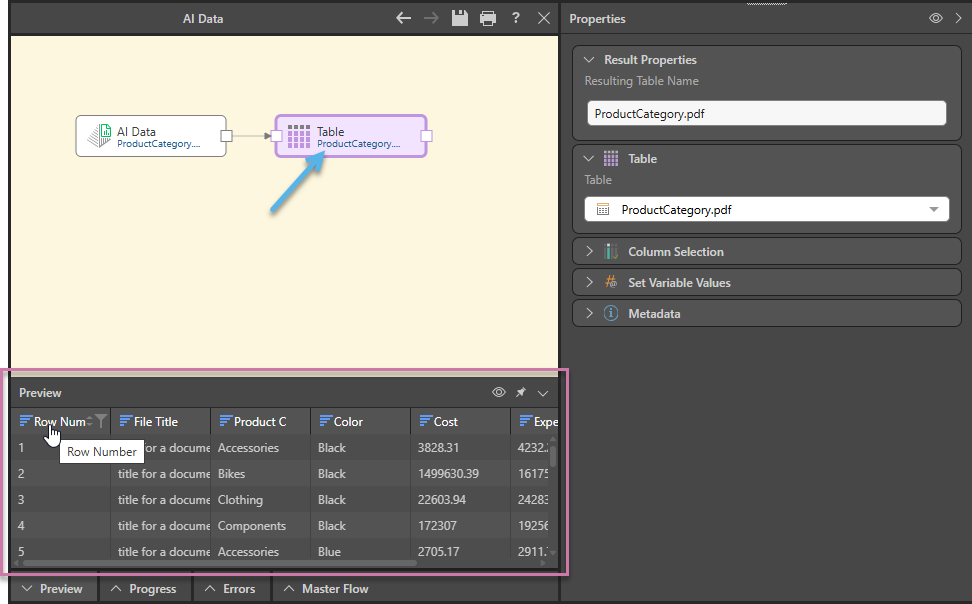
Notice how the columns in the Preview (purple highlight above) reflect the initial PDF:
- The Row Number column is not present in the PDF; it is generated in response to the prompt.
- The File Title column is also generated from content other than the table data.
- The other columns map to the column data in the input PDF's table.
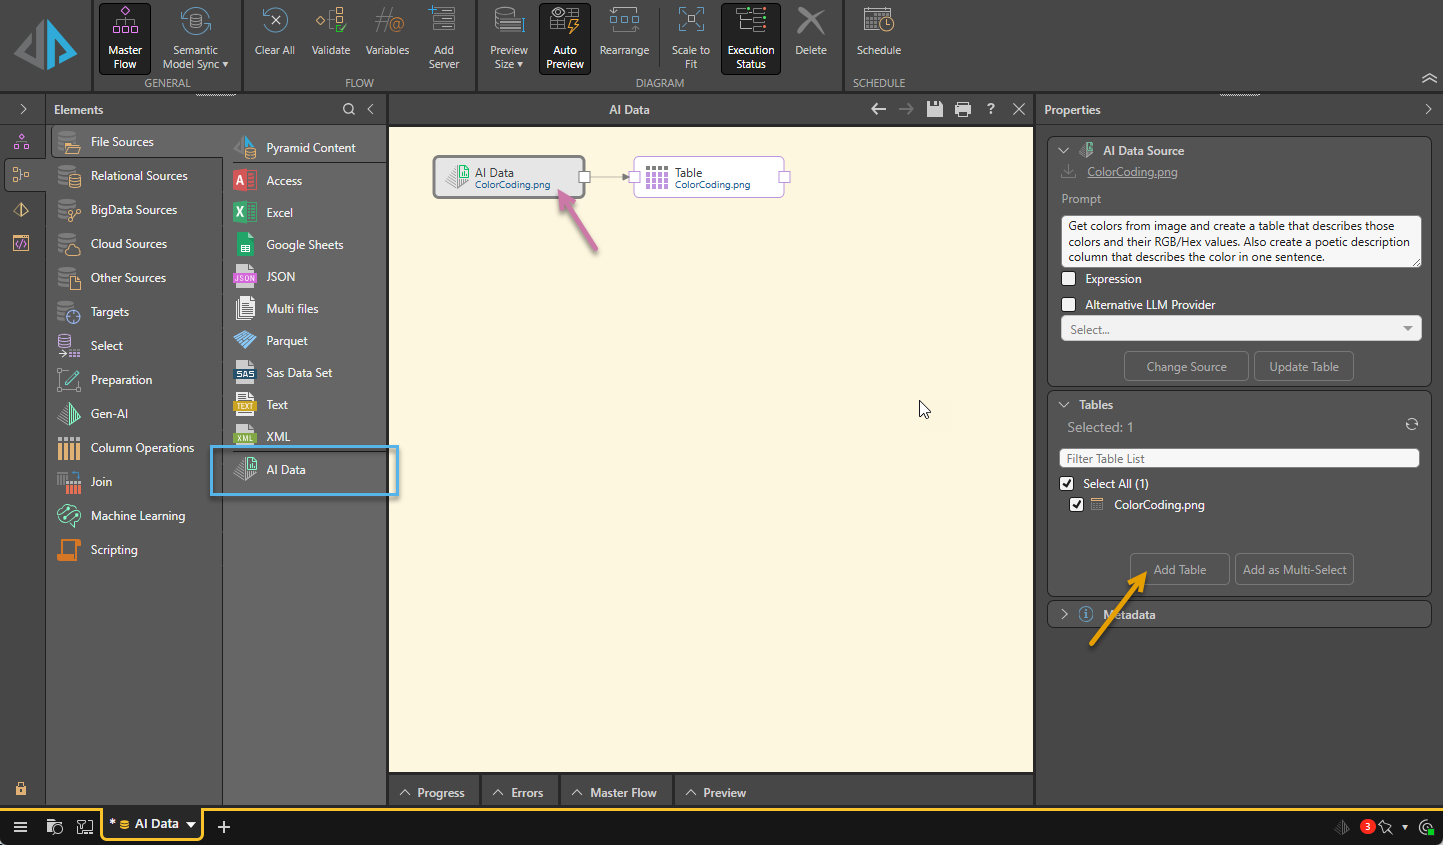
This example takes a simple image and uses the AI to analyze that image and produce some data about its colors, as described in the prompt.
The input ColorCoding.png image is uploaded to the AI Data node on the canvas and a prompt is configured. In this case, the prompt describes some information about the colors in the image that you want to extract for your model. Clicking the Add Table button (orange arrow below) creates the table and connects it to the AI Data node.
Selecting the Table node (blue arrow below) on the canvas opens the Preview panel at the bottom of the page:

Notice how the columns in the Preview (purple highlight above) reflect the initial prompt:
- There is a Color Name column.
- There are two columns reflecting each color value (RGB and Hex).
- There is also a long-text column containing a single sentence "poetic description" for each color.
AI Data Source Properties
Upload File
Where there is no uploaded file, the Upload File fields are shown in the Properties panel. Start by selecting the method you want to use to provide the file.
Uploaded File
To upload a file, either drag and drop the file from its folder location onto the Properties panel or click Upload File and then find and select the file from its folder location.
Shared File
Provide a pointer to a shared file, rather than uploading the file into Pyramid. When the model is processed, the file is read and included in the model. The file path must include the file name and its extension.
- Expression: If you want to build a dynamic file path to connect to your data source, you will need to select this checkbox and then use the PQL Editor to build your custom expression.
Note: The shared file must use a UNC file path format to the shared directory and file on the network. Pyramid's host machine must have access to the shared file location. If the Pyramid services are running on different machines, the Runtime and Task Servers must be given access to the shared file location.
URL
Provide a direct URL to a file hosted online or in a web-accessible location. The data will be downloaded from the URL when the model is processed. To connect to a URL, enter the URL and its required authentication.
- Expression: If you want to build a dynamic URL to connect to your data source, you will need to select the Expression checkbox and then use the PQL Editor to build your custom expression.
- Authentication:
- Custom HTTP Request Fields: Use this table to supply any custom headers you want to add to your HTTP request to send to the server.
Source File
Once your File is updated, you can see it in the AI Data Source panel (blue highlight above).
Tip: You can click the name of your file or its Download icon to download it.
Prompt
Type the prompt that you want to send to the LLM along with the uploaded file. This prompt indicates what the LLM needs to extract from the file and may include requests to augment that data.
You can either type a prompt directly into the text window or select the Expression checkbox and then build a PQL Expression that creates the prompt using the PQL Editor.
Alternative LLM Provider
Typically, your default LLM (as selected in the Admin Console's AI Settings page) is used for all generative activities in Pyramid. However, if you have a specialist task to perform, and you know that one of your other LLMs performs that type of action well, then you can use the LLM Provider options to select your preferred LLM just for this task.
To use an alternative LLM for the task represented by the selected node:
- Select the Alternative LLM Provider checkbox.
- Select the LLM Provider you want to use from the dropdown list.
Note: This list of LLM Providers only includes those LLM Providers in the Admin Console's LLM Manager page that are available to your tenant.
Options
- Change Source: Click to clear your source selection and restart the configuration.
- Update Table: Refresh the table data. If you update your prompt after the table is created, you should use this button to update your table to reflect your recent changes.