Use Report and Page Triggers to trigger rendering of a publication or pages within that publication given particular slicer values. This gives you more control over when the publication (and pages within it) will be rendered and distributed; rather than rendering all slicer values according to a schedule, only slicer values meeting a given condition will trigger the publication to render.
For more information about page and report triggers, watch:
Trigger types
Report Triggers
Report triggers are used to trigger a publication based on slicer values. When a publication containing slices is published, multiple publications are produced, each one being filtered by a different slice or slice combination. If there are multiple slicers, then every possible slice combination will be produced.
Using report triggers, you can determine that specific slices will only be used if a given trigger condition is met. The trigger condition is defined using PQL, and can even incorporate the LLM PQL function.
After defining the condition, proceed to the schedule panel and choose which slices should be used to filter the publication. Of the selected slices, only those for which the given condition is met will be used to filter the publication.
For example, say the publication contains one slicer comprised of three slices; UK, France, and Germany. The given condition was met for UK and France, but not for Germany. The report will be triggered, and two reports will be produced; one filtered by UK and the other filtered by France. If the condition was met for all three slicers, then three reports will be produced; one for each color. If the condition wasn't met for any of the slices, then the publication will not be triggered at all.
Page Triggers
Page triggers offer a way to apply the page repeater based on trigger conditions. The page repeater is used to filter visuals in the publication; it renders a given visual multiple times, filtering it by a different slice each time.
Using page triggers, you can create conditions to trigger this process. The result is that only slices for which the condition was met will be used to filter the visual.
Configuring Triggers
Configure Report Triggers
Before you begin
You must have a publication with at least one slicer.
Step 1: Edit the Report Triggers
From the Publish ribbon:
- Click Report Trigger Manager.
- Select the Use Trigger checkbox and choose the triggering option from the dropdown list:
- Trigger if True
- Trigger if False
- Click Query Condition (yellow arrow).
- Configure your condition.
- Select the checkbox between the trigger and the slicer (green arrow).
- Save the publication.
The Report Triggers panel opens at the bottom of the page:
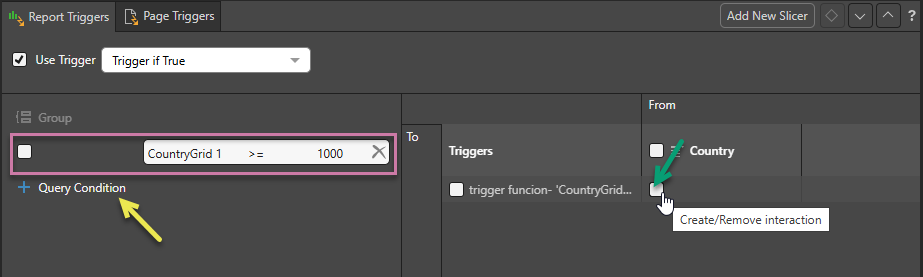
The Create Condition dialog opens. This is where you will define the condition which, when true or false, will prompt this trigger.
When you apply your condition, the Create Condition dialog closes and the new condition is added to the Report Triggers panel (purple box).
This creates an interaction between the trigger and its slicer.
Step 2: Create the Schedule
From the Publish ribbon:
- Click Schedule.
- From the Selections section (shown above), choose the slices that should be used when the report is triggered.
- Save the schedule when done.
The Schedule panel opens. You should create your schedule as normal, but with the slicers (selections) that you want to use when the condition is met and the report is triggered.
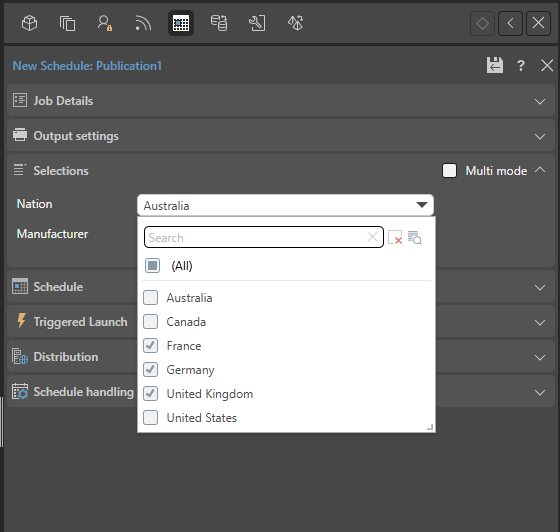
You may select either Basic or Multi mode as per your requirements. For more information about schedules, see Scheduled Publishing in Publish Pro.
The report will be triggered and rendered at the scheduled time or according to the triggered launch. A separate report will be rendered for each slice that the given conditions were met for.
Configure Page Triggers
Before you begin
You need to have added at least one slicer to the Page Repeater, and created an interaction between the page repeater and the visual. For more information, see Page Repeaters in Publish Pro.
Step 1: Edit the Page Triggers
From the Publish ribbon:
- Click Page Trigger Manager.
- From the first dropdown list, select the page that you want to apply your page trigger to (orange arrow).
- Select the Use Trigger checkbox and choose the triggering option from the dropdown list:
- Trigger if True
- Trigger if False
- Click Query Condition (yellow arrow).
- Configure your condition.
- Select the checkbox between the trigger and the slicer (green arrow).
- Save the publication.
The Page Triggers panel opens at the bottom of the page:
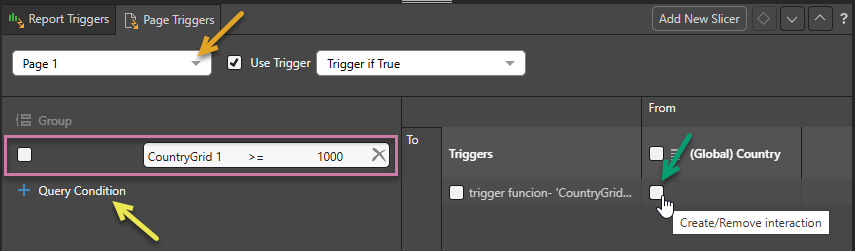
The Create Condition dialog opens. This is where you will define the condition which, when true or false, will prompt this trigger.
When you apply your condition, the Create Condition dialog closes and the new condition is added to the Page Triggers panel (purple box).
This creates an interaction between the trigger and its slicer.
Step 2: Create the Schedule
Create a new schedule as described previously.
The report will be triggered and rendered at the scheduled time, or according to the triggered launch; a separate page will be rendered for each slice that the given condition is met for.
Related information
PQL Functions
The Pyramid Query Language (PQL), pronounced "Prequel," is a language built into Pyramid's PYRANA engine to allow users to construct queries that can run against the many SQL data stacks that Pyramid can query natively. PQL includes a vast array of operations and functions that allow users to query data and build analytical logic.
The Create Query Condition dialog exposes Dynamic and Common functions. Dynamic functions are a set of specialized methods that are designed to act on a given query 's result set. Common functions are a set of methods that are found in most programmatic and mathematical function libraries. These functions are used to perform logic on basic data without concern for data structures, context, or even source.
To add a PQL function from the library to the script editor, simply double click on it. You will then need to inject values into the function.
Using the AI-Driven LLM PQL Function
Pyramid's Generative AI integration enables you to use AI to generate scripts and images, dynamic text and infographics, calculations and lists, schedules, colors, and more. It allows you to generate a range of content, including complex code, simply by providing a text prompt.
Tip: You can use the LLM PQL function (from the Common PQL functions) to generate dynamic text, adding the results to custom tooltips, text fields, or into your PQL formulas. While this function cannot tell you about your data set, it can add additional information and background to your presentation or publication.
Warning: When using LLMs, your assets are generated using public domain algorithms. This can produce erroneous and inconsistent or random results. Use at your own risk.