In Discover, data discoveries are saved and shared using the Save dialog. They can also be shared from the item's Actions Panel.
Content sharing is based on security roles, with predefined folders that allow role-based access. From the Save and Save As dialogs, you can save your data discovery to your own private domain, without sharing it, or you can share it with users who share your security roles, or you can specify the roles with which you want to share it.
Saving your discovery
To save your discovery, click Save above the canvas:

Alternatively, open the App Tab menu and click Save:
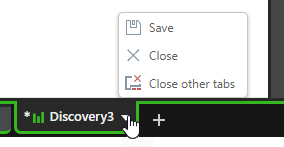
If the item was previously saved, you can save, save and close, save as, or save a new version:

Save or Save As Dialog
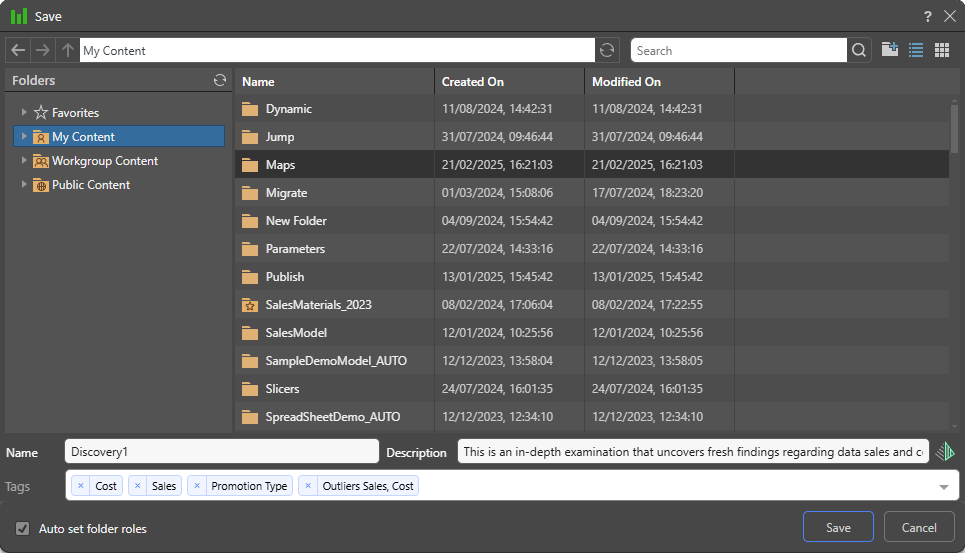
Both the Save and Save As dialogs feature the following:
Folders
The Folders panel contains a Favorites shortcut and the folder tree; navigate through the tree and select the folder that you want to save your discovery in.
Favorites
Use the Favorites option to access those folders that you have flagged as "Favorites." The Favorites option is not a folder; it is a shortcut that allows you to go to your most used or preferred folders without having to navigate the tree. When you access a Favorite folder in the Save dialog, you are saving the file to the location in the tree that you flagged as a favorite.
- Click here for more information about Favorites in the Content Manager
Folder Tree
The folder tree contains three main folders: My Content, Workgroup Content, and Public Content. Open the relevant folder to save your discovery.
My Content
My Content is your own personal content folder. Private content or content that you don't want to share with others should be saved here.
Note: Admins can view content saved to your My Content folder.
Workgroup Content
The content in your Workgroup Content folder is accessible to all other users who share your security roles. It is a shared domain designed to easily share content among users without the need to define content security. Content that you want to share with other users who share your security roles should be saved here.
Note: Users who have access to the content saved to the Workgroup folder have full write permissions to that content.
Public Content
Public Content is another shared workspace similar to Workgroups. However, role access per folder and content item can be specifically set, providing more granular control of who can do what with the items. Non-admin users can determine who within their role groups will be able to see or change this content. Administrators will be able to set this access among all roles in the system.
Folder Navigation
Options at the top of the dialog allow you to navigate through the folder tree:
- Using your Mouse (mouse clicks).
- Using the back, forward, and up arrows.
- Using the search field to find the required folder.
The current folder or item location will be reflected in the breadcrumb trail.
Tip: You can click New Folder to add a new folder within the current folder and click the Details View or the Tile View icon to show the folders and content items as a list or as tiles.
Metadata Options
Name
In the Name field, enter the name you want to give to your discovery.
Description
Add a description. This will be shown in the discovery's Metadata panel.
Tip: If there is a Gen-AI button alongside the Description field (as shown above), you can click it to use the LLM to generate a Description on the fly. This option is only available in Discover or when saving Calculations in Formulate, and is only enabled if your administrator has enabled Generative AI Features in the Admin Console.
Tags
Content tags are automatically applied when saving content. You can remove them, add more, or create new ones.
Auto set folder roles
By default, Pyramid automatically sets role access to items saved in the Public Content folder. If you want to set role access to your content item manually, clear the Auto set folder roles checkbox in the Save dialog (yellow box below):

Note: In the preceding image, the field is disabled. The checkbox only becomes available when a Public Content folder is selected as the save location.
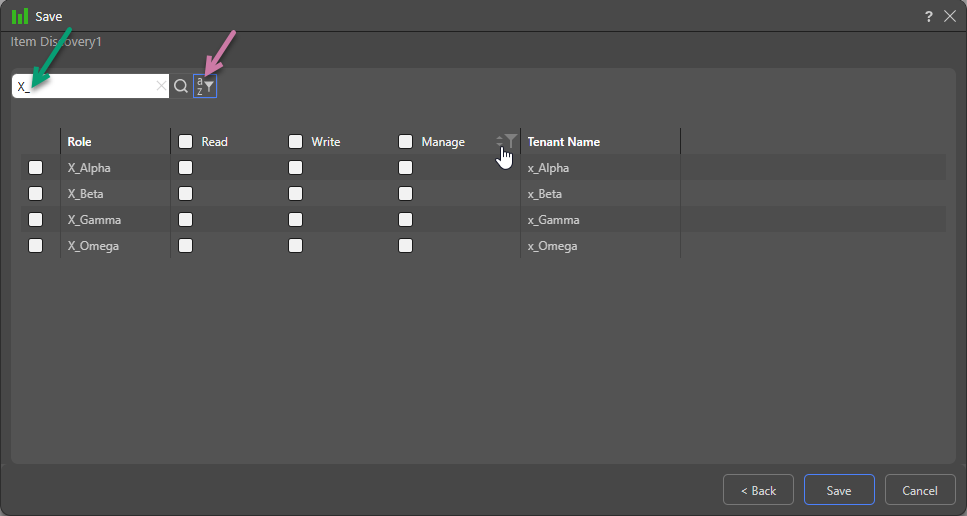
Once the checkbox is cleared (green highlight below), you can click Next (blue arrow) to assign your roles:

Assign Roles to Public Content
Decide which roles should have which kind of permissions to the content being saved:
- Read: Users belonging to the selected role can open the content but cannot edit it.
- Write: Users belonging to the selected role can open the content and they can edit it.
- Manage: Users belonging to the selected role can open and edit the content item, and they can manage permissions to the content item. Admins can assign any role to the Manage permission. Non-admins can only assign roles to which they belong to the Manage permission.
Tip: Given that there can be many roles, you can use Search (green arrow below) to find roles by name, use the name filter to filter them by their starting letter (purple arrow), or manage the list using the sort and filter options on the columns (shown on hover).
Related information
Overwrite Warning
When you click Save, if you see a message about an existing file, you may be in danger of overwriting a file that's already in that location. In this case, you can use the options to Replace the original, create another version of the file (OK), or Cancel to choose a different name or location.