Use the hierarchy designer to build and configure hierarchies to enable drill down later in Discover. There are a variety of different hierarchy types, which dictate how they should be built and used. Once a hierarchy is added into a model, it is usually available for users to navigate through their data when they are querying or visualizing data.
- Click here to learn more about hierarchy types.
Building a Hierarchy
The process of building hierarchies depends on whether it is a regular / drill path hierarchy or parent-child.
To build a hierarchy:
- From the Select Element panel, open the relevant table. Find the columns you want to include in the new hierarchy and drag them one at a time onto the Attribute Selections area of the New Hierarchy panel (purple arrow below).
- From the New Hierarchy panel, specify the hierarchy-level detail:
- Optionally, update the name of your hierarchy.
- Select the required hierarchy Type from Regular, Drill path, or Parent child (blue highlight below).
- From the Attribute Selections area of the New Hierarchy panel, you can change the order of the columns, define the columns as "ragged," show an All checkbox, or remove the columns.
- Define the hierarchy's metadata (yellow highlight). These details indicate where the hierarchy should be added to the Dimensions panel in Discover, what it should be called, and so on.
- Click Add (green arrow) to confirm your hierarchy selection.
Be sure to place the elements in the intended drill-down order, from the most general at the top of the hierarchy to the most granular at the bottom.
For more information, see Attribute Selections.
Note that Pyramid automatically creates the appropriate metadata for each hierarchy as you create it, but you can make changes as needed. For more information, see Hierarchy Metadata.
The hierarchy is added to the Existing hierarchies panel.
Add as many hierarchies as required.
Existing Hierarchies
The Existing Hierarchies panel has options relating to each hierarchy in the top-right (orange highlight). The options, from left to right, are:
- To create a duplicate of the hierarchy, click Duplicate.
- To edit the hierarchy, click Edit. This opens the hierarchy in the New Hierarchy column, where you can edit its details and then click either Apply to save your changes or Cancel to discard them.
- To delete the hierarchy, click the X.
Hierarchy panel

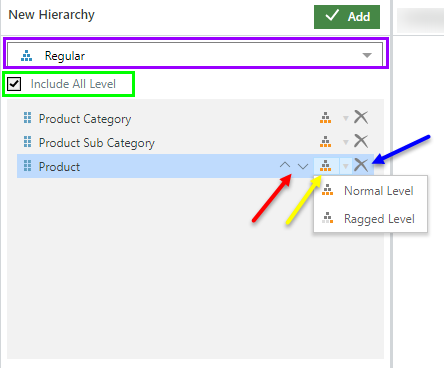
Attribute Selections
When adding a regular hierarchy, select the Include All Level checkbox to include an All level as the parent of the top column (green arrow below).
For each column added to the new hierarchy, you can:
- Change its position in the hierarchy by toggling the up and down arrows (purple arrow below).
- Set the column as either a normal or a ragged level (yellow arrow). For more information, see Ragged Hierarchies.
- Remove the column from the hierarchy by clicking its delete X icon (blue arrow).
- Click here to learn about hierarchy metadata.
Related information
Report-Specific Hierarchies
You can also create, edit, and delete Report-Specific Hierarchies from the Dimensions panel in Discover Pro. These multi-level regular hierarchies are for use in the currently open discovery only. They allow you to make use of multi-level and hierarchy-specific functionality without having to build a hierarchy in Model.
- Click here for information about Report Hierarchies