When your user selects values from a slicer or elements in a visual at runtime, other visuals are typically highlighted or cross-filtered in response to that selection. For example, selecting Australia from a countries slicer may filter a Sales visual so that it only shows Australian sales. This functionality is enabled using interactions; connections between the items on a slide that define which items affect which other items. By default, interactions are automatically and invisibly created as you add relevant content items to your canvas. You can also use the Interaction Picker to show existing interactions, and to delete or edit existing interactions, or add new interactions as needed.
As an example, you might want to remove interactions to simplify a slide in your presentation. If you have some metrics for male and female sales figures, say, you might always want to show the "headline" version of those figures for all sales globally. If that is the case, you can delete the interaction between any visuals or slicers and the metric on the slide. If you regret this change later, it is not a problem, you can add the interaction back in following the steps in this topic.
- Click here to learn more about the runtime effects of interactions
Interaction picker
Show interactions
From the Toolbox:
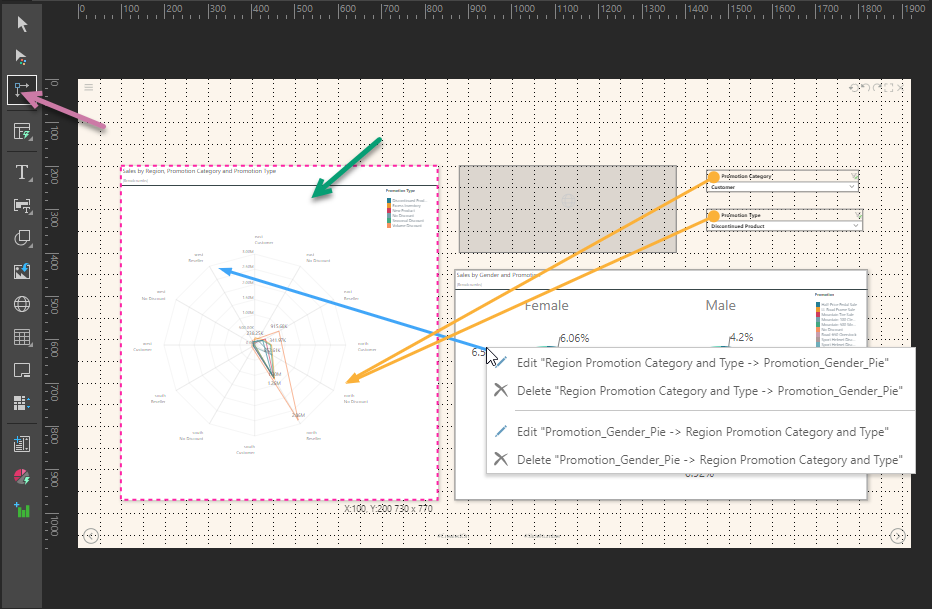
- Click Interaction Picker (purple arrow, above).
- Click any content item on the canvas to display its interactions (green arrow).
Your cursor transforms into an interaction selector.
The selected item is highlighted. The interactions both to and from the selected item are shown as single or double-headed arrows.
If you are happy with your interactions, you can click the Interaction Picker again to hide them.
About interaction arrows
When interactions are shown, they appear as arrows between content items on the slide. These arrows may be bidirectional (double-headed) for visuals, indicating that you can select either visual to filter the other; or they may by unidirectional (single-headed) typically for slicers, cascading slicers, or dynamic assets, with one of the content items filtering the other but no reverse interaction.
Interaction colors indicate the type of content interaction they represent:
- Cross-visual interactions and cross-slicer highlighting interactions are blue.
- Slicer interactions, Target interactions, and interactions with Dynamic Assets (such as dynamic text) are orange.
- Cross-slicer data interactions are green.
Alternative process
You can, alternatively, show interactions in Present Pro by selecting the Show Interactions option in either of the overhead Presentation or Slide ribbons. Unlike the Interaction Picker, this option will show all of the interactions on this slide.
- Click here for more information about the Show interactions tool
Edit interactions
This action opens the Interactions Manager, where you can add, edit, or remove interactions.
With interactions showing on the canvas:
- Right-click the interaction that you want to edit.
- Do one of the following:
- If your interaction only flows in one direction (for example, it connects a slicer to a visual), select Edit Interaction.
- If your interaction flows in both directions (for example, it is a cross-visual interaction that links two visuals), select Edit <Item 1> -> <Item 2> or Edit <Item 2> -> <Item 1> as needed.
The interaction context menu opens.
The Interaction Manager opens at the bottom of the page. The interaction that you have selected on the canvas is selected in the grid. Note: You can use the Interaction Manager to add, delete, and edit interactions as required.
- Click here for more information about the Interaction Manager
Delete interactions
When you delete an interaction, selecting the source content item at runtime does not cause the target content item to be highlighted or filtered. You may choose to do this to limit unnecessary interactivity, making your slide simpler for your viewer.
With interactions showing on the canvas:
- Right-click the interaction that you want to delete.
- Do one of the following:
- If your interaction only flows in one direction (for example, it connects a slicer to a visual), select Delete Interaction.
- If your interaction flows in both directions (for example, it is a cross-visual interaction that links two visuals), select Delete <Item 1> -> <Item 2> or Delete <Item 2> -> <Item 1> as needed.
The interaction or interactions are removed from the canvas.
- Save your changes.
The interaction context menu opens.
Add interactions
When you add an interaction to your slide, you are indicating that you want runtime viewers to be able to select a slicer or visual and for that to cause another visual to be highlighted or filtered in response.
From the Toolbox:
- Click Interaction Picker (purple arrow, above).
- Click the slicer or visual that you want to act as the source of your interaction and drag your cursor to the target. A green connector appears between the two objects; when you drop the connector the interaction is created.
Your cursor transforms into an interaction selector.