If you want to create interactions between items (visuals, slicers, dynamic content, or custom formulations) from different models, you need to either ensure that the two models have the same structure, naming, and so on or create a mapping so Pyramid knows that field X in model A is the same as field Y in model B. That is, the hierarchies and member elements that are used as a filter must exist in the data model of the target visualization for interactions between different models to work. Otherwise, when the visual is used as a filter at runtime, you will receive an error message.
The following videos demonstrate the creation of cross-model mappings:
When might you need Model Mapping?
If the corresponding hierarchies and member elements are identically labeled in both data models, then you can create an interaction as usual. However, if the corresponding hierarchies or member elements are not identically labeled in each data model, then it is necessary to create a model mapping.
The Model Mapping wizard maps the corresponding hierarchies or member elements between the two data models, allowing the user to create functioning interactions between them.
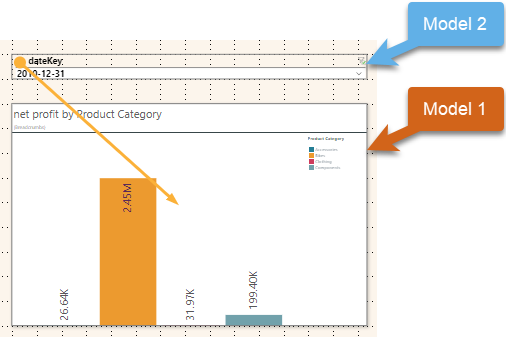
For example, Model 1 contains a date hierarchy called Date, while Model 2's date hierarchy is called dateKey. If you add a Product Sales visual to your presentation from Model 1, and a dateKey slicer from model 2, you will receive an error when you launch the presentation at runtime. To enable the interaction from the dateKey slicer to the Product Sales chart and avoid the error, you need to configure a new model mapping that tells Pyramid that the two differently labeled hierarchies are, in fact, the same.
Create a Model Mapping

From the Presentation ribbon:
- Click Model Mapping (yellow arrow, above).
- Click the blue plus to create a new model mapping.
- From the Settings panel, specify a name for mapping (Title) and select the two models to be mapped. Note: The selection order is not important.
- If there are hierarchies that you do not need to map, select Ignore Unmapped Hierarchies.
- For each hierarchy that you want to create a mapping for:
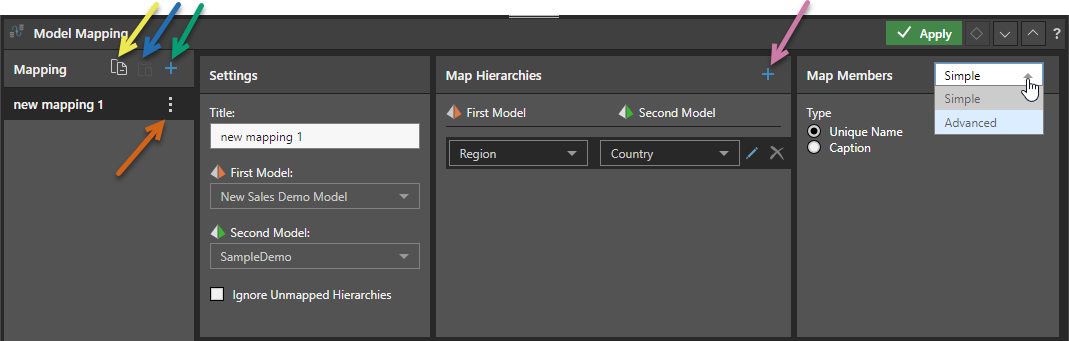
- Click the blue plus in the Map Hierarchies header (purple arrow below).
- For each of the mappings that you want to create:
- Select a hierarchy from the dropdown list under First Model.
- Select the hierarchy that the preceding hierarchy should map to under Second Model.
- From the Map Members panel, select the mapping type:
- Simple: If the hierarchies are labeled differently, but the member elements are labeled identically, choose Simple and select the hierarchy name type (either Unique Name or Caption).
You would do this, for example, if the list of countries in Model 1 is in a hierarchy called Countries and the list of countries in Model 2 is called Locations, but the members are an identical list of English language country names. - Advanced: If the member elements are not identically labeled, choose Advanced and configure the dynamic functions required to map the differently labeled hierarchy members.
You would do this, for example, if the list of countries in model 1 are English language country names but in Model 2 the same countries are abbreviations or ISO country codes.
- Simple: If the hierarchies are labeled differently, but the member elements are labeled identically, choose Simple and select the hierarchy name type (either Unique Name or Caption).
- Once you have defined your mappings, click Apply.
- Test your mapping.
A new mapping row is created.
Your changes are saved.
It is always recommended that you perform some tests by creating some cross-model interactions and checking that your new mappings behave as expected.
The Model Mapping wizard opens.
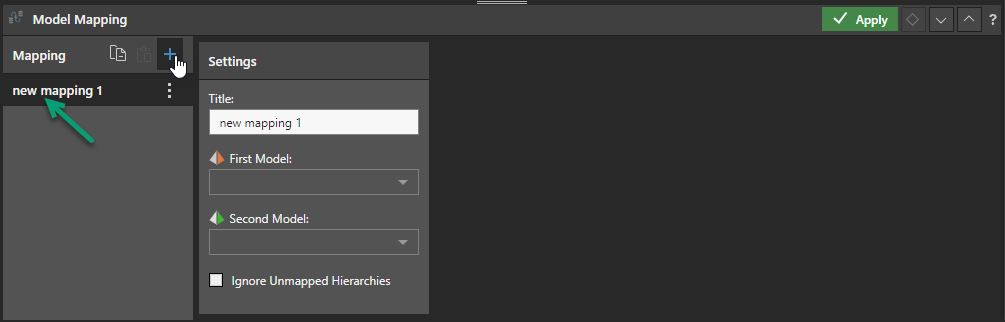
A new mapping is created with a default name (green arrow, above).
The Map Hierarchies panel opens.
You should select this option where there are similar hierarchies that don't have cross-model interactions, so don't need to be mapped.
- Click here for a detailed example of a Simple mapping
- Click here for a detailed example of an Advanced mapping
Model Mapping wizard
Mapping
Mapping panel buttons
If you want to replicate the same model mapping across multiple presentations or publications, use the copy and paste functions above the Mapping list:
- Copy All: (yellow arrow above) Copy all model mappings to your clipboard. You can use this functionality to copy all mappings to another presentation or publication.
- Paste: (blue arrow) Paste any model mappings from your clipboard into the Model Mapping panel of another presentation or publication. This option is only enabled if you have copied one or all mappings to clipboard.
To create a new mapping, click the Plus (+) icon (green arrow).
Mapping context menu
Open the context menu of a specified model mapping list (brown arrow) to:
- Copy: Copy the selected mapping to clipboard, and then paste it into the Model Mapping panel of another presentation or publication.
- Delete: Delete the mapping.
Settings
This panel is created when you create a new mapping. The panel includes:
- Title: The title for the mapping.
- First Model and Second Model: The models that are mapped in any order.
- Ignore Unmapped Hierarchies: Select this checkbox if your models contain similar, but not identical, hierarchies that do not require mapping. For example, both models contain state listings with different naming conventions, but you do not need to map them as there is no interaction. Selecting this option stops you from receiving an error when applying interactions from the mapped models.
Map Hierarchies
Select the hierarchies that you want to create a mapping between:
- To create a new mapping, click the Plus (+) icon (purple arrow).
- Select the hierarchies that you want to map from the First Model and Second Model dropdown lists.
Note: You can add multiple hierarchy mappings here. Each hierarchy mapping should contain a hierarchy from each of the given models.
Map Members
Simple
If Simple is selected, select the identifiers to use for the mapping:
- Unique name: Use the PQL member element path within the data model in the form [Dimension].[Hierarchy].[Member]. The unique name of the Bikes member element, for example, is
[products].[Product Category].[Bikes]. - Caption: Use the caption (the member element's label). The caption for the Bikes member element is "Bikes."
Advanced
If Advanced is selected, the Map Members panel is updated to include the Advanced model mapping tools. The two panels show the two formulas that should be used to enable interactions between the two models:
- Use the First Model -> Second Model panel to write the formula that enables interactions from the first model to the second model.
- Use the Second Model -> First Model: panel to write the formula that enables interactions from the second model to the first model.
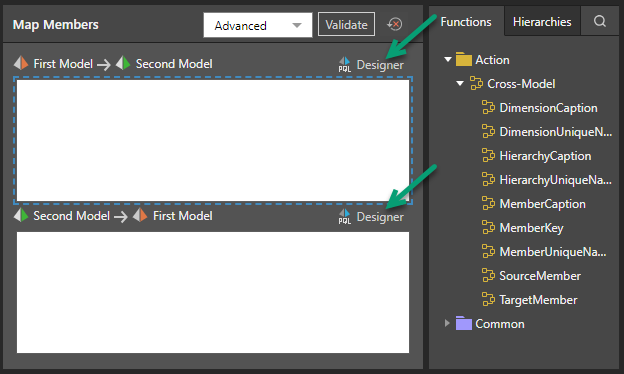
- Click Designer to open the Map Members Designer for the relevant formula:
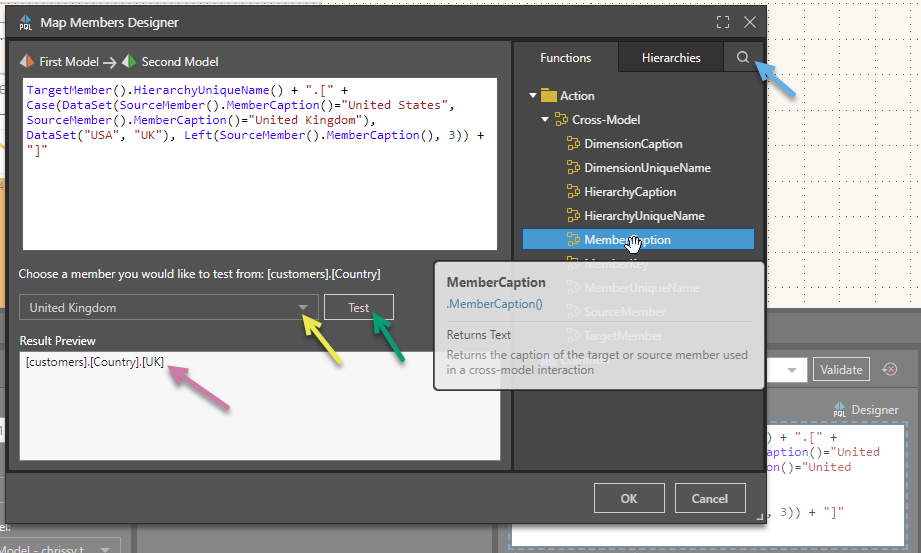
- Use the Functions and Hierarchies tabs to view and select functions and hierarchies to include in your formula. Note: You can use the search option (blue arrow) to search through these trees, hover your cursor over the function names to see more information, and double-click nodes to copy them into the editor.
- Once your formula is complete, select a member from the dropdown list (yellow arrow) and click Test (green arrow) to check that it returns the expected member in the Result Preview panel (purple arrow).
- Click OK to save your formula and close the designer.
Function libraries
Example: Mapping Types
There are two types of model mapping: simple and advanced. The type that you need to configure depends on the differences between the hierarchies being mapped.
Simple Model Mapping
If the hierarchies are labeled differently, but the member elements are labeled identically, then you should create a Simple model mapping. You would do this, for example, if the list of countries in Model 1 is in a hierarchy called Countries and the list of countries in Model 2 is called Locations, but the members are an identical list of English language country names.
Example: Different hierarchy names, identical member names
The following table shows an example where member names are shared, but not hierarchy names:
|
|
Model 1 |
Model 2 |
|---|---|---|
|
Hierarchy Name: |
Country |
Location |
|
Member Names:
|
Australia |
Australia |
|
United States |
United States |
|
|
Canada |
Canada |
|
|
France |
France |
|
|
Germany |
Germany |
In this example, there are two visuals: a Sales by Country grid (from Model 1), and a Net Profit by Product Categories chart (from Model 2). In Model 1, the hierarchy of countries is called Country, while in Model 2 it's called Location, as in the grid above. To add an interaction from the Country grid to the Products chart, it's necessary to configure a model mapping.
- Create a model mapping as described above.
- In the Settings panel, select Model 1 and Model 2.
- In the Map Hierarchies panel, select to map Country from Model 1 to Location in Model 2.
- In the Map Members panel, specify that this is a Simple mapping. The hierarchies have different names, but the members within those hierarchies are the same. If the members within the hierarchies are labeled differently, you should choose Advanced instead.
- Click Apply.
Advanced Model Mapping
Advanced Mapping is required to map the member elements within two hierarchies, if the member elements are not identically labeled. In this case, the Advanced option must be selected in order to configure the dynamic functions required to map the differently labeled hierarchy members.
Example: Member elements not identically named
The following table shows an example where hierarchy names are shared, but not member names:
|
|
Model 1 |
Model 2 |
|---|---|---|
|
Hierarchy Name: |
Country |
Country |
|
Member Names:
|
Australia |
AUS |
|
United States |
USA |
|
|
Canada |
CAN |
|
|
United Kingdom |
UK |
|
|
France |
FRA |
|
|
Germany |
GER |
This example is based on the grid above, mapping two country hierarchies. The country hierarchy in Model 1 lists countries according to their full name, while in Model 2 they are abbreviated. Because the unique names within the hierarchies are different, an advanced model mapping is required. This allows you to configure a formula to determine which unique name in Model 1 corresponds to which unique name in Model 2.
- Create a model mapping as described above.
- In the Settings panel, select Model 1 and Model 2.
- In the Map Hierarchies panel, select to map Country from Model 1 to Country in Model 2.
- In the Map Members panel, specify that this is an Advanced mapping.
- In the First Model -> Second Model panel, write a formula that creates a mapping from the first model (which contains full country names) to the second model (which contains abbreviations). For example:
- Uses the TargetMember and HierarchyUniqueName functions.
- Builds a Case function that determines that:
- If the MemberCaption of the given SourceMember is "United States," the function should return "USA."
- If the given MemberCaption is "United Kingdom," the function should return "UK."
- Uses the Left function to determine that, given any other MemberCaption, the function should return a substring of the first three characters in the string (for example, CAN, FRA, and so on).
- In the Second Model -> First Model panel, write a formula that creates the reverse mapping (from the abbreviations model to the full name model). For example:
- Click Apply.
TargetMember().HierarchyUniqueName() + ".[" + Case(DataSet(SourceMember().MemberCaption()="United States", SourceMember().MemberCaption()="United Kingdom"), DataSet("USA", "UK"), Left(SourceMember().MemberCaption(), 3)) + "]"
In this example, the abbreviations are the first three characters of the full name, apart from for the USA and UK. The formula:
Tip: If you open the Map Members Designer dialog, you can select one or more members and Test that the correct value is returned in the Preview.
TargetMember().HierarchyUniqueName() + ".[" + Case(DataSet(SourceMember().MemberCaption()="USA", SourceMember().MemberCaption()="UK", SourceMember().MemberCaption()="Aus", SourceMember().MemberCaption()="GER", SourceMember().MemberCaption()="CAN", SourceMember().MemberCaption()="FRA"), DataSet("United States", "United Kingdom", "Australia", "Germany", "Canada", "France"), "") + "]"
In this example, the Case function is used to specify which caption should be returned for each of the possible member captions.