Slicer Actions, like other Actions in Present (or Discover) allow presentation designers to configure a guided process for end users who will trigger an effect in the presentation based on their interactive selections when they use the presentation at runtime. Unlike other Actions, Slicer Actions are currently only used for triggering tab changes on the Mini-Tab layout container; that is, opening different tabs in the mini-tab container in response to different selections from a slicer at runtime.
When you configure your Slicer Actions , you can either create Simple actions, where you select your mini-tabs container and indicate which tabs to open by name or tab number, or you can create Advanced actions, where you do the same but can use PQL to create conditions or otherwise mediate your interaction with the slicer,
Note: This feature is not available in the Community Edition.
Conditional Display
If the tabs in a mini-tab are hidden, then the blend of slicer actions with the mini-tab creates a programmatic way to hide and show content - effectively delivering conditional display functionality. This effect works in both Present as well as Publish (delivering conditional display of content when the publication is rendered).
Configure Slicer Actions
Before you begin
In order to create an Action that changes which tab is shown in a mini-tab container, your presentation needs to include a Slicer and a Mini-Tabs container.
Tip: In Present, you can also target an interaction to a slicer and use the parameterization to load the presentation with a given slicer selection applied and trigger any Slicer Actions attached to that slice.
- Click here to learn about adding Slicers in Present
Target Interactions to Slicers
- Right-click a Slicer and select Actions from the context menu.
- From the Action List, click Plus (green arrow above) to add an action.
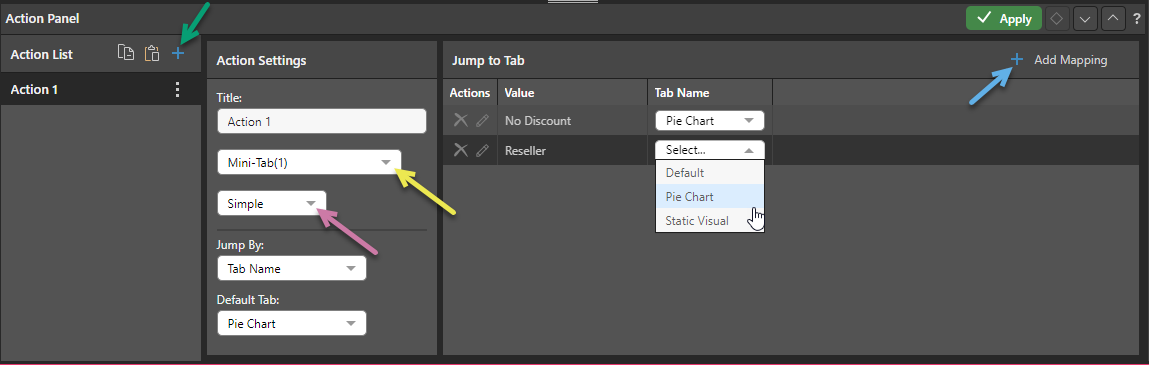
- If needed, choose the name of the Mini-Tab whose tabs you want to dynamically change in response to your slicer selections (yellow arrow).
- If you want to jump to tabs in your mini-tab container when specific values are selected from the slicer:
- Select Simple (purple arrow).
- Create mappings between each slicer value and a tab by clicking Add Mapping and selecting a Tab and Value (see below for more information). Note: You also need to define a Default Tab to show what to do when no mapping is defined.
- If you want to use PQL Functions to write an expression in the Jump to Tab window when particular values are selected from the slicer:
- Select Advanced (purple arrow).
- Create a PQL expression that maps the values from your slicers to your tabs (see below for more information). Note: You should use this advanced feature if you want to use the PQL functions to create a switching or conditional effect, or otherwise apply additional logic to your action.
- Click Validate to test your expression.
- Click Apply.
The Actions panel opens.
An action is created with the name Action # (where # is the next number available) and the Action Settings panel opens.
Tip: The name of the Mini-Tab container is typically Mini-Tab(#). If you want to change it; for example, to give it a meaningful name and thereby make sure you select the correct container; right-click the container on your canvas and select Edit Tabs from the context menu.
Once your changes are saved, you should run your presentation (F2) and check that your selections have the desired effect on your mini-tabs container.
Action Panel
Action List
The Action List shows all of the actions associated with this slicer:
You can:
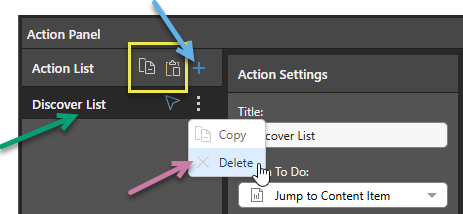
- Add actions to the Action List using the Plus icon (blue arrow above). Once clicked, you need to create the details of your new Action as described below.
- Delete an action from the list by opening its context menu and clicking Delete (purple arrow).
- Edit an existing action by selecting the name of the action in the list and updating its details in the panel.
Copy Actions between Items
You can also replicate the same action or actions across multiple discoveries and publications using the copy and paste functions (yellow highlight above). Copy one or all actions to your clipboard, then paste the actions to the Action List of your target discovery or publication.
Action Settings
From the Action Settings (green highlight above) name the action, select the relevant mini-tab container, choose Simple or Advanced, and select the "Jump to" settings.
Simple Actions
Define simple actions if you want to jump to tabs in your mini-tab container when specific values are selected from the slicer.
- Choose Simple from the Action Settings panel.
Jump to settings
In the lower part of the Action Settings panel, define the rules for the action:
- Jump By: Choose Tab name or Tab number. Pyramid recommends using Tab names, since the sequence of your tabs is likely to change over time.
- Default Tab: The tab that should be displayed if no other tab is selected.
Click Add Mapping (blue highlight above) to select a value in the slicer and the tabs in the mini-tab container. Select the tab that should be displayed for each slicer value. When that slice is selected, the corresponding tab will be displayed. Repeat for each mapping (value to tab) that you want to create.
Click the green Apply button to save the action and apply it to the slicer.
Advanced Actions
Define advanced actions if you want to use PQL Functions to write an expression in the Jump to Tab window when particular values are selected from the slicer. You should use this advanced feature if you want to use the PQL functions to create a switching or conditional effect, or otherwise apply additional logic to your action.
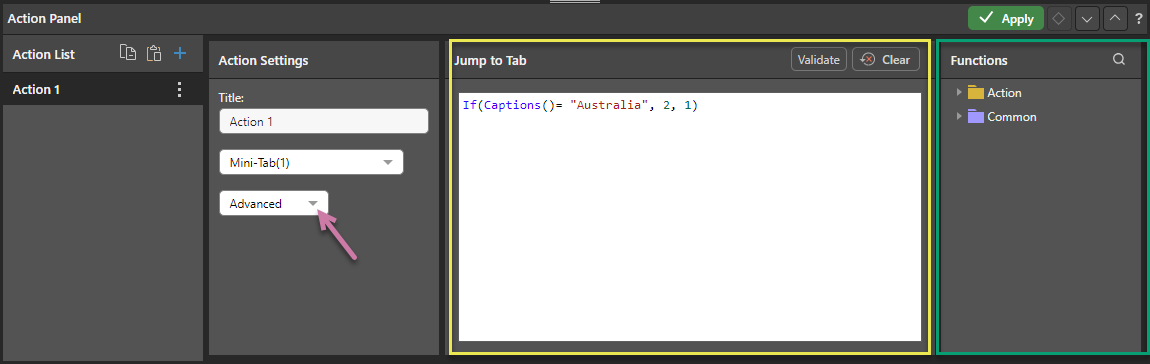
- Choose Advanced from the Action Settings panel (purple arrow below).
Jump to Tab
Use the PQL Functions library (green highlight below) to write an expression in the Jump to Tab window (yellow highlight). You can use the LLM function as part of your PQL statement.
Click Validate to test your expression, then click the green Apply button to apply save the action and apply it to the slicer.
Tip: You can see a description of each available function, including syntax, by hovering your cursor over the item in the Functions tree. You can also double-click the function in the tree to copy it into the Jump to Tab window.
In the example above, the Captions function is placed inside an If statement. When Australia selected from the slicer, Tab 2 is displayed. When any other slicer element is selected, the default tab (Tab 1) is displayed:
If(Captions()= "Australia", 2, 1)
When launched at runtime, the slicer drives the conditional effect:
In this example, the Captions function is inserted into a Switch statement. When Australia is selected from the slicer, Tab 2 is displayed, and when United Kingdom is selected, Tab 3 is displayed. When any other item is selected from the slicer, the default tab (Tab 1) is displayed.
Switch(Captions(), "Australia", "Tab 2", "United Kingdom", "Tab 3", "Tab 1")
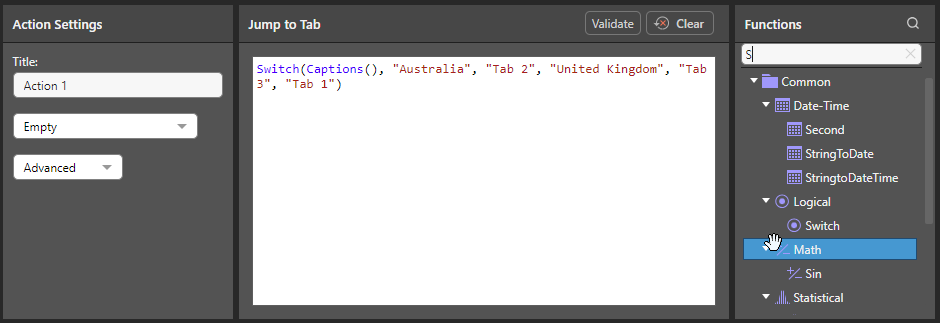
Note: This example uses the tab names. These names are strings, so they need to be contained within "double quotes."
When launched at runtime, the slicer drives the switching effect: