Walkthrough: File Mapping
The following are examples for creating a dynamic distribution list based on file mapping. Click here to learn about data mapping.
Example 1. Single Slicer
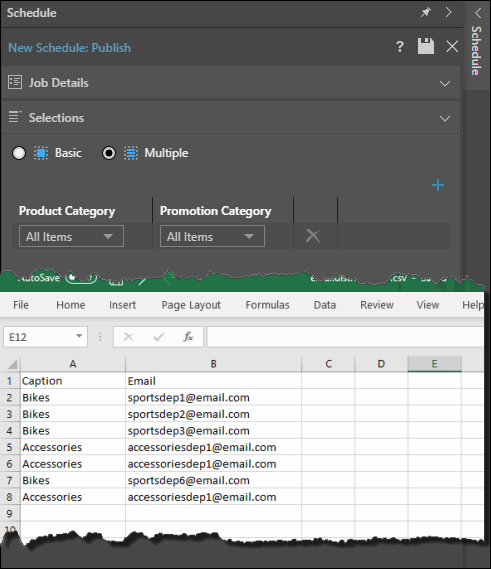
In this example, the Publication contains a single slicer, and 2 product categories are provided as the slices: Bikes, and Accessories. Each copy of the report is then sent to the heads of the relevant departments; sporting equipment, and accessories.
Step 1
Set the schedule's job details, selection, schedule, and triggered launch preferences.
Under Selection, choose Multiple. Then either select All Items, or choose the specific slices that are going to be imported in the email distribution list. See Step 3 for more information.
In this example, the distribution will be driven by the Product Category slicer.

Step 2
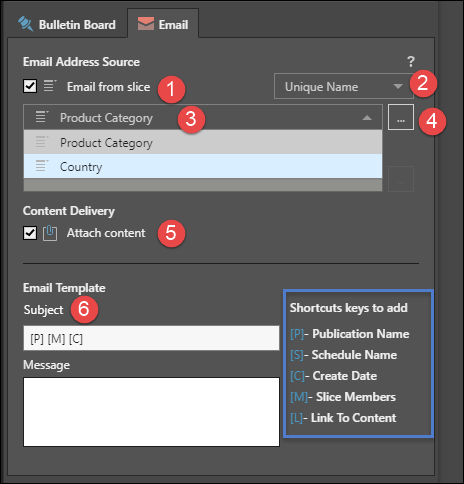
Select 'Email from slice' from the Distribution window. From the first drop down, select either Unique Name or Captions.
From the next drop down, choose the slicer that should drive the email distribution. Then click the button (number 4 below) and select the distribution list from its file location. If successful, you'll see the 'File was uploaded successfully' notification.
If the publication should be attached to the email, ensure this option is selected. Configure the email template as needed.

Step 3
Click save to run the schedule.
If more slices were selected under the Selections window than exist in the imported file, this will be reflected in the publication's job executions summary. For example, here All Items was chosen under Selections. However, only 2 slicers were specified in the uploaded file; the job executions summary shows that the job failed for the 2 slices that were not listed in the uploaded file.

Example 2. Multiple Slicers
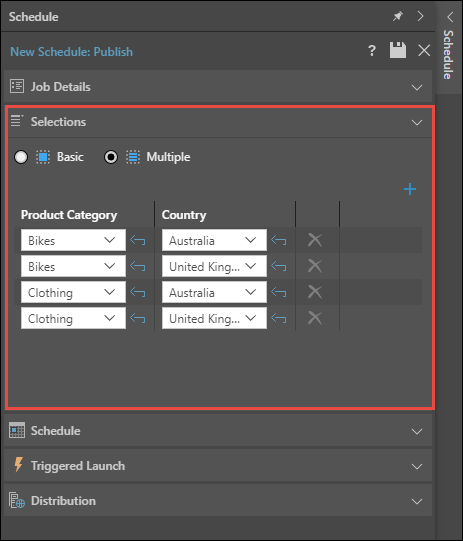
In this example, the publication contains 2 slicers: Product Categories and Country. The schedule will be configured to produce reports filtered by Bikes in Australia, Bikes in the UK, Clothing in Australia, and Clothing in the UK. Each report generated will be sent to the head of sales for each product department in their respective country.
Step 1
Set the job details, selection, schedule, and triggered launch preferences.
Under Selection, choose Multiple and select the required slice combinations by which the report should be filtered. Be aware that if you select All Items, Pyramid will attempt to generate a publication for all possible slice combinations. So for performance reasons, select only the required combinations.

Step 2
In the Distribution window:
- Select 'Email from slice'.
- From the first drop down, select either Unique Name or Captions.
- From the next drop down, choose the slicer that should drive the email distribution. This is the slicer whose elements are included in the distribution list.
- Next, upload the distribution list by clicking the button.
- Enable 'Attach content' to attach the publication to the email.
- Configure the email template as needed.
Note: you can distribute to both the bulletin board and email simultaneously; deselect Publish to bulletin board if this is not required.

Step 3
Click save to commit the schedule.