Users can distribute scheduled publications, alerts, and subscriptions via a channel Webhook. Configuring Webhook distribution requires the user to provide the URL of the channel to which the scheduled message will be sent.
Non-Admins can configure Webhook distribution directly from the schedule of the relevant content item but those Webhook channels cannot be shared with other users or roles. A Webhook channel added by a non-Admin user will be visible to that user only. If a user wants to add a channel that multiple users will be able to distribute scheduled content to, this must be done by an Admin.
Note: Non-Admins can add new channels only when this option is enabled for their tenant.
Further, while non-Admins can edit or delete existing channels that they themselves added, Admins can edit or delete channels added by any user.
The Webhooks configuration page in the Admin console allows Admins to create, edit, and delete channel Webhooks, assign a channel to a given tenant, and set role security for new and existing channels.
- Click here to learn more about Webhooks distribution.
Note: This feature is available with the Enterprise Edition license only.
Webhooks Listing
The main Webhooks listing lists all existing channel Webhooks, created by all users in the System. Each listing displays the following columns:
- Actions: from the Actions column (green highlight below), you can edit or delete the channel or view its Audit Trail.
- Name: the name given to the channel in Pyramid.
- Type: the Webhook destination (that is, where the given channel is located). This may be Teams, Slack, or a general destination.
- URL: the channel's URL.
- Tenant: the tenant to which the Webhook channel is assigned.

Macro Buttons
The following macro buttons are displayed at the top-right of the page:
- Delete Channel: (blue arrow, above) delete the currently selected Webhooks.
- Add New Channel Webhook: (red arrow) add a new channel Webhook.
- Refresh: (yellow arrow) refresh the list of Webhook channels.
Edit a Webhook
To edit a Webhook, select it in the top panel or click Edit in the Actions column. The Webhook editor, in the bottom panel, features two tabs: General and Edit Roles.
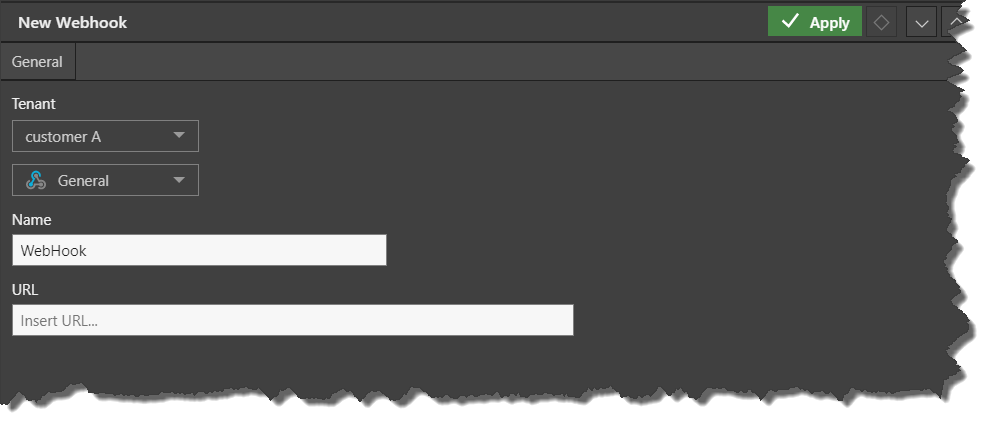
General
From the General view, edit the distribution type and channel:
- Tenant: the tenant to assign the Webhook to.
- Type: the channel type - General, Slack, or Teams.
- Name: the name of the channel Webhook in Pyramid.
- URL: the channel URL to which the Webhook will be distributed.

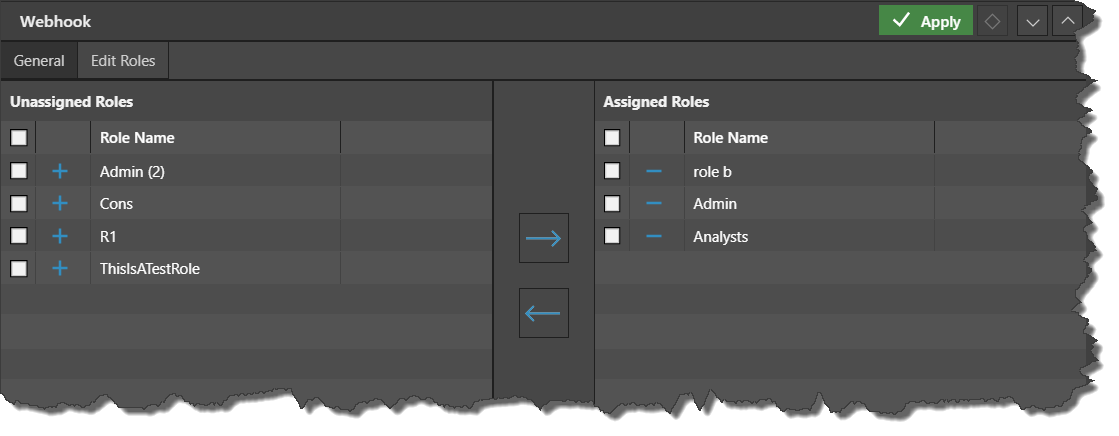
Edit Roles
Switch to Edit Roles to assign roles to the Webhook. Users belonging to the assigned roles will see the channel when configuring Webhook distribution. They will be able to select the channel as the Webhook destination, but they will not be able to edit or delete the channel.
By default, a channel that has been added by a non-Admin will not have any roles assigned to it unless an Admin edits its roles.
Add a New Webhook
To add a new Webhook, click Add New Channel Webhook from the buttons at the top-right of the page (see red arrow above).
- Click here to learn how to build a Microsoft Teams channel webhook.
- Click here to learn how to build a Slack channel webhook.