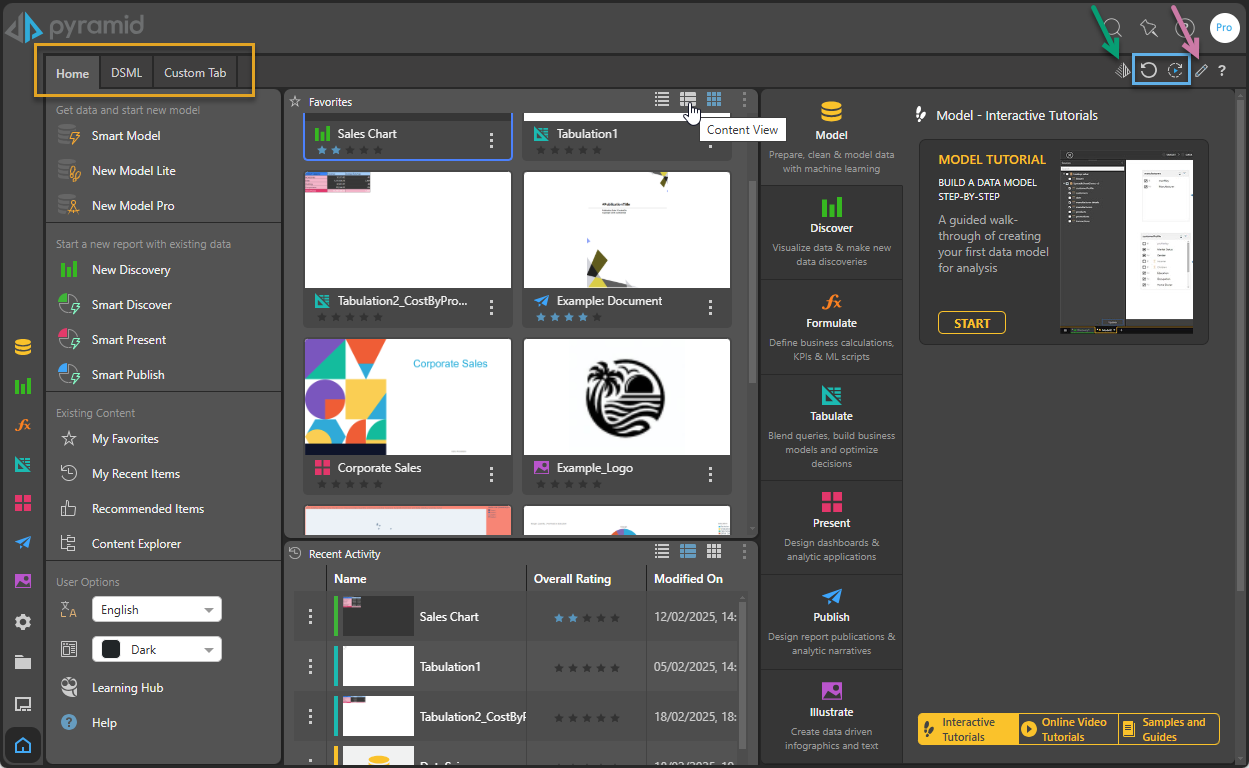
The User Hub allows users to build a collage of existing content for the home page of the main client interface for Pyramid. The user hub is defined by the Admin, but each user can edit their own view of the user hub.
- Tabs: Click the relevant tab to open it (orange highlight below).
- Embedded Search: Use the Chatbot to create and embed a new discovery in your Hub (green arrow below). For more information, see Embedded Search.
- Reset All: Reset all items in the hub to their most recently saved state (blue highlight below).
- Rerun Queries: Run all queries in the hub (blue highlight below).
- Edit: Edit the hub template (purple arrow below).
Content Types
The user hub can display the following types of content:
- Widget Presets: A selection of pre-designed widgets featuring various views from the Content Manager (yellow arrows below).
- Discoveries and Presentations: Discoveries (green arrow) and presentations (purple arrow) can be added directly to the hub.
![]()
Widget Presets
The widget presets allow you to add various home page and content manager views directly to the user hub. The Content Manager is the main toolset for working with content in the Pro and Analyst clients. It includes various views of the content system to enable users to find relevant content easily.
The following widget presets can be added to the hub:
- Alerts: Alert messages that have been posted to the user's inbox.
- Auto Recommended: A list of the top system recommended content items for a given user, based an AI-driven algorithm.
- Bulletin Board: All rendered publications and alerts earmarked for the user, their conversation threads, and the status of any model processing jobs.
- Favorites: Favorites is a flat list of up to 20 items (content items and folders) that have been flagged as favorites by the current user.
- Models: Recents is a flat list of up to 20 content items that have been used recently by the current user.
- Publications: A list of rendered publication reports that have been posted to the user's inbox.
- Recent Activity: A flat listing of all recently used content items by the current user.
- Subscriptions: A list of rendered subscription reports that have been posted to the user's inbox.
- Tutorials: The in-app, interactive, tutorials are designed to give users hands-on experience with the application.
- URL: Load a URL in an iframe. To set this up, you need to paste the URL into the URL field.
- User Recommended: The top 20 most recommended content items.
- Welcome: Opens the Quick Start and Learning Center dialog, letting Pro users quickly start new Model and Discover sessions or jump to the Content management tools.
- Workflows: Displays all of a user's workflow and conversation threads. This includes threads initiated by the user, or those that have the user as a participant.
Container Buttons
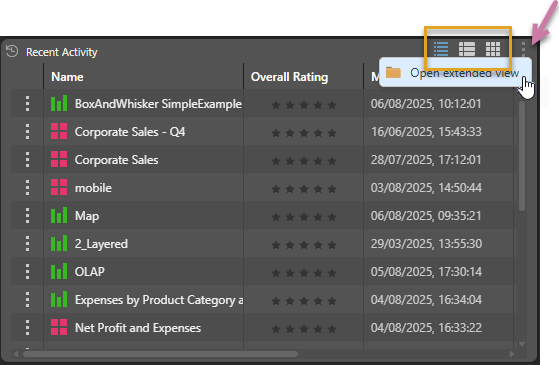
The widget preset containers expose the following functions:
- Display Listing: (Orange highlight above.) Display the content items in the widget in a Details View, Content View, or Tile View. Click on an item in the list to open it.
- Open Extended View: (Purple arrow.) Open the given content view in the Content Manager.
Content Menus
Content items can be displayed within the widget presets or independently. When content items appear within the widget presets you can perform the following functions from the item's context menu (purple arrow below):

- View: (Presentations only.) Open the presentation in viewer mode.
- Open: Open the item in its editor.
- Go to item location: Go to the item's location in the Content Explorer.
- Add to Favorites: Add the item or folder to your favorites list.
- This option changes to Remove from Favorites if your content item is currently a favorite. Select this option to remove the item or folder from your favorites list.
- Share:Opens the Share Content dialog. You can share your artifact with other users (recipients), either by attaching the exported content to an email or by sending a Share Link to the recipient for access in Pyramid. For more information, see Share Content.
- Rate Item: Apply a rating out of five.
Discoveries and Presentations
Discoveries and presentations can be added directly to the hub, to be displayed independently within their own container (not as a widget preset).
In this case, you can access a range of features via various context menus, which are exposed from the containers, the visuals, and the visual backgrounds.
The context menu for the container is indicated by an ellipsis at the top-right corner (green arrow below). Open this menu to access the following options:
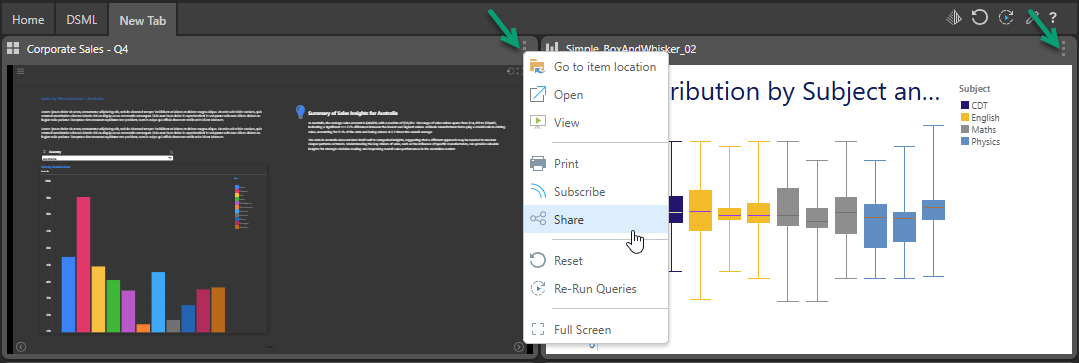
- Go to item location: Go to the item in the Content Explorer.
- Open: Open the item in the editor.
- View: (Presentations only.) Launch the presentation at runtime.
- Print: Export and print the presentation or discovery.
- Subscribe: Subscribe to the presentation or discovery.
- Share: Opens the Share Content dialog. You can share your artifact with other users (recipients), either by attaching the exported content to an email or by sending a Share Link to the recipient for access in Pyramid. For more information, see Share Content.
- Reset: Reset the item to its most recently saved state.
- Re-Run Queries: Run all queries in the item again.
- Full Screen: Show the item in full screen mode.
Right-click the background of a discovery to access the following functions:
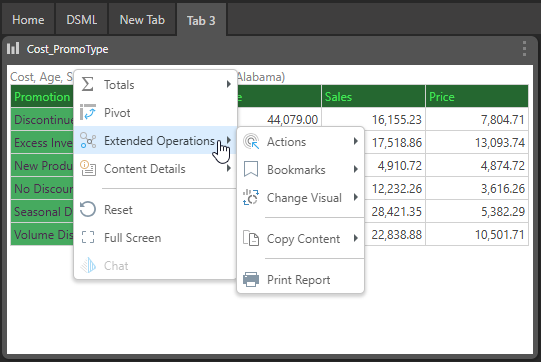
- Totals: Add or hide totals for grids.
- Pivot: Automatically switch around the positions of hierarchies or values.
- Extended Operations: These features extend beyond typical data analysis, offering functionality that compliments and enhances the data analytics experience.
- Actions: Execute actions that have been configured for a given hierarchy.
- Bookmarks: Apply or create a bookmark where the visual includes a slicer.
- Change Visual: Display the query in a different visual.
- Copy Content: Copy raw or visual data from the discovery.
- Print Report: Open the Print & Export dialog.
- Content Details: Rate the report or capture the OData URL or snippet.
- Reset: Reset the report to its most recently saved state.
- Full Screen: Show the visual in full screen mode. (You can return from full screen mode by clicking
Escon your keypad.) - Chat: Open the Chatbot and manipulate the selected visual.
Right-click the visual itself to access the following:
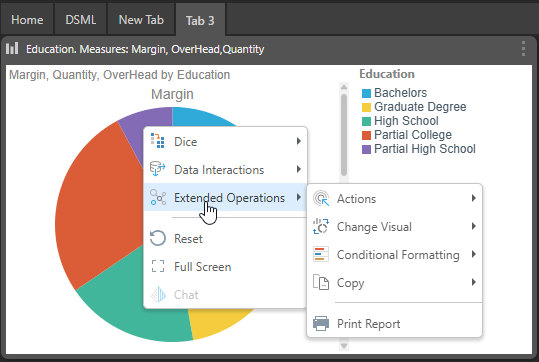
- Dice: Simultaneously filter the query by a given element while exposing an alternative selected hierarchy in its place in the visual and query.
- Drill: Move between different levels of regular, parent-child and drill path hierarchies.
- Expand and Collapse: Hide and show multiple levels of regular and drill path hierarchies in a grid visual.
- Data Interactions: Interact with your data and queries on the fly.
- Member Selection: Easily and intuitively select elements and data points for analysis directly from visuals.
- Swap, Add, Remove: Inject, replace, or remove a selected hierarchy.
- Extended Operations: These features extend beyond typical data analysis, offering functionality that compliments and enhances the data analytics experience.
- Actions: Execute actions that have been configured for a given hierarchy.
- Change Visual: Display the query in a different visualization type.
- Conditional Formatting: Highlight important items in a visualization using mathematical or logical rules and graphical adjustments to the underlying chart or grid.
- Print Report: Open the Print & Export dialog.
- Copy: Copy data from the discovery.
- Reset: reset the discovery to its most recently saved state.
- Full Screen: show the visual in full screen mode.
- Chat: Open the Chatbot and manipulate the selected visual.
A streamlined selection of navigation tools is available for each presentation when viewed in the hub:
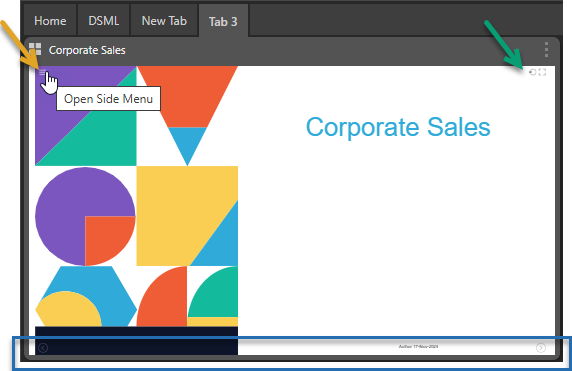
- Presentation Menu: Open the presentation runtime menu from the Hamburger (orange arrow above) to re-run queries, and set slicers and bookmarks.
- Run options (green arrow):
- Reset: Reset the presentation to its most recently saved state.
- Full Screen Mode: Show the presentation in full screen mode.
- Slide Navigation: Navigate through the presentation slides (blue highlight).
A streamlined selection of panel tools is available for each presentation visual from the hub:
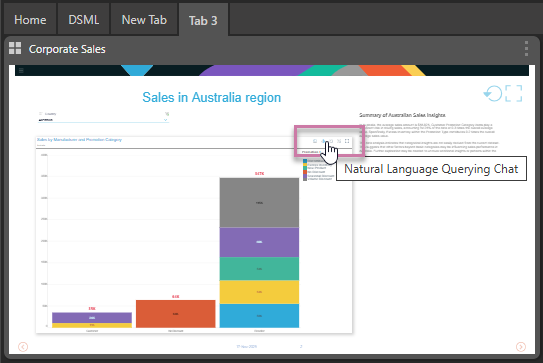
- Smart Insights: generate AI-automated analysis of a given query, with the output returned in natural language.
- Chatbot: interact with visuals in an intuitive way with plain English.
- Lasso Selection: define cross-visual interactions in order to pass values from one visual to another, via cross-filtering, or to highlight values across two or more visuals, via cross-highlighting.
- Full Screen: full-screen the specified visual.