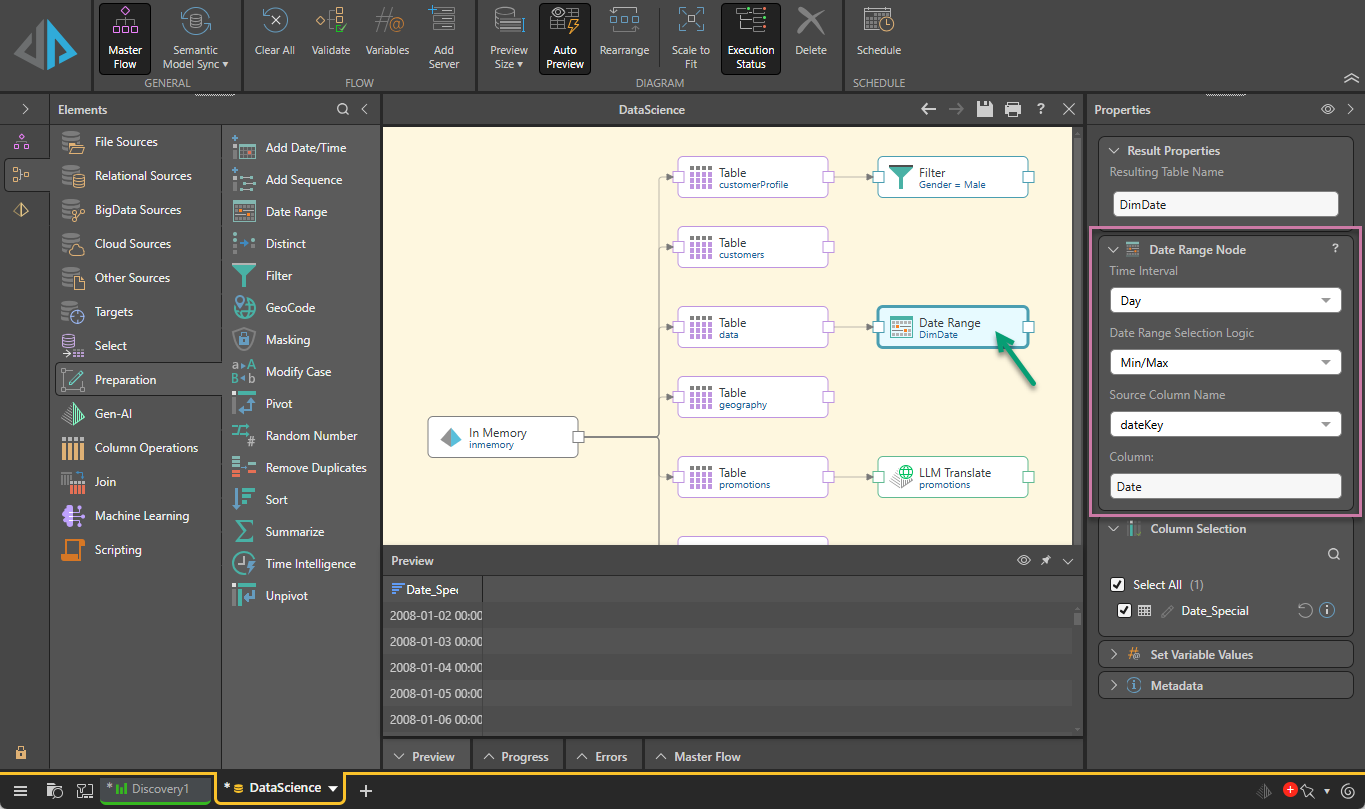
The Preparation nodes are used to apply a range of formulas on the tables in the flow diagram. These functions are used to transform data and optimize tables and columns for end-users by generation addition logic and columns, such as the creation of new date-time columns based on various date parts, generating latitude and longitude columns, and adding random number columns. These functions are also used for data cleansing, like sorting and filtering columns, removing duplicate rows, and transforming matrix grids into tabular ones so that they can be queried.
Configuring Preparation Functions
The Preparation nodes can be connected to Select, SQL Query, Bottom N, and Top N nodes. Connect the required Preparation node to the node representing the relevant table.
Once connected to the Data Flow, the Preparation node usually requires configuration from its Properties panel.

Preparation Nodes
The following Preparation nodes can be connected to the Data Flow:
- Add Date/Time: Generate a new date-time column based on a given date part.
- Add Sequence: Add a UUID or a numeric sequence as an additional column at the beginning of the table.
- Date Range: Generate a date-time column, based on a given date part, listing all dates in the given range, including dates that don't exist in the source column.
- Distinct: Remove duplicate rows from the table.
- Filter: Filter a specified column.
- GeoCode: Extract latitude and longitude columns from your existing geolocation columns.
- Masking: Replace values in a specified column with a mask string.
- Modify Case: Change the case of string values in a column.
- Pivot: Transform a tabular grid into a matrix grid.
- Random Number: Add a column of random numbers.
- Remove Duplicates: Remove user-defined duplicate rows.
- Sort: Sort a specified column in ascending or descending order.
- Summarize: Generate summarize columns by applying an aggregate calculation or the Group By function.
- Time Intelligence: Produce multiple date-time columns at different levels of granularity, based on a dateKey column in the data source.
- Unpivot: Transform a matrix grid into a tabular grid.
Common Properties
The following fields are present in the Properties panel when you have any of the preceding nodes selected on the canvas. There are also Properties that are specific to the nodes described above, see the linked pages for more information.
Result Properties
The Result Properties panel contains only one field: Resulting Table Name. This is the name for the resulting table. You can change this value, if required, or leave its default name.
Column Selection
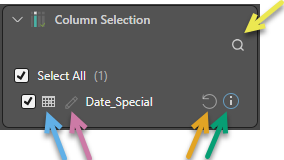
Expand the Column Selection panel to update the column selection for the given table. By default, all columns in the table are selected. You can, however, remove columns by clearing their checkboxes. Columns that are not selected will not be copied to the new data model.

The Data Type icon (blue arrow above) indicates the data type for this column.
Tip: Hover your cursor over the Data Type icon to view the current name of the column as a tooltip. This is useful where the name is too long to fit in the available space.
Searching your columns
If you are interested in particular columns, click Search (yellow arrow) to open a search field.
Renaming your Columns
To rename your column in this view, either double-click the current name or click Edit (purple arrow). The updated name will be used downstream of this node in your Data Flow.
Note: You can see that the name of this column has been updated in the example above, because the Info icon (green arrow) is visible. Hover your cursor over this icon to see the column's original name as a tooltip. Click Reset (orange arrow) to return the column to its original name.
Set Variable Values
Expand the Set Variable Values window to select variables that you want to pass to the node. Click the Plus (+) sign and then select the relevant variable, the aggregation type (update with), and the relevant column. For information about creating and editing variables, see Variables Panel.
Metadata
Expand the Metadata panel and add the following metadata details.
Description
Add a description for this node. This is useful for keeping track of the Data Flow (ETL) process, especially if multiple users are working with the same Data Flow. The description is visible only in the Model app.
Validate
If you do not want to validate this node when you run the validation process, for example because it is under construction and temporarily contains some invalid scripting, you can clear the selection of the Validate checkbox. Recommended: Always leave the Validate checkbox selected.
Node ID
The unique ID for this node. Click the Copy icon to copy this ID to your clipboard.