Use the server manager to manage the data source Server and set server security.
Tip: This topic describes data source Server management. For information about managing your Databases and Models, see Database Management in the Admin Console and Data Model Management in the Admin Console, respectively.
Source Manager
Use the Server Tree on the left (red highlight below) to find and select the data source Server you wish to manage (purple arrow below):

Server Tree
Filter by Type
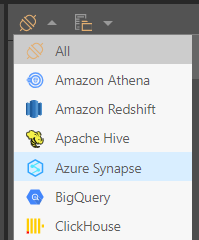
Use the Data Type dropdown list (yellow box) to limit the list of servers to only those of the selected data source type. In the example above All has been selected, so the Server dropdown list includes servers of all types:
Sort
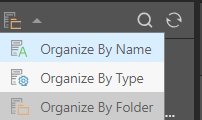
Use the Sort By dropdown list (orange box) to organize the servers by name, data source type, or folder. The folder structure can be defined when creating or editing the server. The default sort order is to organize by name alphabetically, but can be changed in the user defaults.
Note: The filter and sort selections are saved within the session, so any subsequent source management activity will default to the selected sort and filter selections.
Tip: Hover your cursor over the server, the server name, or type, and the description will be displayed as a tooltip.
Search
Open the Search field to search for your data server in the tree.
By default, the search tries to match your string with the beginning of your search term, so if you enter "sch" it searches for results with names starting with "sch". However, if you type "*sch" (prefixing with an asterisk) it searches for results whose name contains "sch" anywhere.
General
Once the Server is selected in the tree, the General tab shows:
- Server IP: The IP address for the data source server.
- Port: The port number, if relevant.
- User Name: The username to connect to the data source, if relevant.
From any of the server tabs (General, Security, and Databases), you can see and edit the server definitions.
Note: For Pyramid In-memory data source servers, two extra charts are displayed showing disk size and memory size (green highlight).
Security
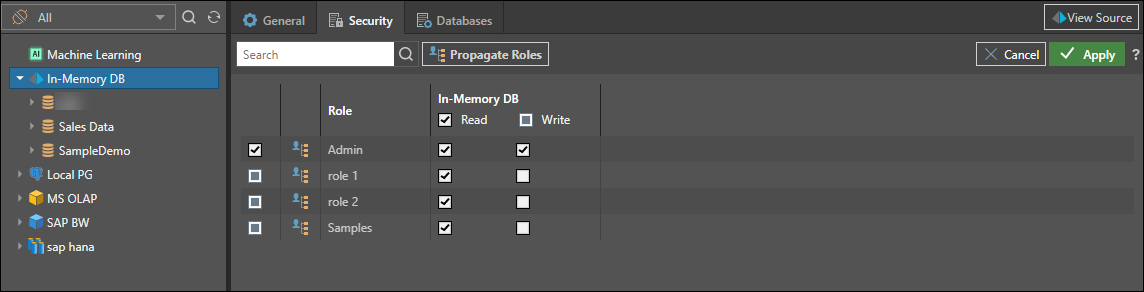
For a given data source server, select the Security tab to manage access to this server by role.
- Select the roles that should be assigned to the server.
- Read: users will be able to query the server (subject to database and model specific access).
- Write: users will be able to build new databases on this server using the data modeling tools.
- You can assign the same role permissions for all of the subordinate databases and models within the server by clicking Propagate Roles button.
- Use the role-specific propagate button to propagate a single role at a time.
Click Apply to save your selections.
Sort By Role Permission
Users can sort roles by read or write access by clicking on the area to the right of the read and write columns (Green Arrows). Users can click the area three times, where each click will sort the list by different criteria.
- The first click will sort the column in ascending order resulting in checked items appearing at the bottom of the list.
- The second click will sort the column in descending order resulting in checked items appearing at the top of the list.
- The third click will sort the column by role name in ascending order.
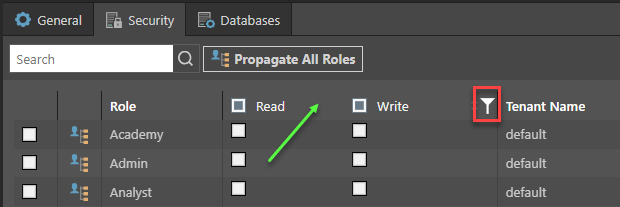
Filter By Role Permission
Users can filter roles by read or write access by hovering the cursor next to the write column and clicking on the filter icon (red box above). Users can check the required role types displayed in the filter, then click on the filter button to filter the list of roles.

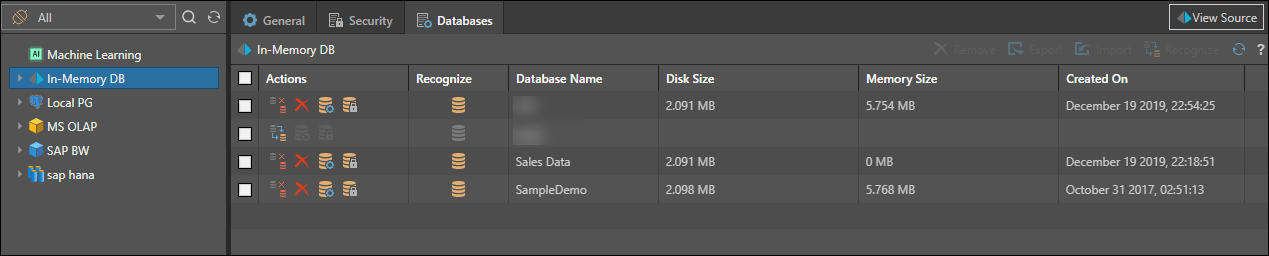
Databases
Click the Databases tab to see the list of databases hosted on the selected server.
For each database, you'll see the following columns:
- Actions: this is a list of database specific actions. The choices will vary by data source type.
- De-recognize: click to de-recognize a materialized database in the Pyramid repository. This will make the database INVISIBLE to users in Pyramid without deleting the actual database.
- Recognize: click to recognize a materialized database in the Pyramid repository. This will make the database VISIBLE to users in Pyramid, even if it was created outside of Pyramid.
- Delete: click to delete the database. This feature is only available on some systems.
- Edit: go to the General tab for the given database. This is a shortcut button.
- Security: go to the Security tab for the given database. This is a shortcut button.
- Recognize: indicates if the database is currently recognized in Pyramid. If not, you can select the database and click recognize it. You can also select a materialized database and click Remove to de-materialize it.
- Database Name: displays the database name.
- Disk Size: the database's disk size.
- Memory Size: the database's memory size (if relevant)
- Created On: the date and time that the database was created.
Macro Actions
Users can use the checkboxes in the list to perform bulk actions. Not all actions are available on every database type.
- Remove: when a recognized database is selected, the Remove button is enabled, allowing you to de-recognize that database.
- Recognize: when an unrecognized database is selected, the Recognize button is enabled, allowing you to recognize the database in the Pyramid repository.
- Refresh: refresh the list of databases.