Add a table of contents (TOC) to your publication to describe the document structure for your reader. When the document is built, any text using a Heading style is added to the table of contents with a reference to its page number. For example, all Heading 1s are added and numbered with Heading 2s (and their numbers) indented beneath them. You may want to add a table of contents if your document is long or includes meaningful sections.
Note: Tables of contents are included in the printed output for the following document types: PDF, PowerPoint, Word, XML, and HTML.
TOCs in your publication
The table of contents is created from the static or variable text fields in your presentation that use the Header styles (typically, heading 1, 2, and 3). It is built automatically when you build your publication, meaning that its content reflects the content of the document (number of pages, heading levels, content order) at the point in time when the document was built:
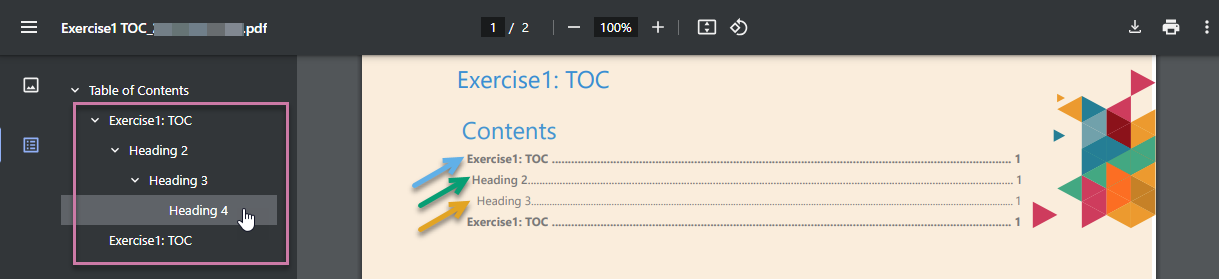
The items at the root of the Table of Contents are those with the text style Heading 1 (blue arrow above), the next have the text style Heading 2 (green arrow), and last are the Heading 3 items (orange arrow).
Tip: If you are creating a PDF, it will include a hyperlinked "document outline" (purple highlight) that you can use to navigate around your publication if you select Add Bookmarks in the Print and Export dialog when you build your publication. These hyperlinks are also based on the text with heading styles and are created regardless of whether the publication incorporates a table of contents.
Creating a Table of Contents
Step 1: Set up headings for use in the TOC
Only the text fields that use heading styles will be incorporated into your table of contents. You, therefore, need to go through your document applying these styles to selected text fields.
Note: By default, the TOC will include entries for Heading 1, Heading 2, and Heading 3, but you can also incorporate Heading 4 or reduce the number of headings included, perhaps only showing Heading 1s in the TOC on your home page.
To add a heading for your TOC:
- Select the Text field that you want to make into a heading on the canvas.
- On the Component ribbon (purple arrow below), use the styles dropdown list to apply a Header style to the selected text field (yellow arrow).
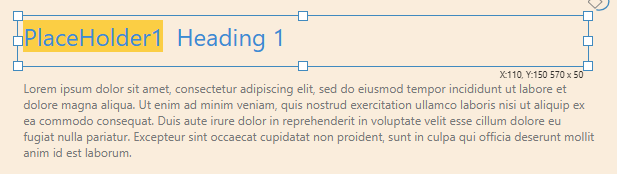

Note: You do not need to select static text fields. Where text fields containing variables or placeholders are used, it is the replacement value that will appear in the TOC.
Tip: If you want to check that your headings are correctly positioned in the document outline, you can click F2 on your keyboard at any time to build your publication as a PDF.
Step 2: Create the TOC
To add a table of contents to your publication:
- Open the page that you want to add your TOC to by selecting it in the Pages panel.
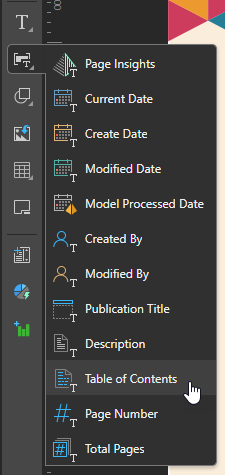
- From the Toolbox, click Add Text Field > Table of Contents.
- Do one of the following:
- Click the canvas at the point where you would like to add your Table of Contents.
- Click and drag your cursor to draw the text field that will contain your Table of Contents on your canvas. (This option allows you to customize the size of your text field.)
- Drag the TOC to the correct location on the page and re-size it.
This is typically the first page, or the page after the cover.
For information about the other options in this list, see Static Shapes and Images in Publish Pro.
The table of contents is dropped onto the canvas. Note that it is added with default text so that you can see the size and style of the fonts that will be used for your actual table of contents when your publication is built.
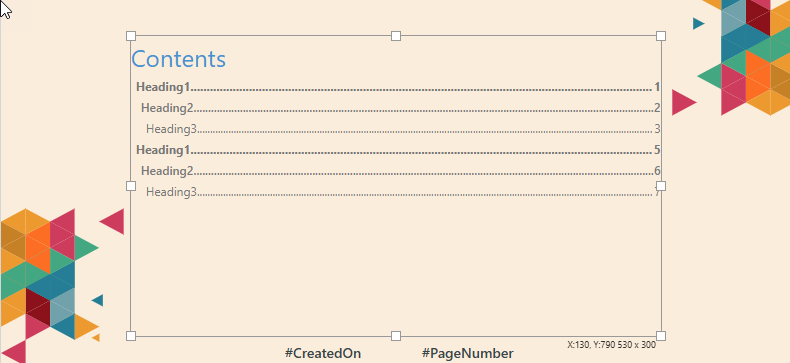
Note: You should consider the probable length of your final TOC when you are positioning and re-sizing the text field.
When you next build your publication, the dummy table of contents that you see in the editor will be replaced with values for each of the text fields that uses a Heading style.
Editing a Table of Contents
When you select the Table of Contents on the canvas, its content and formatting options appear in the Table of Contents tab (purple arrow below) in the Components ribbon:

Changing the "Levels" of the TOC
You can use the General Settings options (green highlight above) to indicate the heading levels to show in the table of contents. The Show Levels widget can be a number between 1 and 4:
- 1 indicates that only Heading 1s should be included in the TOC.
- 2 indicates that Heading 1s and Heading 2s should be included.
- 3 indicates that Heading 1s, Heading 2s, and Heading 3s should be included.
- 4 indicates that Heading 1s, Heading 2s, Heading 3s, and Heading 4s should be included.
By default, the Show Levels widget indicates that 3 levels are shown in the TOC.
Formatting the TOC
Background Color
Change the Background Color of the Text Field containing the TOC using the Color Picker.
Heading Styles (H1, H2, H3, and H4)
Change the font type, size, style, and color for the headings in the TOC. As you edit these properties using the Text Formatting tools, you will see the impact of your changes in the selected TOC on the canvas.
Size and Position
Precisely set the width, height, x, and y positions for the text field containing your TOC. This can also be done by dragging and dropping the container and its border nodes directly on the page.
Change the size and position of the selected item:
- Adjust the item size using Width and Height.
- Adjust the item position using X and Y.
Tip: The X and Y coordinates and width and height are displayed underneath each content item when it is selected on the canvas.
Deleting a Table of Contents
To delete a Table of Contents, select the text field on the canvas and do one of the following:
- Click Delete from the Publish ribbon.
- Right-click Delete in the context menu.
- Click Delete (DEL) on your keypad.