The Jump to Slide action opens another slide in the current presentation. You can specify which slide using its number or name, go to the next or previous slide in the sequence, or use a PQL function to create your own Advanced jump option. You can also select Inject to Target to pass data selected at runtime to a Target, causing the visuals it has interactions with to be filtered or highlighted.
Visual Actions are triggered when an end user picks a visual and, from the right-click Actions menu or on click, selects an action at runtime. If you want to jump to another slide when you select a value from a slicer, see Jump to Slide from Slicer Actions. If you want to add a "button" to your canvas and jump to another slide from there, see Jump to Slide "Jump Action" in Present Pro.
Opening the Action Panel
You have two options to open the Actions panel:
- Select a visual on the slide and click Actions on the Component ribbon.
- Select a visual or slicer and then right-click Actions on the context menu. When you open the Actions context menu for a slicer, only the Jump to Mini Tab and Jump to Slide options are available.
For details of these steps, see Creating Actions in Present Pro.
Configuring the Jump to Slide Action
It is possible to configure a Jump to Slide action using the simple method, where you select the slide to jump to when the action is triggered and the advanced method, where you write a PQL expression that selects which slide to jump to based on conditions.
Simple: Jump to slide by number
When you define a simple Jump To Slide action, you are creating an Action on the right-click context menu that can be used to open a particular slide at runtime. The configuration selects the slide to open using its slide number, name, or position in the presentation (next or back).
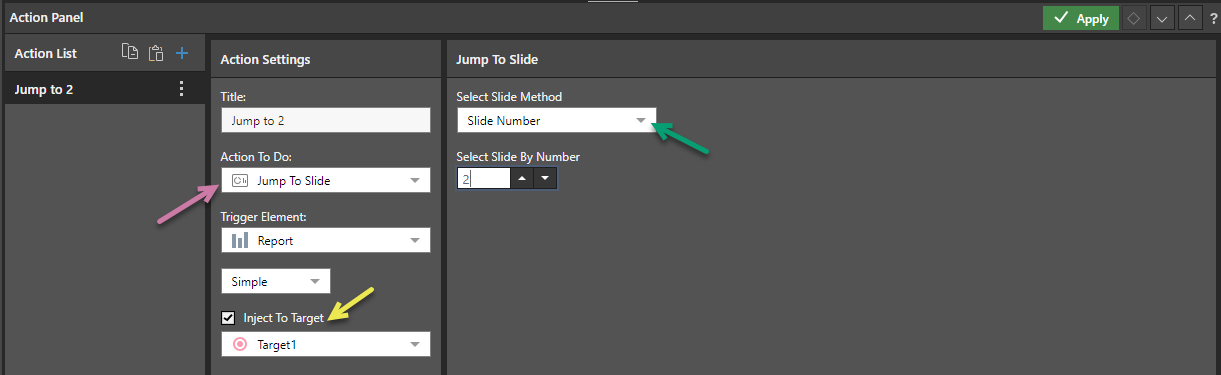
- In the Action Settings panel, select Jump To Slide from the Actions To Do field (purple arrow, above).
- Choose a Select Slide Method (green arrow) to select the slide you want to jump to.
- Optionally, select the Inject to Target checkbox and choose a Target from the associated dropdown list (yellow arrow).
- Click Apply to create your action and save your changes.
The Jump To Slide panel opens.
For example, select Slide Number and then 2 to jump to slide 2 when this action is run.
Selecting this option causes the data selected at runtime to be passed to the Target, which, in turn, causes any visuals the Target has interactions with to be filtered or highlighted. This is typically used to initialize visuals or slicers on the slide being opened to reflect your selections on the page you jumped from. For more information about creating Targets and Target interactions, see Creating Targets using Present Pro.
Advanced: Jump to Slide based on selection
The Advanced option allows users to jump to a slide based on a given PQL formula. This offers a lot of flexibility, as you can basically determine the conditions that decide which slide to jump to, rather than having to create a jump action that relies on a static slide number or name. This ensures that report consumers are led to the most relevant information, based on the data they clicked at runtime.
Tip: It is best practice to use a slide name rather than a slide number for this type of Action, since the sequence of slides in your presentation is likely to be subject to frequent change.

- From the Mode dropdown list, select Advanced (purple arrow).
- Build a PQL expression that determines which slide to jump to:
- When the user selects Bikes in the visual and opens the Action Jump to 2 from the right-click context menu (right-click Extended Operations > Actions > Jump to 2), Slide 2 opens.
- When the user selects Components, Slide 3 opens.
- When the user selects any other option, Slide 1 opens.
- Click Validate to check your PQL is valid.
- Click Apply to create your action and save your changes.
The script editor opens in the Jump To Slide panel.
Case(Criterias(Contains(Captions(), "Bikes"), Contains(Captions(), "Components")), DataSet("Slide 2", "Slide 3"), "Slide 1")
The preceding example causes the following runtime behavior:
Action Panel
For details of the options in the Action List panel, see Creating Visual Actions in Present Pro.
Action Settings
Title
Name your action. If you want to open your action from the right-click Actions context menu (the default option), you will need to know its name later.
Action to Do
From the Action To Do dropdown list, select Jump to Slide.
Trigger Element
Set the trigger element from the query, when this element is "clicked" the action is triggered. This may be a report, hierarchy, measure, member, or cells. The action will only be available for the selected trigger.
Report
The action will be available from any report element; that is, any part of the visualization, its background, or the canvas.
Hierarchy
The action will only be available from the specified hierarchy. Therefore, you should select a hierarchy that has been added to the query.
Member
The action will only be available from the selected member element. Therefore, you should select a member that has been added to the query.
Cells
The action will be available from the cell (data point) level only.
Run From
The Run From dropdown list (blue arrow below) indicates the user interaction that should trigger the action once configured. By default, you can run custom actions by selecting the Trigger Element and choosing the action name from the context menu. This configuration allows you to create additional "click actions" that run the same action on Click, Double-click, or Alt+click:
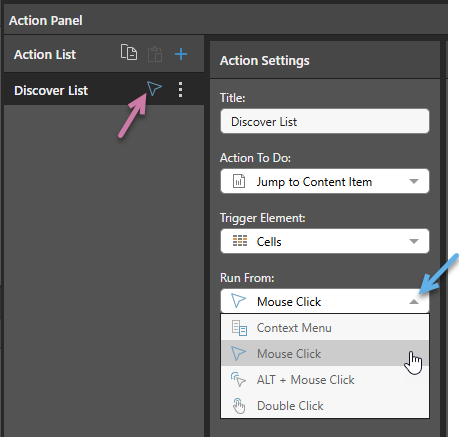
- Context Menu: Default. Where this option is selected, the action can only be run from the Actions context menu.
- Mouse Click: The action runs when you single-click the Trigger Element.
- ALT + Mouse Click: The action runs when you hold the
Altkey and click the Trigger Element. - Double Click: The action runs when you double-click the Trigger Element.
These click actions take precedence over any conflicting click actions set in your User Defaults. If different click actions are defined for the same visual in Discover and Present, the action defined in Discover is used.
Notes: Each click type can only appear once in the Action List. When a click type is defined, the icon for that type is displayed alongside the action's name in the list (purple arrow above).
Context Menu Access
Regardless of your Run From selection, actions remain accessible on the context menu.
Advanced Settings
Mode
Select from Simple or Advanced to indicate whether you want to select a redirect target or create a PQL expression that conditionally selects different targets.
Inject to Target
Selecting this option causes the data selected at runtime to be passed to the Target, which, in turn, causes any visuals the Target has interactions with to be filtered or highlighted. This is typically used to initialize visuals or slicers on the slide being opened to reflect your selections on the page you jumped from. For more information about creating Targets and Target interactions, see Creating Targets using Present Pro.
Tooltip
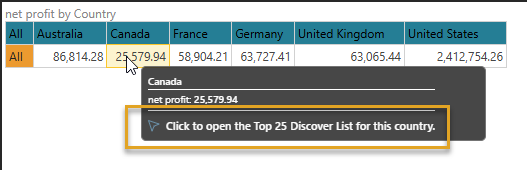
Where the Action is run using one of the Click options (Mouse Click, ALT + Mouse Click, Double Click), a Tooltip field typically becomes available in the Advanced Settings panel. You can add some text to your tooltip that describes the action itself or how to use the action on hover:
Note: You cannot add a Tooltip for Execute JavaScript or Tooltip actions.
Trigger Hierarchies
The Trigger Hierarchies panel allows you to choose which members or hierarchies should trigger the Action:
- Where the Trigger Element is Hierarchy, you can select Measures or one of the Hierarchies in the tree to only offer the Action on the context menu when the item on the visual matches that selected from the tree.
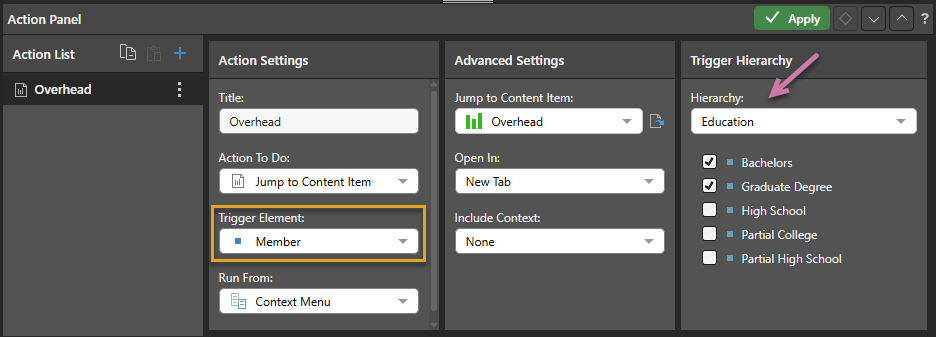
- Where the Trigger Element is Member, you can select Measures or a Hierarchy and then use the checkboxes to select the items that you would like to trigger the Action from.
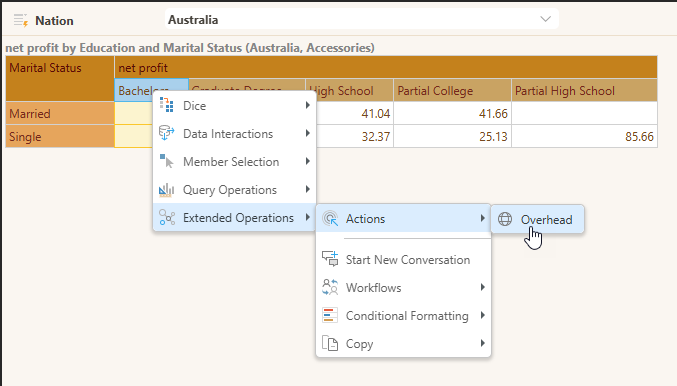
The following selection indicates that the Overhead Action should be available on the context menu only where the selected Members are Bachelors or Graduate Degree from the Education hierarchy:
This affects the context menu as follows when the selected member is Bachelors (one of the selected members in the Trigger Hierarchy):
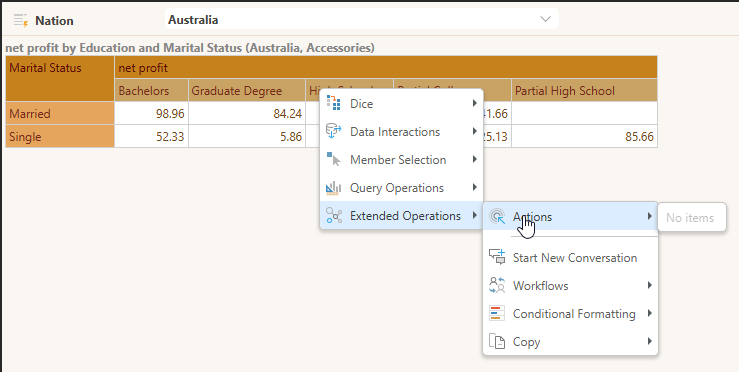
It affects the context menu as follows when the selected menu is High School (one of the members in the Trigger Hierarchy that is not selected):
Jump To Slide
The content of the Jump to Slide panel differs depending on whether you have selected Simple or Advanced from the Mode dropdown list.
Simple
Where Simple is selected as your Mode, the Jump to Slide panel contains the following options:
- Slide Number: Jump to the slide with the selected slide number.
- Slide Name: Jump to the slide with the selected name.
- Next Slide: Jump to the next slide in the sequence. (The Action option has the same effect as clicking Next using the navigation arrows. You might want to name this action "Next.")
- Previous Slide: Jump to the previous slide in the sequence. (The Action option has the same effect as clicking Back using the navigation arrows. You might want to name this action "Back.")
Advanced
Where Advanced is selected as your Mode, the Jump to Slide panel is a single text window that you can use to define your PQL expression.
You can use the PQL functions in the Functions panel to create your PQL expression:
- The PQL libraries that are available in this panel are Action and Common.
- Search the functions by name using the Search field at the top of the Functions panel.
- Hover your cursor over the item in the Functions tree to show a description of the available function, including its syntax.
- Double-click the functions in the tree to copy them into the Formula window. If you select content in the Formula panel and then double-click a function, anything that is selected is inserted within the parentheses.
Note: The Pyramid Query Language (PQL), pronounced "Prequel," is a language built into Pyramid's PYRANA engine to allow users to construct queries that can run against the many SQL data stacks that Pyramid can query natively. PQL includes a vast array of operations and functions that allow users to query data and build analytical logic.