Create actions that help your users to navigate around their presentation at runtime. Actions are very flexible, allowing your users to jump to other slides, content items, or tabs in the presentation, run some custom JavaScript or PQL, open a tooltip, and so on. You might want to add actions if, for example, you want your user to be able to jump to a target slide and initialize the visuals on that slide with selections made in the source, or if you want to add Next and Back options to every right-click Action menu.
You can add, remove, and edit actions using the options in the Action panel. Be aware that each list of actions is specific to the visual or slicer that you have selected on the canvas, and that you should make use of the copy and paste options to re-use actions where necessary.
- Click here to learn more about the runtime effects of actions
Opening the Action Panel
You have two options to open the Actions panel:
- Select a visual on the slide and click Actions on the Component ribbon.
- Select a visual or slicer and then right-click Actions on the context menu. When you open the Actions context menu for a slicer, only the Jump to Mini Tab and Jump to Slide options are available.
For details of these steps, see Creating Actions in Present Pro.
Action Panel
Action List
The Action List shows all of the actions associated with this visual:
You can:
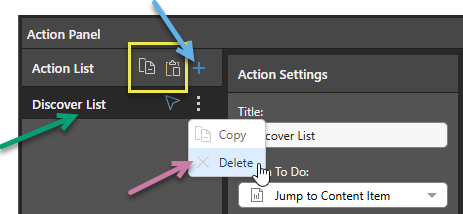
- Add actions to the Action List using the Plus icon (blue arrow above). Once clicked, you need to create the details of your new Action as described below.
- Delete an action from the list by opening its context menu and clicking Delete (purple arrow).
- Edit an existing action by selecting the name of the action in the list and updating its details in the panel.
Copy Actions between Items
You can also replicate the same action or actions across multiple discoveries and publications using the copy and paste functions (yellow highlight above). Copy one or all actions to your clipboard, then paste the actions to the Action List of your target discovery or publication.
New Action
To create a new action:
- Click the Plus (+) icon (blue arrow above).
Note: You can add multiple actions to a single Action List, but each action added to the list can only contain a single "action to do."
Action To Do
Select the type of Action that you want to create from the Action To Do dropdown list in the Action Settings panel:
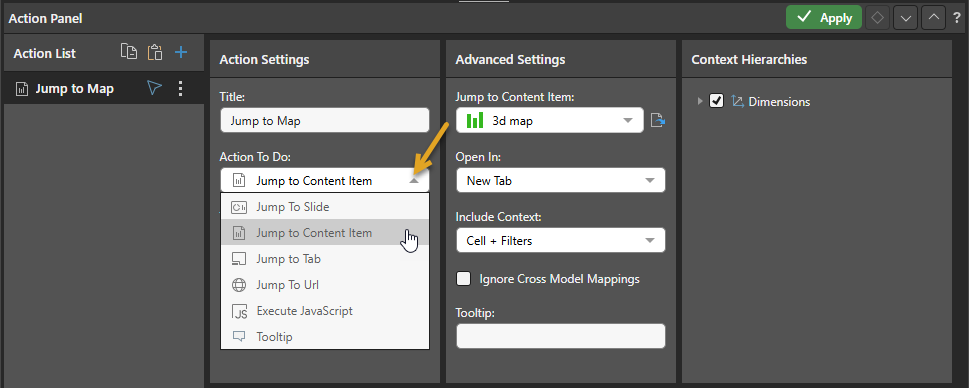
Jump To Slide
The Jump to Slide action opens another slide in the current presentation. You can specify which slide using its number or name, go to the next or previous slide in the sequence, or use a PQL function to create your own Advanced jump option. You can also select Inject to Target to pass data selected at runtime to a Target, causing the visuals it has interactions with to be filtered or highlighted.
- Click here for more information
Jump to Content Item
Open a specified content item in a pop-up, tab, or "in place" (specified using the Open In option). Select the content item that opens in response to this selection from the Jump To Content Item dropdown list. You can also select options to include context and exclude cross-model mappings as required.
- Click here for more information
Jump to Tab
The Jump to Tab action opens a specific tab in a Mini-Tab container. For example, where you use a mini-tab container to show visuals for sales, returns, and net profit, you could create a Jump to Tab action that opens the Returns page given particular selections by the end user.
- Click here for more information (slicer action)
Jump To URL
Build a URL and open it in the Open In target. To specify a static URL, type the URL including its scheme (http:// or https://) into the URL panel, surrounded by "double quotation marks." To create a dynamic URL, make use of PQL functions to add functionality.
Execute JavaScript
When the specified element is selected, run a custom JavaScript function.
- Click here to view the Execute JavaScript instructions in the Discover help
Tooltip
Create a tooltip that displays a visual or presentation when the viewer hovers their cursor over the trigger element at runtime. Note: Tooltip actions configured from Present are applied only to the instance of the visual in the presentation. It is not shown when the visual is added to other presentations or opened in Discover.
- Click here for more information
Note: Jump to Slide, Jump to Tab, and Execute JavaScript options all incorporate a panel for creating and validating advanced scripting. You need to select both the Advanced option and select a Tab for the panel to open for the Jump to Tab action.
Common Action Fields
Action settings
Title
Name your action. If you want to open your action from the right-click Actions context menu (the default option), you will need to know its name later.
Trigger Element
Set the trigger element from the query, when this element is "clicked" the action is triggered. This may be a report, hierarchy, measure, member, or cells. The action will only be available for the selected trigger.
Report
The action will be available from any report element; that is, any part of the visualization, its background, or the canvas.
Hierarchy
The action will only be available from the specified hierarchy. Therefore, you should select a hierarchy that has been added to the query.
Member
The action will only be available from the selected member element. Therefore, you should select a member that has been added to the query.
Cells
The action will be available from the cell (data point) level only.
Run From
The Run From dropdown list (blue arrow below) indicates the user interaction that should trigger the action once configured. By default, you can run custom actions by selecting the Trigger Element and choosing the action name from the context menu. This configuration allows you to create additional "click actions" that run the same action on Click, Double-click, or Alt+click:
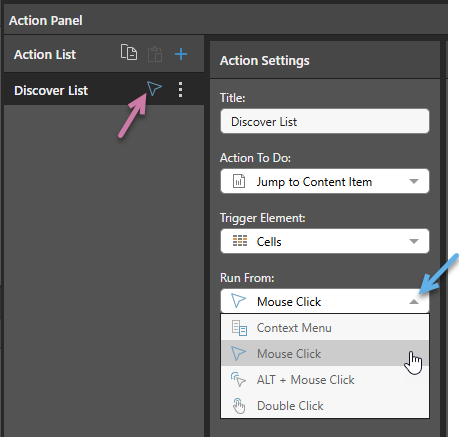
- Context Menu: Default. Where this option is selected, the action can only be run from the Actions context menu.
- Mouse Click: The action runs when you single-click the Trigger Element.
- ALT + Mouse Click: The action runs when you hold the
Altkey and click the Trigger Element. - Double Click: The action runs when you double-click the Trigger Element.
These click actions take precedence over any conflicting click actions set in your User Defaults. If different click actions are defined for the same visual in Discover and Present, the action defined in Discover is used.
Notes: Each click type can only appear once in the Action List. When a click type is defined, the icon for that type is displayed alongside the action's name in the list (purple arrow above).
Context Menu Access
Regardless of your Run From selection, actions remain accessible on the context menu.
Mobile Devices
On mobile devices, Jump to Content Item, Jump to Tab (presentations only), and Jump to URL actions can be accessed using a long tap (which opens the Actions menu) or using a standard tap where the Run From configuration indicates that Mouse Click is enabled for the action. For more information, see Run Actions on a Mobile Device.
Tooltip
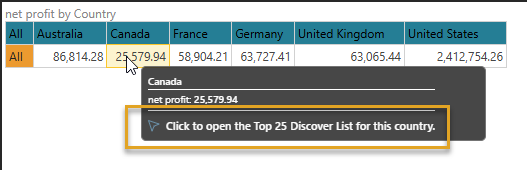
Where the Action is run using one of the Click options (Mouse Click, ALT + Mouse Click, Double Click), a Tooltip field typically becomes available in the Advanced Settings panel. You can add some text to your tooltip that describes the action itself or how to use the action on hover:
Note: You cannot add a Tooltip for Execute JavaScript or Tooltip actions.
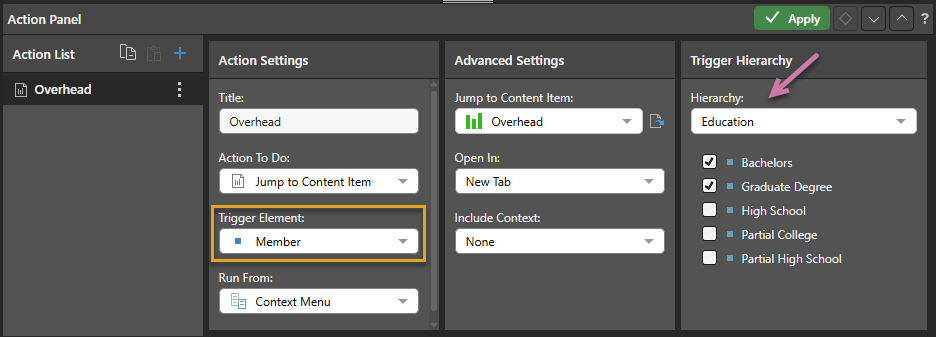
Trigger Hierarchies
The Trigger Hierarchies panel allows you to choose which members or hierarchies should trigger the Action:
- Where the Trigger Element is Hierarchy, you can select Measures or one of the Hierarchies in the tree to only offer the Action on the context menu when the item on the visual matches that selected from the tree.
- Where the Trigger Element is Member, you can select Measures or a Hierarchy and then use the checkboxes to select the items that you would like to trigger the Action from.
The following selection indicates that the Overhead Action should be available on the context menu only where the selected Members are Bachelors or Graduate Degree from the Education hierarchy:
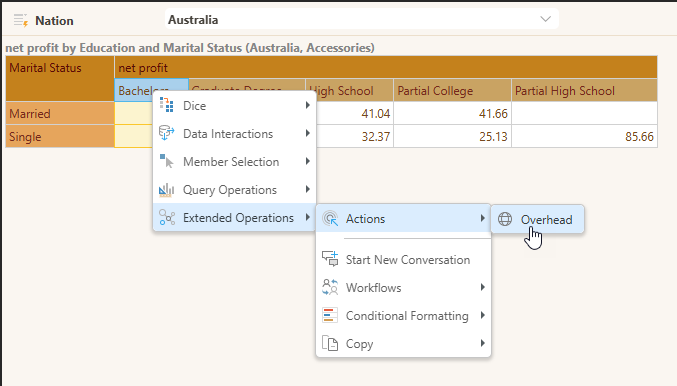
This affects the context menu as follows when the selected member is Bachelors (one of the selected members in the Trigger Hierarchy):
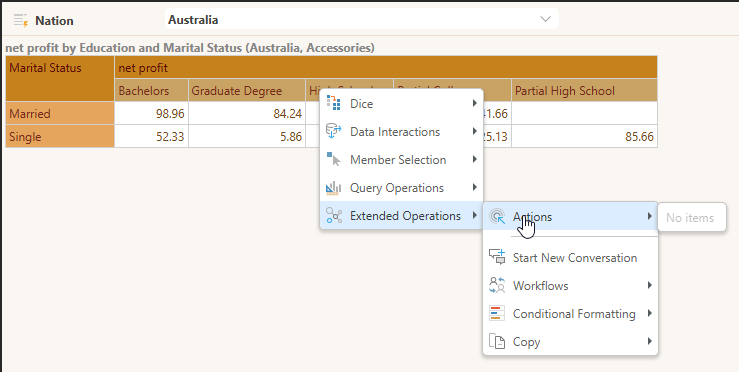
It affects the context menu as follows when the selected menu is High School (one of the members in the Trigger Hierarchy that is not selected):
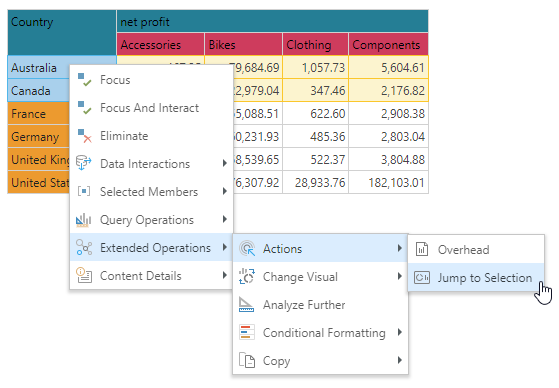
Execute Actions at Runtime
To run visual actions at runtime, users typically open the context menu with a right-click on a desktop or a long tap on a mobile (where the action is a supported type):
For Jump to Slide, Jump to Content Item, Jump to Tab, Jump to URL, and Execute JavaScript actions, you may also be able to run the Action "on click." That is, you may be able to run the action when you Click (or Tap in some cases), Double-click, or Alt+click the Target Element. The availability of the click action depends on the configuration of the Run From attribute in the Action panel.
- Click here for more information about actions at runtime