Sometimes, when you add a visual to your publication, its size means that it is illegible; for example, because your Grid has so many columns they don't fit in your panel, your trellis has so many items that they don't either, or simply because you want to add it as a small tile. Where this is the case, Miniature Visuals can be used to replace the full visual with a miniature summary that fits better in the available space.
Note: When you enable this function, the Miniature Visual is used automatically when the visual becomes too small.
Miniature Visual Appearance
Miniature visual tiles typically display the measure in the visual as a number alongside its name, providing a way to easily view and interpret the most important data at-a-glance:
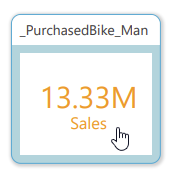
Note: In the preceding example, the cursor appears as a hand when you hover over the panel. This is because Link-Back was enabled in the PDF on build. You can click the tile to open the live version of the full visual in your browser. For more information, see Linking back to live content from a publication.
Enable Miniature Visuals
Miniature visuals are enabled by default. Any visual added to your publication will, therefore, automatically become a miniature visual when scaled down enough in edit mode:
- To enable miniature visuals, right-click Visual Options > Miniature On on the context menu.
- To disable miniature visuals, right-click Visual Options > Miniature Off.
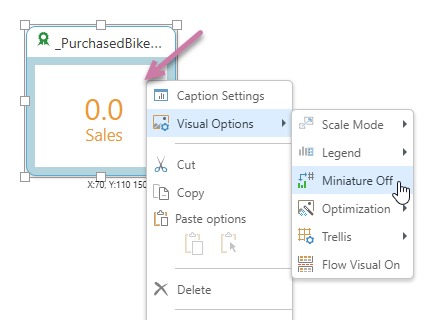
Note: When you are working in edit mode, your miniature visuals always display a value of zero (as shown above). When you build your publication, the actual value is displayed.
Miniature visual formatting
Text Colors
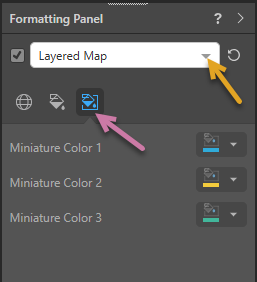
You can define the colors that should be used for the text in your Miniature Visuals in the Formatting panel for your visual. You must open the Formatting panel, select the visualization type from the menu (orange arrow below), choose Miniatures from the tabs (purple arrow) and then specify the colors you want to use:
Note: If your selected visual is saved in the Content Manager (for example, it was created in Discover and appears in multiple presentations and publications), you might need to use the right-click menu to open your visual in Discover before you can edit its formatting as described above.
Visual and Caption Settings
You can use the options in the Component ribbon to show and hide the "caption"; that is, the panel that acts as a container for the visual; and to show and hide the caption title and subtitle.
- Click here for details of Caption and other Formatting