When designing your publication, you can use the Interaction Manager to indicate which slicers should affect which visuals, placeholders, and so on, in your output publication. The Interaction Manager opens at the bottom of your canvas and allows you to define "interactions" between content items and slices as needed. For example, you can create an interaction between a Country slicer and a Sales visual by selecting the checkbox between the two; this selection indicates that the visual should be filtered by the slicer when the publication is built (when it is exported or a subscription is created).
You can use the Interaction Manager to add, remove, and edit interactions, and even to delete slicers from the presentation.
Note: It is important to stress that the interactions in Publish (unlike those in Present) do not enable "runtime interactivity" for the reader. The filter associated with the selected slice is applied when the publication is built, meaning that those visuals, placeholders, and so on that have an interaction with the slicer are published in the filtered state, with the slicer applied as defined in the build details.
Opening the Interaction Manager
The Interaction Manager opens:
- After you have created a new slicer from the toolbox. For more information, see New "Quick" Slicer in Publish Pro.
- After you have created a new slicer from the Publish ribbon. For more information, see New "Advanced" Slicer in Publish Pro.
- When you click the Interaction Manager button in the Publish ribbon (purple arrow below):

Editing your interactions
Use the interaction manager to specify which slicers affect which visuals, placeholders, and so on when the publication is built:
Add and remove interactions
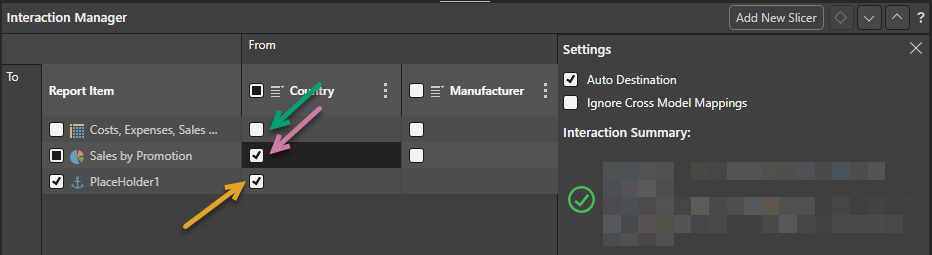
Interactions can be added or deleted by selecting or clearing the relevant checkboxes:
- When the checkbox is selected (purple arrow), there is an interaction between the slicer in the From column and the content item in the To row. This indicates that the content item in the To field will be filtered by the slicer when the publication is built.
- When the checkbox is clear (green arrow), there is no interaction between the slicer and the content item. This indicates that the content item will not be filtered by the slicer when the publication is built.
Note: You can only create exactly one interaction to any placeholder (orange arrow); this is because the placeholder can only be replaced with a single value. If you want the value from the slicer to appear in multiple places, you need to create multiple placeholders and create an interaction between the slicer and each of those placeholders. For more information, see Dynamic Placeholders in Publish Pro.
Settings
When a cell representing an interaction is selected in the Interaction Manager, the Settings panel opens:
- Clear the Auto Destination checkbox to disable the interaction. This causes the interaction to be ignored when the publication is built.
- Select the Ignore Cross Model Mappings checkbox if you don't want cross-model mappings to be used where there is a cross-model interaction that is not supported out of the box. For more information, see below.
Tip: You can pin the Settings panel in the Interaction Manager to keep it open while you work. Click the Pin icon (blue arrow above) in the header to pin the panel. The panel will remain open until you unpin it.
Parameter Interactions
Select the intersection between the slicer and the content item that it affects (green arrow below) and then select the correct parameter interaction checkbox:
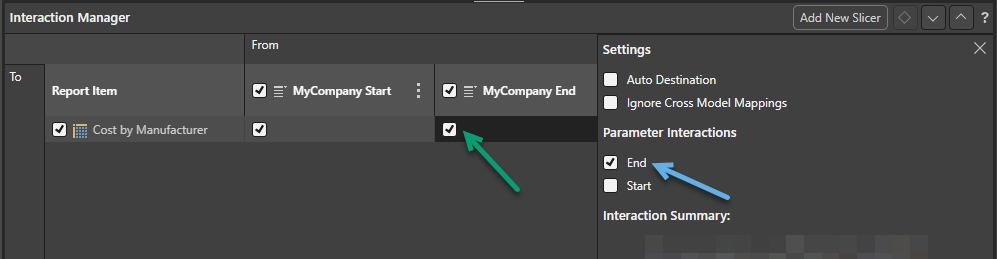
This links the slicer to an underlying parameter list.
- Click here to learn more about Range Slicers
Context Menu
Click the Ellipse icon in the header row to open that slicer's context menu:
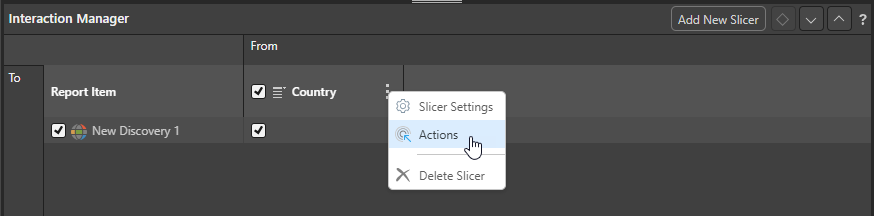
Slicer Settings
Update the Settings associated with a slicer that already exists in your publication. You can edit the slicer settings in the Slicer Settings panel, changing the slicer's title, slicer type, or configuring its elements list as needed.
- Click here for more information about Slicer Settings
Actions
Actions are only used to configure the Jump to Tab action in Publish. This feature is used to select which Tab (and therefore the visuals or images that the tab contains) should be shown in your Mini-Tab container when your publication is built.
- Click here for more information about Conditional Tabs (Jump Actions)
Delete Slicer
Since slicers do not appear on the canvas of your publication, you can only delete them from the Interaction Manager.
Note: Where the slicer is local to the publication (is not linked to a discovery), it is deleted from Pyramid. Where the slicer is re-used from a discovery or has been made shareable, it is simply removed from the publication.
Add New Slicer
Add a new slicer through the Interaction manager by clicking the Add New Slicer button and then completing the details in the New Slicer panel that opens. This process is the same as creating a slicer using the Advanced Slicer wizard and results in a brand new slicer that is local to this publication.
- Click here for a step-by-step guide to adding a new slicer
Similar Interactions Detected
Where multiple interactions are created whose details are too similar to distinguish between, you may receive an error as follows:

You should select between the conflicting interactions to ensure the effect is as expected.
Related information
Cross-model interactions and mappings
Cross-model interactions connect content items from different data sources. This type of interaction is only supported "out-of-the-box" between models with the same structure. If you add interactions between items whose models have different structures (for example, different data types, formatting, hierarchies, and so on), the interactions will fail unless a Model Mapping is defined that maps the items in one model to items in the other. If you select to ignore cross model mappings in the Interaction Manager, any model mappings are ignored by Pyramid meaning that you may see an error when it tries to build a publication with a cross model interaction.
- Click here for more information about Model Mapping