In Publish, slicers determine the filters that are applied to your publications when they are built. They define what should be included in your output publication based on selected hierarchies; for example, they are used to select the Country or Manufacturer whose data is relevant to your reader. This task describes how to build a new slicer for your publication "on the fly" using the New Slicer tool from the Toolbox. This is the simplest creation method for slicers.
Your new slicer will not be visible to the reader in the output publication but will, instead, drive the interactions or actions applied when building the publication; for example, selecting USA from a Country slicer at build time could result in a document where the visuals are filtered to reflect only American Sales data, or where the Logo used on the front page is particular to your North America region.
This process is typically the first stage of a wider task to "specialize" your publication. For example, you might create a slicer first and then create interactions between your slicer and the visuals, placeholders, dynamic text, or dynamic illustrations it affects. Alternatively, you could also create actions between the slicer and a Mini-Tabs container to select specific tabs.
Note: This is the simplest mechanism for creating a new slicer. You can, alternatively, build an Advanced Slicer using the dedicated wizard. The alternative process provides you with more control, allowing you to limit the elements used by your slicer, but takes longer to complete. If you would like to apply advanced options after your slicer is created, you open its Slicer Settings and make your updates.
Building a New Quick Slicer
From the Toolbox:
- Click Add New Slicer (purple arrow below).
- From the Choose Model panel, select the relevant data model (blue arrow) .
- From the Choose Data panel, open the relevant dimension and double-click the hierarchy that should be used as a slicer (yellow arrow).
The New Slicer panel opens.
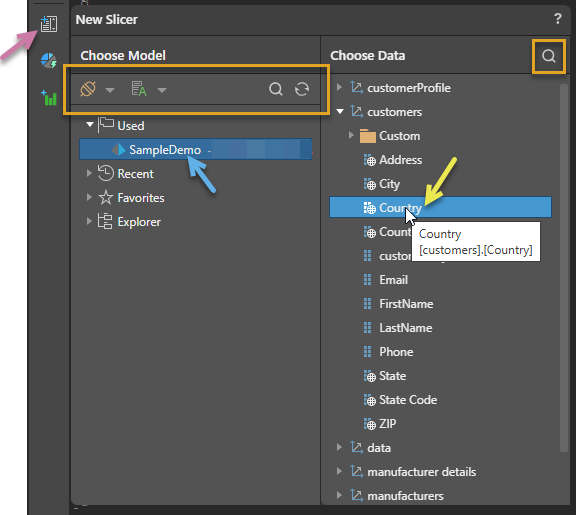
This example shows that the model Used in this publication already is selected.
Tip: You could use the filter and search facilities (orange highlights) to find your model and data if you know names or other details about them.
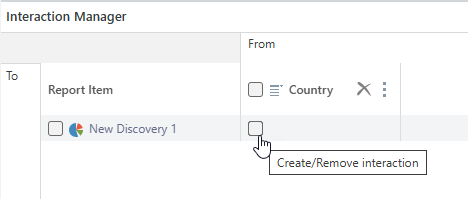
The Interaction Manager panel opens at the bottom of the page with your new Slicer in it:
What next?
Set up your build-time interactions or actions in the Interaction Manager:
- Select the checkbox between your Slicer and any visual, placeholder, or dynamic text it should affect at build time. For more information about creating interactions, see Interaction Manager in Publish Pro.
- From the context menu (ellipse) alongside your Slicer's name, create an Action that selects a tabs from a Mini-Tab container based on the selection from your slicer. For more information, see Conditional Display for Mini-Tabs in Publish Pro.
Related information
Alternative processes
- New "Advanced" Slicer in Publish Pro - Use the wizard to select more details when creating your Slicer.
- Interaction Manager in Publish Pro - If you already have the Interaction Manager open, use the Add New Slicer option to create a new slicer. Clicking Add New Slicer opens the Advanced Slicer wizard.
Building your publication
Once you have created your slicer and connected the interactions or actions it should drive, you should build your publication. You can build your publications manually using F2 or the Run button; schedule a build either at regular intervals, when your model is reprocessed, or once; and "subscribe to" your publication to receive re-builds. (Note: You can also set up details of users and channels that you want to distribute your publications to.)
- Click here for more information about building, scheduling, and distributing