Create actions that help your users to navigate around their presentation at runtime. Actions are very flexible, allowing your users to jump to other slides, content items, or tabs in the presentation, run some custom JavaScript or PQL, open a tooltip, and so on. You might want to add actions if, for example, you want your user to be able to jump to a target slide and initialize the visuals on that slide with selections made in the source, or if you want to add Next and Back options to every right-click Action menu.
You can add, remove, and edit actions using the options in the Action panel. Be aware that each list of actions is specific to the visual or slicer that you have selected on the canvas, and that you should make use of the copy and paste options to re-use actions where necessary.
- Click here to learn more about the runtime effects of actions
Open the Action Panel
You have two options to open the Actions panel:
- Select a visual on the slide and click Actionson the Component ribbon.
- Select a visual or slicer and then right-click Actions on the context menu.
For details of these steps, see Creating Actions in Present Pro.
Action Panel
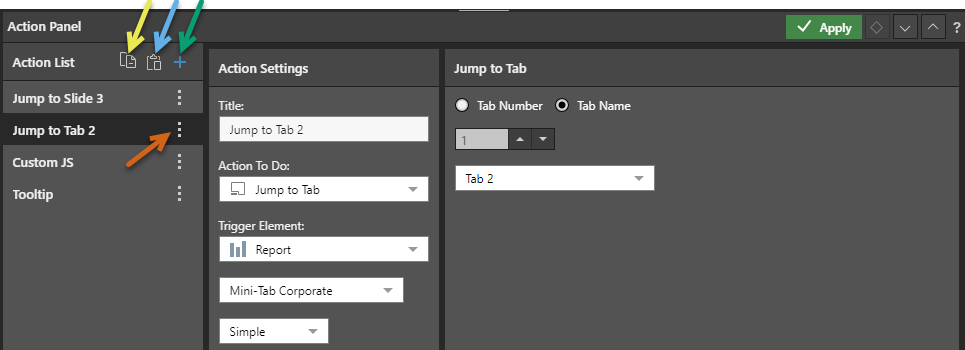
Action List header
If you want to replicate the actions across multiple presentations or publications, use the copy and paste functions above the Actions list (green or yellow). Note that you can also edit the existing actions from the context menu in this panel (brown arrow above).
- Click here for more information about these options
New Action
To create a new action:
- Click the Plus (+) icon (green arrow above).
Note: You can add multiple actions to a single Action List, but each action added to the list can only contain a single "action to do."
Action settings
- Title: The title for the action. Where relevant, this name is shown on the Actions context menu at runtime.
Action to Do
Choose the type of action that should be performed when the trigger event occurs (typically, the Action is selected from the Actions context menu at runtime):
- Jump To Slide: Open another slide in the current presentation. You can specify which slide using its number or name, go to the next or previous slide in the sequence, or use a PQL function to create your own Advanced jump option. You can also select Inject to Target to pass data selected at runtime to a Target, causing the visuals it has interactions with to be filtered or highlighted.
- Jump To Content Item: Open a specified content item in a pop-up, tab, or "in place" (specified using the Open In option). Select the content item that opens in response to this selection from the Jump To Content Item drop-down. You can also select options to include context and exclude cross-model mappings as required.
- Jump To Tab: Open a specific tab in a mini-tab container. For example, where you use a mini-tab container to show visuals for sales, returns, and net profit, you could create a Jump to Tab action that opens the Returns page. This is the only action available for slicers. For more details, see Slicer Actions.
- Jump To URL: Build a URL and open it in the Open In target. To specify a static URL, type the URL including its scheme (http:// or https://) into the URL panel, surrounded by "double quotation marks." To create a dynamic URL, make use of PQL functions to add functionality.
- Execute JavaScript: When the specified element is selected, run a custom JavaScript function.
- Tooltip: Create a tooltip that displays a visual or presentation when the viewer hovers their cursor over the trigger element at runtime. Note: Tooltip actions configured from Present are applied only to the instance of the visual in the presentation. It is not shown when the visual is added to other presentations or opened in Discover. For more details, see Tooltip Actions.
Trigger Element
Select the element, associated with the selected visual, that should trigger the action when clicked at runtime:
- Report: The action is available from any "report" (discovery) element.
- Hierarchy: The action is available for the specified hierarchy.
- Member: The action is available for the selected member.
- Cells: The action is available from the cell (data point) context menus. Note: This is the only valid option for a Tooltip and is selected as a fixed value.
Jump to Slide
Simple: Jump to slide by number
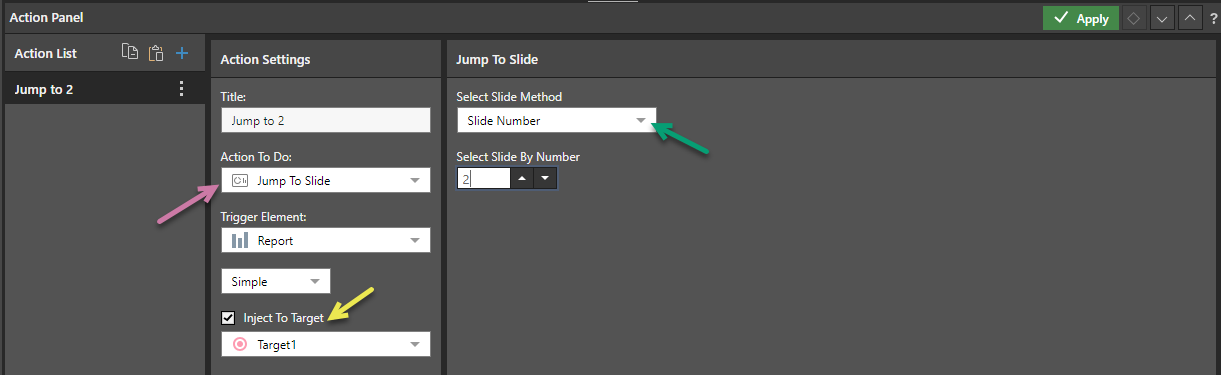
When you define a simple Jump To Slide action, you are creating an Action on the right-click context menu that can be used to open a particular slide at runtime. The configuration selects the slide to open using its slide number, name, or position in the presentation (next or back).
- In the Action Settings panel,
- Select Jump To Slide from the Actions To Do field (purple arrow, above).
- Choose a Select Slide Method (green arrow) to select the slide you want to jump to:
- Slide Number: Jump to the slide with the selected slide number.
- Slide Name: Jump to the slide with the selected name.
- Next Slide: Jump to the next slide in the sequence. (The Action option has the same effect as clicking Back using the navigation arrows. You might want to name this action "Next.")
- Previous Slide: Jump to the previous slide in the sequence. (The Action option has the same effect as clicking Next using the navigation arrows. You might want to name this action "Back.")
- Optionally, select the Inject to Target checkbox and choose a Target from the associated drop-down list (yellow arrow).
- Click Apply to create your action and save your changes.
The Jump To Slide panel opens.
Selecting this option causes the data selected at runtime to be passed to the Target, which, in turn, causes any visuals the Target has interactions with to be filtered or highlighted. This is typically used to initialize visuals or slicers on the slide being opened to reflect your selections on the page you jumped from. For more information about creating Targets and Target interactions, see Creating Targets using Present Pro.
Advanced: Jump to Slide based on selection
The Advanced option allows users to jump to a slide based on a given PQL formula. This offers a lot of flexibility, as you can basically determine the conditions that decide which slide to jump to, rather than having to create a jump action that relies on a static slide number or name. This ensures that report consumers are led to the most relevant information, based on the data they clicked at runtime.
Tip: It is best practice to use a slide name rather than a slide number for this type of Action, since the sequence of slides in your presentation is likely to be subject to frequent change.
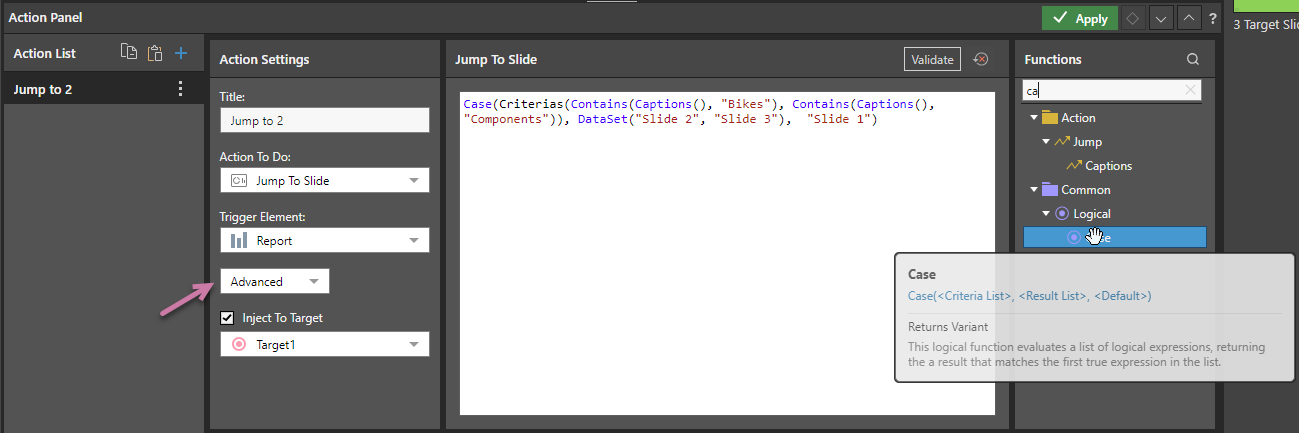
- In the Action Settings panel, select Advanced (purple arrow).
- Build a PQL function that determines which slide to jump to:
- When the user selects Bikes in the visual and opens the Action Jump to 2 from the right-click context menu (right-click Extended Operations > Actions > Jump to 2), Slide 2 opens.
- When the user selects Components, Slide 3 opens.
- When the user selects any other option, Slide 1 opens.
- Click Validate to check your PQL is valid.
- Click Apply to create your action and save your changes.
The script editor opens in the Jump To Slide panel.
Case(Criterias(Contains(Captions(), "Bikes"), Contains(Captions(), "Components")), DataSet("Slide 2", "Slide 3"), "Slide 1")
The preceding example causes the following runtime behavior:
Note: Both of the Jump to Tab and Execute JavaScript options also incorporate a similar panel for creating and validating advanced scripting. You need to select both the Advanced option and select a Tab for the panel to open for the Jump to Tab action.
Jump to Content Item
The Jump to Content Item Action opens a visual from Discover at runtime. Since this is a visual and not a presentation, any cross-filtering from the trigger element is passed to the content item when the target visual opens in a new browser tab.
With the presentation open at runtime:
- Optionally, select one or more items for cross-filtering (see the purple arrow).
- Right-click Extended Operations > Actions > Overhead from the selected rows. This opens the target visual using the custom Overhead action.
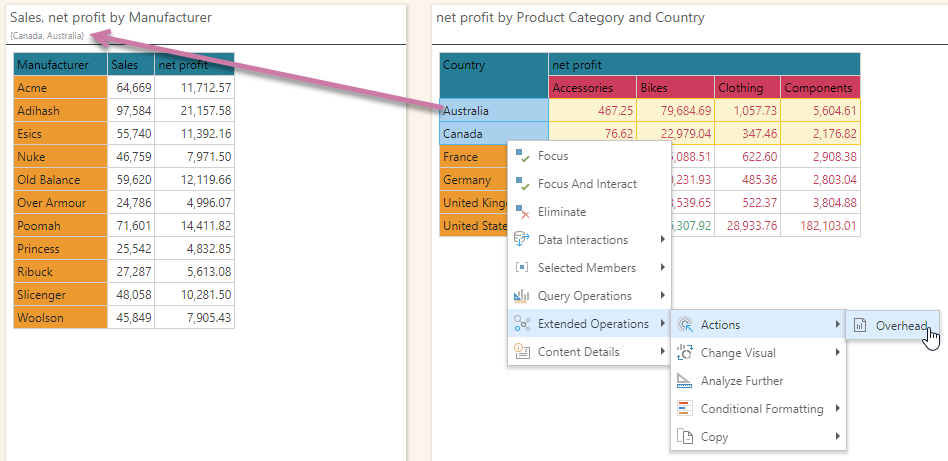
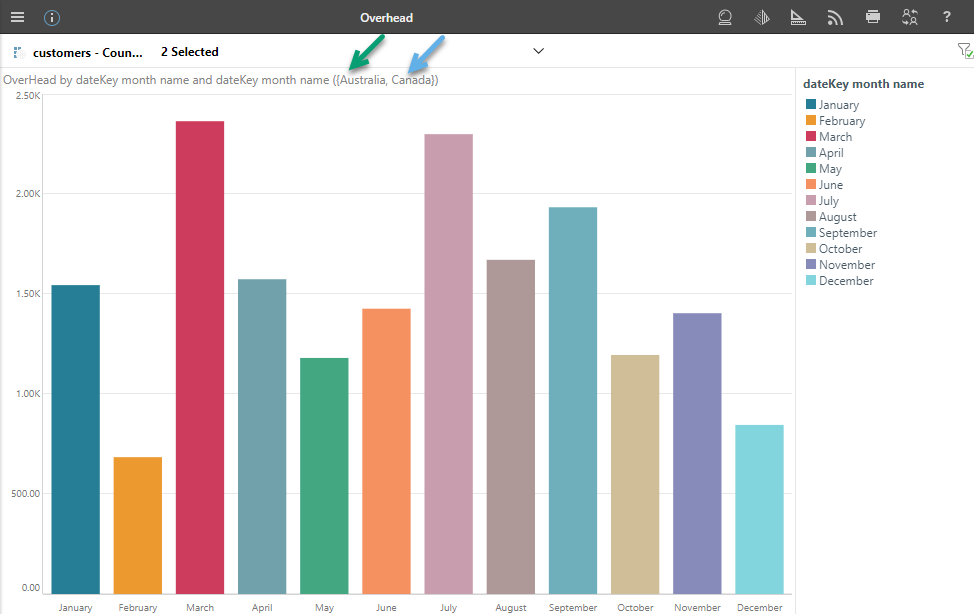
The target visual opens in a new tab. Note that the cross-filtering on the source visual causes the following filtering on the target visual:
- The selected rows from the cross-filter are shown in the subtitle if the subtitle is configured to show bookmarks.
- The Direct URL for the target visual also contains the same filter parameters:
https://<SITE>/direct/?id=<GUID>&filter=%5Bcustomers%5D.%5BCountry%5D.%5BCanada%5D&filter=%5Bcustomers%5D.%5BCountry%5D.%5BAustralia%5D
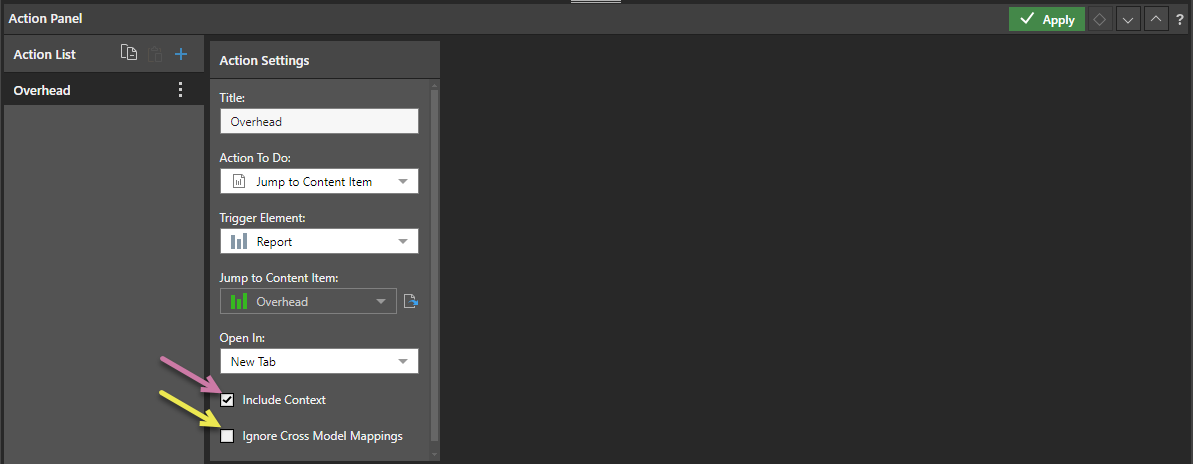
Include Context
Select the Include Context checkbox to include the context selections in your target visual when it is filtered using slicer selections or query interactions and is then opened using the Jump To Content Item action. The context, in this scenario, refers to the selections made on the source visual prior to adding the slicer selection or background chip.
With the presentation open at runtime:
- Select the cross-filtering items that you want to apply (see the purple arrows below).
- Create your filter:
- Select an item from a slicer that affects the visual.
- Use one of the right-click context menu options to perform a query interaction that creates a background chip. For example, select Dice > Customer Profile > Marital Status to further filter the data by whether customers are married.
- Right-click Extended Operations > Actions > Overhead from the selected rows to open the target visual using the Overhead action.
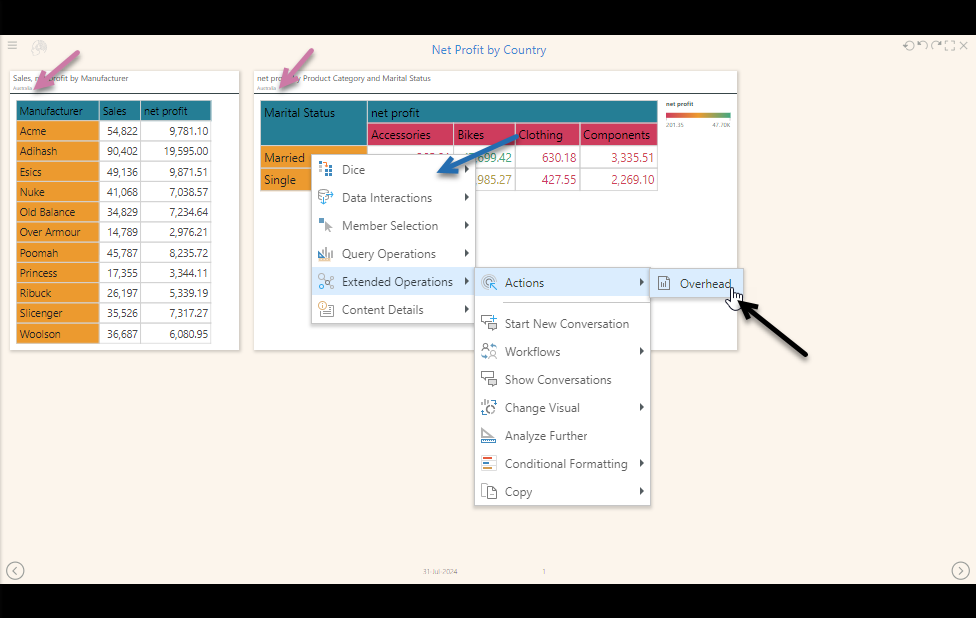
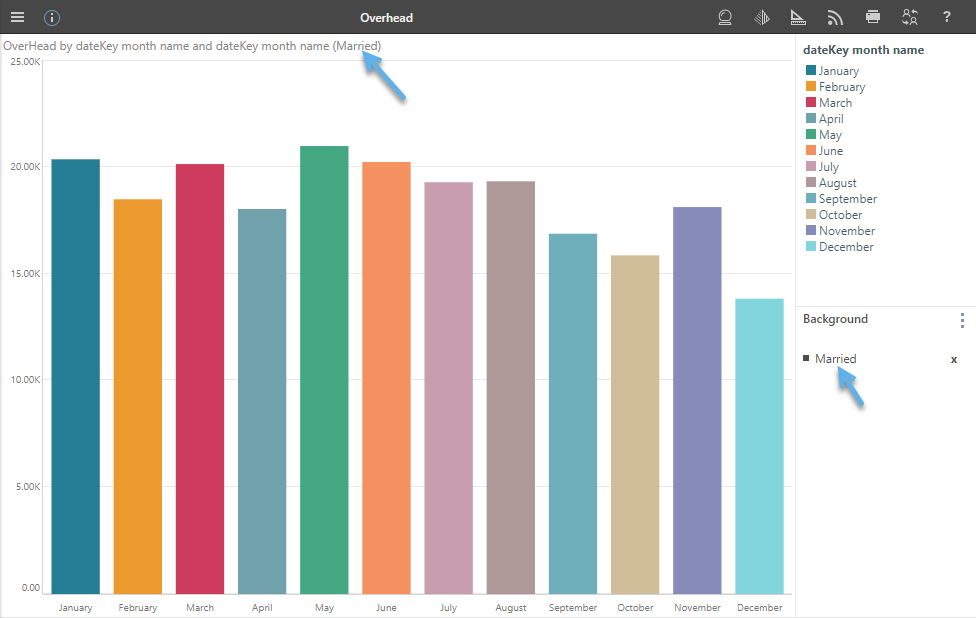
As shown in the preceding example, the visual was diced by marital status before the target was opened using the Overhead action.
If the Include context checkbox was selected in the Action Settings, then the context is included (orange arrows) in the target visual:
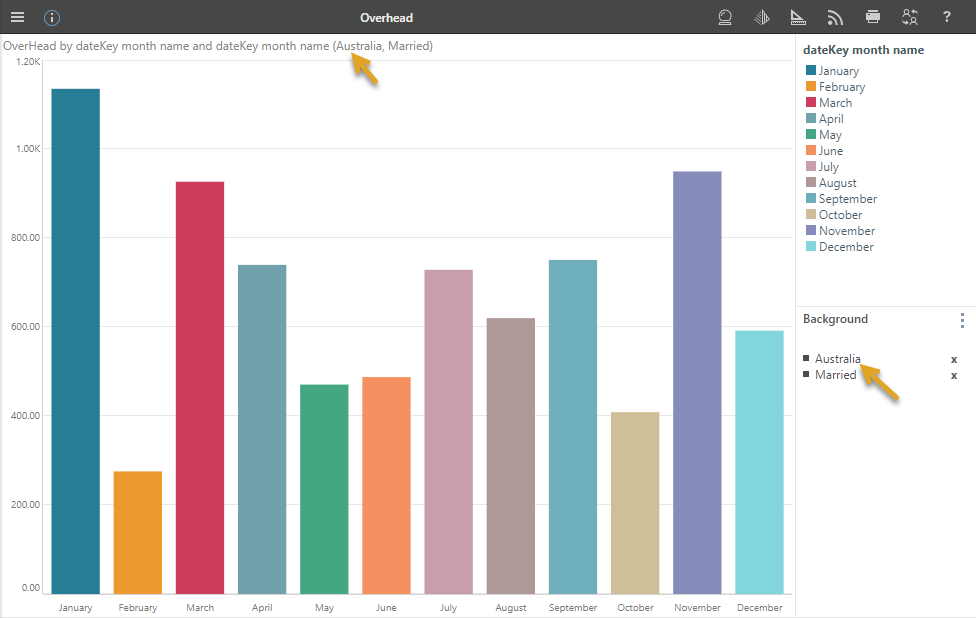
If the Include context checkbox was not selected in the Action Settings, then the context is not included in the target visual (blue arrows):
Ignore Cross-Model mappings
When the selected action type is Jump to Content Item, any interactions at runtime are applied to the content item opened by the action. By default, Pyramid recognizes any cross-model mappings that have been configured between items with interactions, but you can select Ignore Cross-Model mappings on the Actions Settings tab to ignore any cross-model mappings and instead produce an error.
Note: Cross-model interactions enable interactivity between content items from different data sources. These interactions are only supported "out-of-the-box" between models with the same structure. If you add interactions between items whose models have different structures (for example, different data types, formatting, hierarchies, and so on), the interactions will fail at runtime unless a Model Mapping is defined that maps the items in one model to items in the other. For more information, see Model Mapping in Present Pro.
Actions Context Menu at Runtime
As shown above, Actions are typically accessed from the right-click context menu at runtime.
- Click here for more information about actions at runtime