You can use File Distribution in Publish Pro to distribute your document publications by writing them to custom directories on an external file system. This is typically a file system that your users already have secure access to and use for their team activities or other important documentation.
It is important to note that you can also distribute your publications to your users by scheduling delivery through the Bulletin Board, by Email, and through WebHook Channels. This can be done on the same schedule or across multiple schedules.
Note: Scheduled publications may be distributed to File Systems using a static or dynamic destination location.
Note: This functionality is only available with an External Bursting Premium license. It is not available for inline email publications.
Creating a File Distribution
Before you begin
Your administrator must have used the Admin Console to set up an external File System to write your publications to. As part of that configuration, they will define the connection details for the target server and specify whether your publications will be written to a location under the publication or recipient tree. For more information, see Storage Settings.
Opening the Distribution Panel
Open the Distribution panel and select the File Distribution tab:
- From the Schedule panel.
- In the CMS, from the Schedule button at the top of your publication's Actions Panel.
Use the Distribution panel to define the details of your File Distribution.
Distribution
Tip: Before you set up your distribution details, be sure to select an Output Type, Selections, and other settings in the New Schedule panel.
Distribution
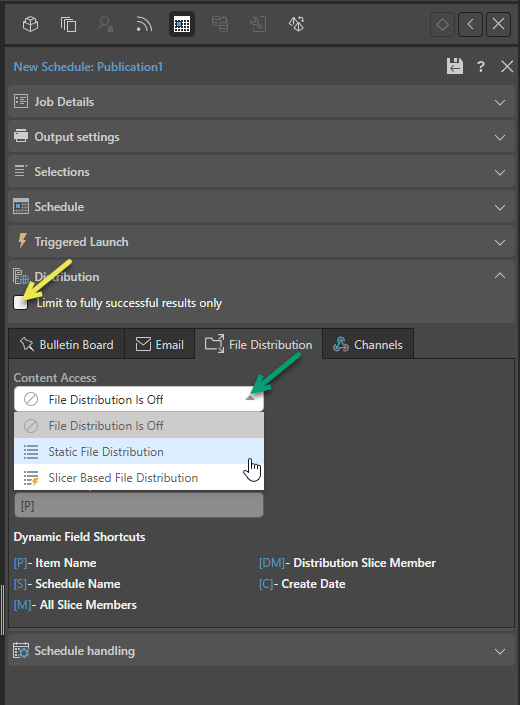
Limit to fully successful results only
Select the Limit to fully successful results only checkbox to prevent automatic distribution where content was not built completely successfully; that is, where a scheduled build "finished with errors" (or is a "Partial Success" in the language of the Task Manager):
- Where this option is not selected (default), the output is built and automatically distributed according to the schedule. The broken item is simply excluded from the output.
- Where this option is selected, the output is built with the missing broken item but it is not automatically distributed. You can still view the built output in the Schedule Manager.
File Distribution
Content Access
From the Content Access dropdown list (green arrow above):
- Select File Distribution is Off if you do not want to distribute the scheduled item to a selected File System.
- Select Static File Distribution to build your publications and write them to the selected File System with a custom document name.
- Select Slicer Based File Distribution to build your publications and write them to custom directories on the File System that are built dynamically based on your slicers. With this option selected you will need to configure the mechanism by which the custom directories are created, either using a mapping file or data model selection (see below).
Static File Distribution
With the Static File Distribution option selected, you need to indicate which File System to write your publication to and what to name your publication on creation:
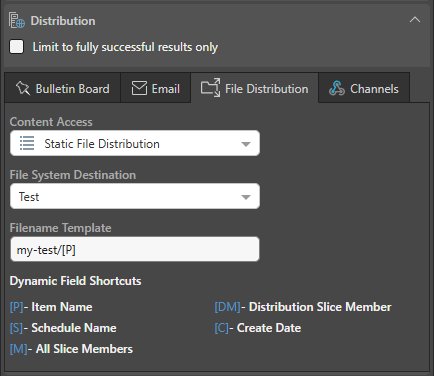
File System Destination
Select the name of the File System that you want to write your publication or publications to. These File Systems should have been created in advance by your Administrator. For more information, see Storage Settings.
Note: You can only select external File Systems from this list.
Filename Template
Specify the file name for your publications:
- Use a forward slash / to create folders inside the File System folder you are writing to. For example, add
my-test/to create my-test as a sub-folder of the selected File System location. - Add [variables] from the Dynamic Field Shortcuts. For example, adding
[P]writes the publication name into a file or folder name when the publication is built. Where the variable is a multi-valued list (for example, [M]), the variable is replaced with a semi-colon separated list of the selected items.
Note: A file extension is added to your published file automatically based on your selected file type (Job Details > Output). The generated file is also suffixed with a creation date.
Based on the configuration above and assuming the File System with the name Test is an Amazon S3 bucket with the Publication Tree format selected, the files will be distributed to the following location:
<File System>/<Tenant>/<Publication>/<Schedule>/DATETIME/<Slicer>/my-test/<Publication>_<Date>
The bold text represents the Filename Template. An example where your publication is a PDF built from the publication template Publication1, which has been sliced to show data from 2008 may be as follows:
s3://my-bucket/default-123456/Publication1-123456/Job1-123456/202508091500/2008/my-test/Publication1-2008_2025-08-05.pdf
Slicer-Based File Distribution
With the Slicer Based File Distribution option selected, you need to configure a mapping that describes which directories should be created on the file system based on the slicer values. Your publications will then be written to those newly created directories. There are two options:
File Mapping Source
Where the File option is selected from the Mapping source dropdown list (purple arrow below), you need to upload a file that maps slices (either by their Unique Name or Caption) to those directory names you want to create on the target File System:

The fields that are specific to this type of distribution setup are shown above (green highlight):
- Distribution Slicer: Select the Slicer from your publication that your mapping is based on. You must have selected at least one value from a slice in the Selections panel for this dropdown list to be available.
- Mapping source: Select File.
- Map by: Indicates whether the first column in the file should contain the slicer names as Captions or as Unique Names. You cannot create a file with a mix of Unique Names and Captions.
- Distribution List: (Orange arrow.) Navigate to and select a .txt, .csv, or .tsv file that maps the slicer members in its first column to the custom directories in its second column.
Important: The target directory on the File System always has the following structure where file mapping is used: <Tenant>/<Publication>/<Schedule>/DATETIME/<Slicer>
This example uses the preceding File Distribution configuration and the following configuration file to distribute publications to locations on the external File System with Spanish names based on the mapped slicer values:
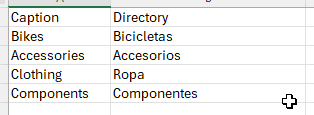
Note the following about the example spreadsheet (above):
- Column 1 includes the names of the slices as Captions. They must all be captions because that is selected from the Map By dropdown list. If you want to supply Unique Names, you must change both the Map By value and the values in this column.
- Column 2 includes the names of the directories that you want to create on the external File System.
Assuming the Publication only has one slicer (Product Categories), Every Item is selected in the Selections panel, the output documents are PDFs, and the selected file system is using the publication tree, the following documents will be created:
- <File System>/Bikes/Bicicletas/es/Publication1-Bikes_<Date>.pdf
- <File System>/Accessories/Accesorios/es/Publication1-Accessories_<Date>.pdf
- <File System>/Clothing/Ropa/es/Publication1-Clothing_<Date>.pdf
- <File System>/Components/Componentes/es/Publication1-Components_<Date>.pdf
Note the following about the example file structures:
- The <File System> variable above references the File System and its configured tree path:
- Publication Tree: <Tenant>/<Publication>/<Schedule>/DATETIME/<Slice>/<Custom>
- Recipient Tree: <Tenant>/<Custom>/<Publication>/<Schedule>/DATETIME/<Slice>
- The first bold items are the custom directories that were built using the mapping; one directory is created for each slice. Spanish names are used for the directories to make it clear how the slicer value has been customized in this example.
- The rest of the document path and the file name are defined by the Filename Template value. In each case, an /es folder is created, then the file name is created from the Publication name [P], the slice name [DM], and the <Date>. The <Date> is the publication date and is suffixed automatically.
(Each of the <Tenant>, <Publication>, and <Schedule> variable values is replaced with a name-ID pair.)
Publication Tree example: s3://my-bucket/default-123456/Publication1-123456/Job1-123456/202508091500/Accessories/accesorios/es/Publication1-Accessories_2025-08-09.pdf
Recipient Tree example: s3://my-bucket/default-123456/accesorios/Publication1-123456/Job1-123456/202508091500/Accessories/es/Publication1-Accessories_2025-08-09.pdf
Data Model Mapping Source
Where the Data Model option is selected from the Mapping source dropdown list (purple arrow below), you need to select the Distribution Slicer and Role Column that identify the recipient for your publication. This creates directories on the File System that your recipient accesses to see their publications:
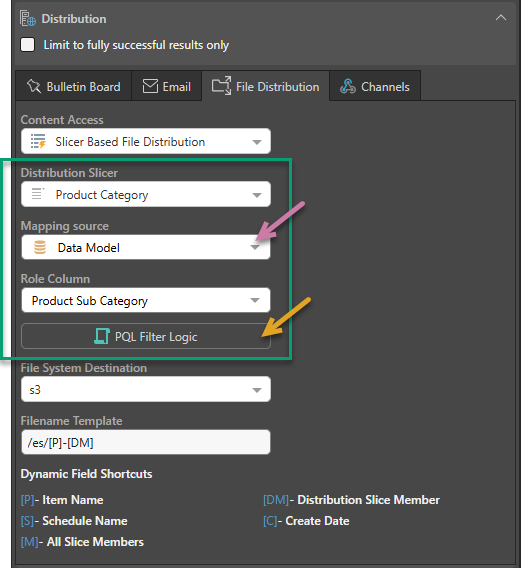
The fields that are specific to this type of distribution setup are shown above (green highlight):
- Distribution Slicer: Select the Slicer from your publication that your mapping is based on. You must have selected at least one value from a slice in the Selections panel for this dropdown list to be available.
- Mapping source: Select Data Model.
- Role Column: Select a slicer to identify the Recipient that the publications are for. For example, if your Distribution Slicer is Country, you can set your Role Column to Manufacturer to indicate that the Recipients are Manufacturers within a particular Country. This creates a <Recipient> directory on the File System and writes publications for the Recipients to it. Without any further configuration, the folder name will be a semicolon-separated list of Manufacturers in the selected country. In a publication tree, this would create folders like: Germany/ACME;Asics;OldBalance/.
- PQL Filter Logic: (Orange arrow.) If the slicer in the publication is from an SQL data source, you can click this button to open the PQL Editor and create a PQL expression using Semantic or Common functions to customize the folder structure. For example, changing a long list of Manufacturer Names into a single name.
Note: Where this functionality is in use, the final structure of the directories that target File System files is affected by the Administrator's selection of the Recipient or Publication Tree. For details, see Storage Settings.
This example uses the preceding Data Model Distribution configuration and no PQL Filter logic. The folder locations will be built based on the slicer selections and whether the selected File System uses a publication or recipient tree.
For example, the preceding slicer configuration may create multiple files including:
- Publication tree: <Tenant>/<Publication>/<Schedule>/DATETIME/Bikes/MountainBikes;RoadBikes;TouringBikes/es/Publication1-Bikes_<Date>.pdf
- Recipient tree: <Tenant>/MountainBikes;RoadBikes;TouringBikes/<Publication>/<Schedule>/DATETIME/Bikes/es/Publication1-Bikes_<Date>.pdf
Note: Your publications will either be written to the Publication Tree structure or the Recipient Tree structure depending on the File System configuration.
In this example, the folders shown in bold reflect a value from the Distribution Slicer (the Product Category Bikes) and a list of values from the Role Column that are associated with that category (the values from the Product Sub Category when Bikes is the Product Category). The second of these values identifies a Recipient.
You can configure the name of the directory for the recipient using the PQL Filter Logic. For example, you could create a PQL script that transforms any value containing "Bike" to be "Bike Team." This would change /Accessories/Bike Racks;Bike Stands;... to /Accessories/Bike Team.
Example: The preceding would create the following files:
- Publication tree: s3://my-bucket/default-123456/Publication1-123456/Job1-123456/202508091500/Accessories/Bike Team/es/Publication1-Accessories_2025-08-05.pdf
- Recipient tree: s3://my-bucket/default-123456/Bike Team/Publication1-123456/Job1-123456/202508091500/Accessories/es/Publication1-Accessories_2025-08-05.pdf
The option used depends on how your target Filer Server is configured. For more information, see Storage Settings.