A "slicer" comprises a list of member elements from a model hierarchy that you can use to filter the query by one or more elements at runtime. For example, if you add the Country hierarchy to a dropdown slicer, you can use it to filter the data query to include data from just one selected country from the hierarchy.
Slicers can also be used with measures to drive slightly different mechanisms, including:
- A "switching" effect, where the measure can be swapped out using the measure slice. These are known as variable measure sets.
- A "parameterization" effect, where a VALUE filter can be built using a given measure to numerically filter the query. (See below for more information.)
Slicers at runtime
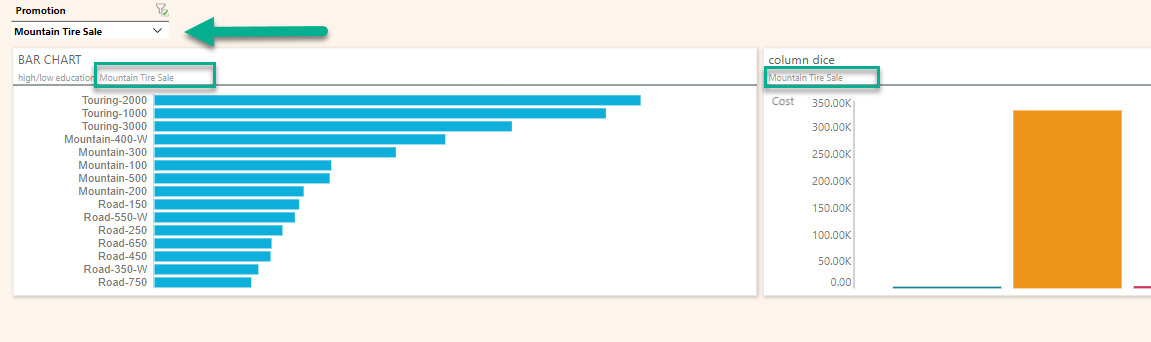
Typically, slicers on your presentation look like dropdown lists that you can select one or more options from to filter and highlight the items in your presentation dynamically at runtime. When you select slices from your slicer, the visuals or other slicers in the presentation are dynamically filtered or highlighted to reflect your selection. In the following example, the selection from the slicer (green arrow), causes the two visuals to be filtered (the green highlights show the filtering applied to the target visuals).
- Click here for information about interactivity at runtime
Build a new slicer
From the Toolbox:
- Click Add New Slicer in the Toolbox.
- In the New Slicer pop up, select the required data model in the Choose Model panel. This is the model containing the member hierarchy you intend to use as your slicer.
- From the Choose Data panel, select the hierarchy you want to use; the given hierarchy will immediately appear on the current slide.
Note: The slicer and its target should typically be selected from the same data model. Otherwise, Pyramid may not know how to map the elements between the two models and may show an error at runtime.
Step 1: Add New Slicer
- As described above, open the New Slicer menu by clicking Add New Slicer (purple arrow below).
- From the Choose Model panel, select the relevant data model.
- Select the element hierarchy that you want to use as a slicer.
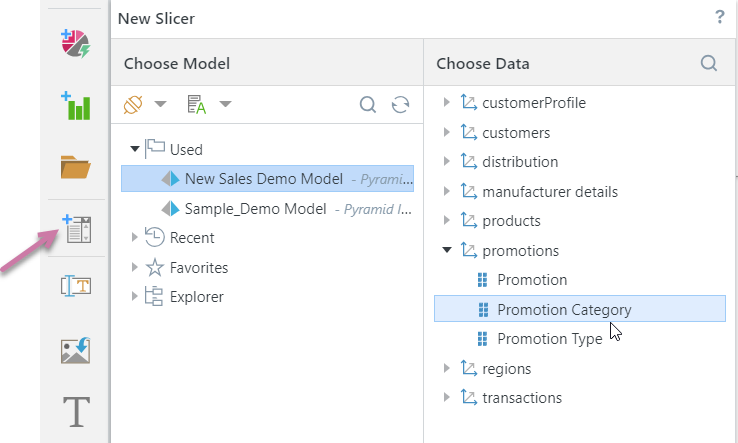
The Choose Data panel is populated with the element hierarchy associated with your selected model.
The element hierarchy is added to the canvas. Note: You can move your slicer to the correct position on the slide using drag and drop and format it using the options on the ribbon.
Step 2: Check your interactions
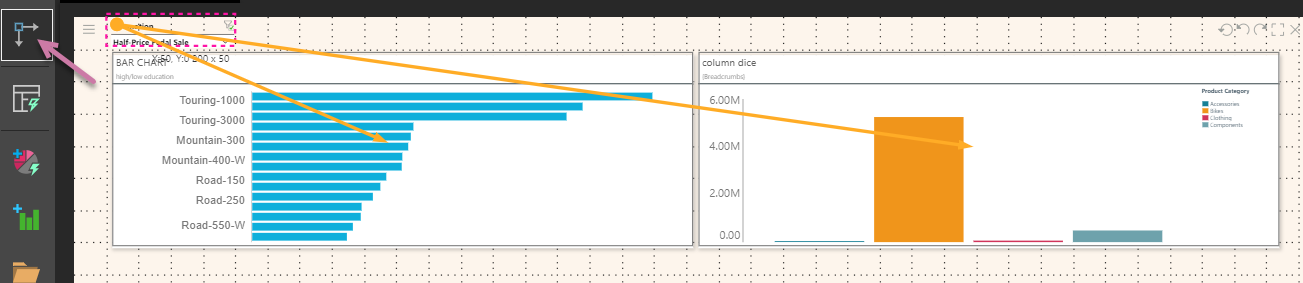
Using the Interaction Picker (green arrow below), ensure the slicer has an outgoing interaction to any visuals, slicers, or other content items that should be filtered by it.
From the Toolbox:
- Click Interaction Picker (purple arrow, above).
- Click any content item on the canvas to display its interactions (green arrow).
Your cursor transforms into an interaction selector.
The selected item is highlighted. The interactions both to and from the selected item are shown as single or double-headed arrows.
If you are happy with your interactions, you can click the Interaction Picker again to hide them.
If you are not happy with your interactions, you can use the Interaction Picker create and delete interactions. For more information, see Managing Interactions in Present Lite.
Step 3: Test your slicer at runtime
Launch the presentation at runtime by pressing F2 or clicking Run:

You can now use the slicer to select the options that you would like to filter your Visuals by. Note: The currently selected slicer is shown in the breadcrumb trailof each of the filtered visuals.
Manage Slicers
Hide Slicers
By default, slicers added to your presentation appear on the slide where they are placed. You can hide slicers from the slide using the Hide on this slide option on the right-click context menu. These hidden slicers, and slicers that appear on other slides in the presentation, are shown in the Slicers panel and are accessed at runtime from the Present runtime menu. To "unhide" (show) a slicer, drag it from the Slicer panel onto the canvas.
- Click here for more information about the Slicers panel and hidden slicers
Detach Slicers
The Detach Slicer function offers a simple way to remove slicer interactions from content on slides other than the one currently being viewed.
You should find the instance of the slicer that you want to preserve; this should be the slide where you want to retain the slicer interactions.
You will be presented with the Detach Slicers dialog, where you can select one of the following options:
- Detach Slicer Interactions: Remove the slicer's interactions throughout the presentation, except on the current slide.
- Detach Slicer Interactions and Hide: Remove the slicer's interaction from the other slides, and hide the slicer so that it won't be displayed on slides where it doesn't have any interactions. In this case, the slicer is moved onto the Hidden Slicers panel.
- Cancel: Cancel the operation and retain the slicer's interactions.
Slicer Search
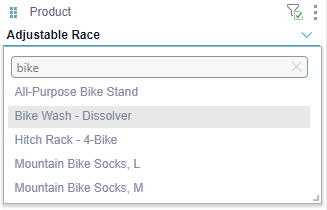
When the presentation is launched at runtime, you can search slicer elements in dropdown list using the slicer search bar:
More Slicer Operations
You can use the slicer capabilities to quickly find and select items from any slicer list. Search directly within the slicer to filter available values, or, where the slicer allows multiple selections, use the advanced Multi‑Item Search dialog to select multiple items at once by entering a delimited list.
- Click here for more information about the available Slicer Operations
Delete Slicers
To delete a slicer, right-click on it (on the canvas or from the Slicers panel) and click Delete from the context menu.
Where the slicer is local to the publication (was built as a new slicer in the presentation) is not linked to a discovery) it is deleted from Pyramid. Where the slicer is a preexisting one added from the Content panel, it is removed from the publication, but not from Pyramid.