The Slicers panel shows those slicers associated with the open presentation that are either "hidden" on this slide (not shown on the canvas) or are located on another slide in the presentation. Even though these slicers are not on this slide's canvas, they can still be accessed at runtime from other slides or from the Present runtime menu, and they can still be used to filter visuals or other slicers on this slide.
This panel allows you to create new slicers, choose whether slicers should be visible on the Present runtime menu and the order they should appear in, and create interactions between these hidden slicers and the visuals or slicers on this slide.
- Click here for more information about slicers and their use
- Click here for more information about the runtime Present runtime menu
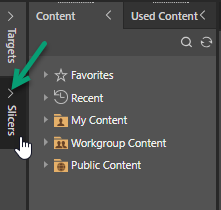
Opening the Slicers panel
The Slicers panel is open by default when you open Present Pro. If it is collapsed, you may need to click Expand (green arrow) to open it on the left-hand side of the interface:
Once expanded, you will see the Slicers panel. It contains the list of slicers that are present in this presentation but are either hidden or not on the currently open slide.
Slicers panel header
Using the options along the header bar, you can:
- Click Plus (green arrow above) to add a new slicer. Selecting this option opens the Advanced Slicer wizard at the bottom of the page, where you select the details of your slicer. Note that the new slicer is added to the open slide by default.
- Click Pin (blue arrow) to pin or dock the target panel. By default, the Slicers panel will "dock" beneath the Content panel. Once you have docked the panel, you will need to click Collapse if you want to close it again.
- Click Collapse (yellow arrow) to close the panel.
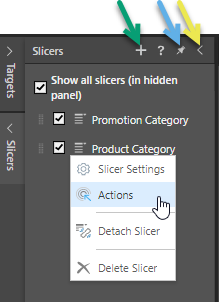
Slicer context menu
Each of the individual slicers in the panel has a right-click context menu that allows you to select the following options:
- Slicer Settings: Open the Slicer Settings panel, where you can set the default behavior of the slicer, configure the type of elements used in the slicer, and so on.
- Actions: Open the Action panel and set up a guided process that allows users to trigger an effect based on their selections at runtime.
- Detach Slicer: Remove slicer interactions from other slides.
- Delete Slicer: Delete all instances of the selected slicer from the presentation.
Select and move slicers
The order of the slicers in the Slicers panel dictates their order in the Present runtime menu for this slide:
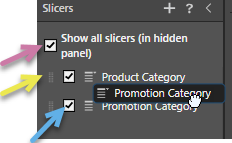
Show all slicers
- Clear the Show all slicers checkbox to exclude all slicers from the Present runtime menu when the current slide is open at runtime.
Individual slicers
For each individual slicer in the panel:
- Use the Drag handle (yellow arrow) to select the slicer and drag it into a different position in the list of slicers. The slicer sequence here is the same as the slicer sequence in the Present runtime menu.
- Hide the individual slicer by clearing one or more of the slicer checkboxes (blue arrow). This excludes individual slicers from the Present runtime menu.
- Select the slicer to drag it onto the canvas and add it to the slide. Adding a slicer to the slide removes it from the Slicers panel.
Hide slicers
If you have a slicer on the currently open slide and you would like to move it from the canvas to the Slicer panel (you would like to "hide" the slicer), you can:
- Select the slicer on the canvas and right-click Hide on this slide on the context menu.
- Select the slicer on the canvas and click Hide on the Presentation ribbon. (This option is only present on the ribbon when a slicer is selected on the canvas.)
This moves the slicer from the canvas to the Slicer panel and adds it to the Present runtime menu at runtime.
Interactions from the Slicers panel
If you want the slicers in the Present runtime menu or from a different slide to affect the visuals or slicers on the currently open slide at runtime, you can create interactions between the slicers in the Slicers panel and the target visuals or slicers on the slide.
The following examples show how to add an interaction from a slicer in the Slicers panel to a Grid on this slide. At runtime, this means that a selection from the slicer in the Present runtime menu or on another slide will cross-filter this Grid.
- Click here for more information about cross-filtering and highlighting effects at runtime
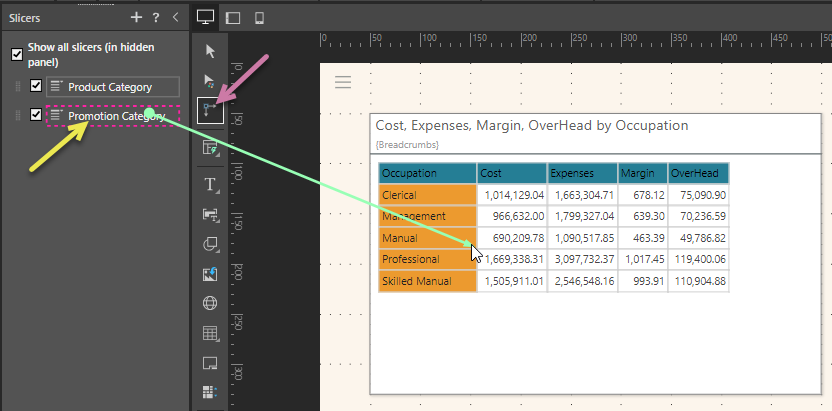
Interaction Picker
You can add an interaction from a slicer on one slide, to a visualization on another slide, without duplicating the slicer or using a target. Simply drag the interaction from the slicer in the Slicer panel to the relevant content on the slide.
Tip: You must dock the Slicers panel to be able to create an interaction using the interaction picker. To do this, click the Pin icon in the panel heading.
From the Toolbox:
- Click the Interaction Picker (purple arrow).
- Click the source slicer for your interaction (yellow arrow).
- While holding your cursor, drag to the target visual or slicer and then drop.
As you drag, a green arrow is drawn. Once you drop, and the interaction is created and the arrow changes to orange.
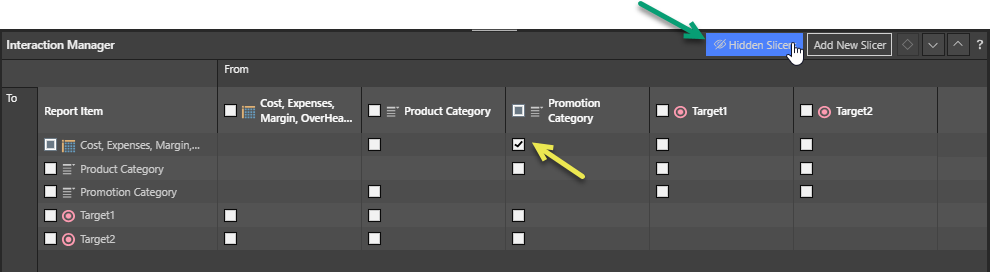
Interaction Manager
In the Interaction Manager (opened from the Presentation ribbon), you need to:
- Click Hidden Slicers (green arrow).
- Select the checkbox that sits at the intersection between the source slicer (From column) and the target Grid (To row).
In the Interaction Manager, the Promotion Category to Grid interaction (described above) is represented by the checkbox selection below (yellow arrow).
The interaction is created. You can see your new interaction by selecting Show Interactions from the Presentation ribbon.